Table of Contents >> Show >> Hide
- Why “Fast Curling” Usually Fails (and How to Fix It)
- Your 10-Minute Pre-Curl Setup
- Method 1: Fast Curls with a Curling Iron (Clamp Tool)
- Method 2: Quick Waves with a Curling Wand
- Method 3: Curl with a Flat Iron (One Tool, Two Jobs)
- Method 4: Hot Rollers for Speed + Volume
- Method 5: Heatless Curls for Busy Nights
- How to Make Curls Last All Day
- Common Time-Wasting Mistakes (and Fast Fixes)
- Fast Curl Recipes by Hair Type
- Hair Health & Safety: The Smart Styler’s Rules
- Your 15-Minute Emergency Curl Routine
- Final Takeaway
- Experience Section (): What Happens When You Actually Try to Curl Fast at Home
You want curls. You want them now. You do not want to spend 47 minutes wrestling a hot tool while your coffee gets cold and your left arm files a formal complaint.
Good news: fast curls are absolutely doable at homeand they can actually lastif you use the right prep, the right tool, and the right sequence.
This guide blends practical techniques from salon educators, beauty-lab testing insights, dermatologist-backed hair-care advice, and trichology research into one simple plan.
Whether you love a curling iron, a wand, a straightener, rollers, or heatless methods, you’ll learn how to curl your own hair quickly without turning your ends into toast.
Let’s get you from “wet-hair panic” to “I woke up like this” energy.
Why “Fast Curling” Usually Fails (and How to Fix It)
Most at-home curling fails are caused by one of five things:
- Hair isn’t fully dry before heat styling.
- No heat protectant is used.
- Temperature is too high (or too low) for your hair type.
- Sections are too big, so heat doesn’t distribute evenly.
- Curls are touched before they cool and set.
The fix is simple: prep correctly, style in a repeatable pattern, and let curls cool before you fluff. That alone cuts styling time and boosts hold dramatically.
Your 10-Minute Pre-Curl Setup
1) Start with fully dry, detangled hair
If you’re in a rush, rough-dry first, then smooth with a quick pass of a brush and dryer until every section is dry. Damp spots are curl-killers and damage magnets.
2) Use a heat protectant like it’s non-negotiable
Mist or apply evenly from mid-lengths to ends, then comb through so you don’t end up with one protected chunk and one brave, unprotected chunk.
(We don’t send any strand into battle alone.)
3) Pick your temperature on purpose
- Fine, fragile, color-treated, or damaged hair: lower settings first.
- Medium/normal hair: moderate heat.
- Coarse, dense, or resistant hair: higher settings, but still controlled.
Rule of thumb: start lower, increase only if needed, and avoid repeated passes.
4) Section before you style
Split hair into top and bottom, then clip. Work in 1-inch sections for speed and consistency. Bigger chunks look faster but often require redo passes, which steals time and stresses hair.
5) Choose your “finish vibe” now
Want polished curls? Keep sections neat and uniform. Want beachy texture? Alternate curl directions and leave the ends slightly straighter.
Decide first so you don’t freestyle into chaos halfway through.
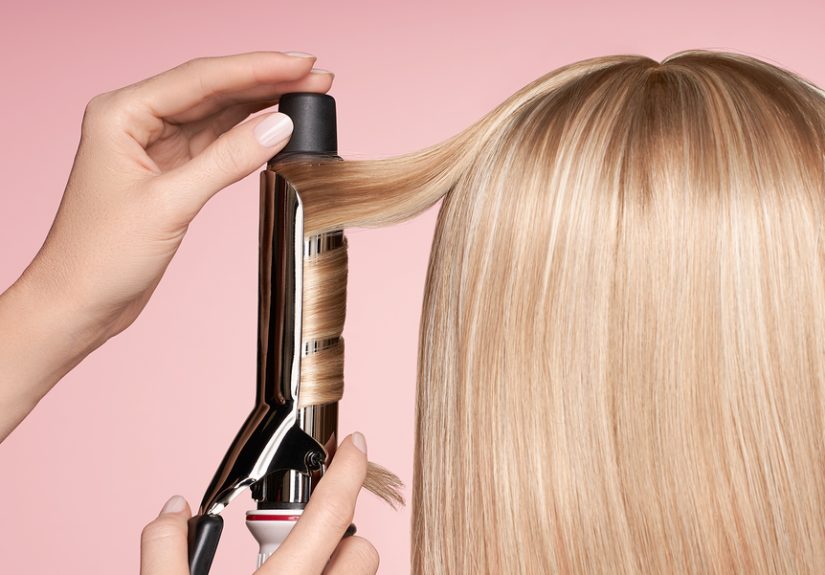
Method 1: Fast Curls with a Curling Iron (Clamp Tool)
Best for: classic curls, defined shape, reliable results.
- Take a 1-inch section and clamp near the mid-length or root.
- Wrap away from your face (especially around the front pieces).
- Hold briefly, release, and do not touch the curl yet.
- Repeat around the head in the same rhythm.
Speed tip: Curl in “columns” (back-right, front-right, back-left, front-left) so you don’t lose your place.
Hold tip: For stubborn hair, use a slightly smaller barrel than your target curl.
Method 2: Quick Waves with a Curling Wand
Best for: effortless, modern waves and quick styling once you get the hang of it.
- Wear a heat glove on your wrapping hand.
- Hold wand vertically, tip down.
- Wrap sections away from the face; leave 1 inch of ends out for beachy texture.
- Release and let curls cool before breaking them up.
Wands are fast because there’s no clamp line to fix. If your waves fall quickly, prep with a light mousse before blow-drying and use smaller sections.
Method 3: Curl with a Flat Iron (One Tool, Two Jobs)
Best for: people who want one tool for both smooth looks and curls.
- Clamp a 1-inch section near the root.
- Rotate the iron away from your face about a half turn to full turn.
- Glide down steadily (not too slow, not a panic sprint).
- Repeat and alternate direction for a more natural finish.
You can also use S-wave clamping for beach texture. Flat irons are especially useful when you want bends and movement rather than tight spiral curls.
Method 4: Hot Rollers for Speed + Volume
Best for: multitaskers and anyone who wants bounce without hand-curling every strand.
- Start on dry hair.
- Roll 1- to 2-inch sections, focusing first on the crown/mohawk area.
- Let rollers cool fully before removing.
- Brush or finger-shape based on desired finish.
This method feels old-school in the best way: set it, do your makeup, remove, done. It’s one of the fastest routes to soft volume.
Method 5: Heatless Curls for Busy Nights
Best for: reducing heat exposure, saving morning time, and waking up with shape already in place.
- Try robe-belt wraps, soft rollers, or overnight braids.
- Apply a lightweight styling product first.
- Secure gently and sleep.
- In the morning, separate with fingers and finish with a flexible spray.
Heatless methods are slower upfront but lightning-fast the next day. Great for school mornings, travel, and “I hit snooze five times” situations.
How to Make Curls Last All Day
Use “grip” products before styling
Very silky, freshly washed hair can be slippery. A little mousse, dry shampoo at roots, or texturizing spray can improve hold.
Clip curls while they cool
Pinning each fresh curl for a few minutes gives more structure and memory. This is one of the highest-ROI tricks in home styling.
Don’t brush immediately
Let curls fully cool before finger-combing or brushing. If you fluff early, gravity says thank you and your curl pattern says goodbye.
Finish with the right spray
Flexible hold for movement, stronger hold for events or humidity. Mist lightly and build as needed to avoid stiffness.
Use the right barrel size
Bigger barrel = looser waves. Smaller barrel = tighter, longer-lasting curls. If curls drop fast, size down.
Common Time-Wasting Mistakes (and Fast Fixes)
- Mistake: Curling huge sections. Fix: 1-inch sections.
- Mistake: Going over the same piece repeatedly. Fix: Adjust temp and technique instead.
- Mistake: Wrong tool for your goal. Fix: Clamp iron for definition, wand/flat iron for softer texture.
- Mistake: Starting without a plan. Fix: Section and follow a repeatable pattern.
- Mistake: Touching hot curls too soon. Fix: Cool first, then style out.
Fast Curl Recipes by Hair Type
Fine or thin hair
- Use lower heat and smaller sections.
- Prep with mousse for memory.
- Use lighter finishing spray to avoid collapse.
Thick or coarse hair
- Work in cleaner sections and clip aggressively.
- Use slightly higher, controlled heat.
- Try smaller barrel than expected for longer hold.
Wavy or curly hair that needs polishing
- Smooth first if needed, then curl select sections for uniform pattern.
- Use wrap-wave flat iron technique for softer blend.
- Finish with anti-humidity product in humid weather.
Short hair
- Use narrower barrels/plates.
- Alternate curl direction for texture.
- Leave ends out for modern, piecey movement.
Hair Health & Safety: The Smart Styler’s Rules
- Never curl wet or damp hair with high heat.
- Keep tools moving; avoid baking one spot.
- Check cords, barrels, and auto-shutoff function regularly.
- Let tools cool on heat-safe surfaces only.
- Keep hot tools away from kids and check product recalls periodically.
- Rotate in heatless days each week to reduce cumulative stress on hair.
Healthy hair holds styles better over time. In other words, prevention is a styling shortcut.
Your 15-Minute Emergency Curl Routine
- Dry shampoo at roots + quick brush-through (1 minute).
- Heat protectant mist + comb (1 minute).
- Curl only top layer + face frame with iron or wand (8 minutes).
- Clip front curls while they cool (2 minutes).
- Release, finger-shape, spray, done (3 minutes).
This “visible zones first” method is the secret when time is tight and you still want polished results.
Final Takeaway
If you remember only three things, make it these: dry hair, heat protectant, cool-down time.
From there, choose one method and practice it two or three times exactly the same way. Speed comes from repetition, not chaos.
Once your sequence is locked in, fast curls stop being a special event and become a Tuesday morning skill.
And when you finally get compliments that sound suspiciously like “Who did your hair?”you can smile, say “Thanks,” and keep your highly efficient curl system classified.
Experience Section (): What Happens When You Actually Try to Curl Fast at Home
The first time most people try to curl their own hair fast, it starts with confidence and ends with one arm cramping while the back sections look like they were styled during an earthquake.
That’s normal. The learning curve is real, but it’s short if you focus on process instead of perfection.
A common beginner experience goes like this: you copy a gorgeous tutorial, use the same tool, and still get totally different results. Usually, the hidden variable is prep.
In real life, the difference between “wow curls” and “why is this falling flat?” is often whether the hair was fully dry and whether product was distributed evenly.
Once people switch from random spraying to section-by-section prep, results improve immediately.
Another pattern: people with fine hair often assume they need more heat because curls won’t hold, then accidentally overheat and lose bounce.
Ironically, they usually do better with lower-to-moderate heat, smaller sections, and a grip product before styling.
On the other hand, people with thick hair often use low heat and giant sections to save time, then repeat passes on every strand.
That ends up taking longer. When they increase heat slightly (safely) and reduce section size, curl time drops and hold improves.
One of the biggest real-world breakthroughs is learning to leave curls alone while they cool. It feels wrong at first because you want to check, fluff, and admire.
But the “hands-off cool-down” habit is what turns a one-hour style into an all-day style.
Many people report this one change did more for longevity than buying a new tool.
There’s also the emotional side no one talks about: styling your own hair can feel frustrating when one side behaves and the other side acts like it has its own legal counsel.
The fix is to create a pattern and repeat it exactlysame section size, same timing, same wrap direction rules.
Once the motion becomes muscle memory, curling gets dramatically faster and less stressful.
People who are always late (respectfully, a large and beautiful community) tend to love the “visible zones” strategy.
Instead of curling every inch, they style the crown, top layer, and face frame first.
In mirrors and photos, this looks fully done, even if lower layers are lightly waved or untouched.
It’s the hairstyle equivalent of answering only the exam questions worth the most points.
A lot of at-home stylers eventually settle into a hybrid routine: heatless curls some nights, quick hot-tool refinement in the morning.
This combo saves time, reduces heat exposure, and makes hair look consistently styled without daily full-effort sessions.
It also lowers the pressureif overnight curls are slightly uneven, five minutes with a flat iron on strategic pieces solves it.
The most encouraging experience, though, is confidence.
Once someone learns how to curl their own hair quickly, they stop feeling “dependent” on salon days for polished hair.
They can get ready for interviews, birthdays, date nights, school events, and random Tuesday confidence boosts on their own schedule.
That’s the real win: not just faster curls, but control, consistency, and a little extra swagger in the mirror.


