Table of Contents >> Show >> Hide
- What Makes a Roblox Character Easy to Draw?
- Supplies You Need Before You Start
- Step 1: Choose the Type of Roblox Character You Want to Draw
- Step 2: Draw a Light Guideline for the Pose
- Step 3: Sketch the Head as a Rounded Square
- Step 4: Build the Torso With a Simple Block Shape
- Step 5: Add Blocky Arms and Hands
- Step 6: Draw the Legs and Feet
- Step 7: Place the Face
- Step 8: Add Hair, Hats, or Head Accessories
- Step 9: Design the Outfit
- Step 10: Clean Up the Sketch
- Step 11: Ink the Final Lines
- Step 12: Add Color
- Step 13: Add a Background or Props
- Common Mistakes When Drawing a Roblox Character
- Easy Roblox Character Ideas for Beginners
- How to Improve Your Roblox Character Drawing
- Experience Notes: What Drawing Roblox Characters Teaches You
- Conclusion
Learning how to draw a Roblox character is one of the most beginner-friendly ways to practice cartoon art because the classic Roblox look is built from simple shapes: boxes, cylinders, rectangles, and a face that does not need a PhD in eyebrow physics. Whether you want to sketch your own avatar, design a character for fan art, or create a fun drawing for a school project, the secret is to start with structure before adding style.
Roblox avatars are known for their customizable bodies, clothing, accessories, hairstyles, faces, and bold visual personalities. Some look like classic blocky figures, while others use more modern proportions, layered clothing, dynamic heads, or detailed accessories. For drawing, that is excellent news. You can begin with a simple block-style character and then level up with hats, hoodies, wings, headphones, armor, sneakers, or whatever your imagination drags out of the virtual closet.
This step-by-step guide will show you how to draw a Roblox character from basic sketch to finished artwork. You do not need fancy tools. A pencil, eraser, paper, and coloring supplies are enough. Digital artists can use the same method in Procreate, Photoshop, Clip Studio Paint, Krita, or any drawing app with layers. The goal is not to copy one exact avatar perfectly. The goal is to understand the Roblox character style so you can draw your own version confidently.
What Makes a Roblox Character Easy to Draw?
The classic Roblox character design is friendly to beginners because it uses clear, readable forms. The head is usually square or slightly rounded. The torso is boxy. Arms and legs are simple block-like shapes. Unlike realistic figure drawing, you do not need to worry about perfect anatomy, muscle groups, or whether the elbow is judging you from across the page.
Roblox characters also work well because they are highly customizable. A simple drawing can become instantly recognizable with the right details: a smiling face, chunky hands, blocky shoes, a colorful shirt, spiky hair, a cap, glasses, headphones, or a backpack. The basic body gives you a clean foundation, while the accessories create personality.
Supplies You Need Before You Start
For a traditional drawing, use a pencil for the first sketch, an eraser for cleanup, a black fineliner or marker for outlines, and colored pencils or markers for finishing. Smooth paper helps if you want cleaner linework, but regular notebook paper works fine for practice. If your first drawing happens during math class, please at least pretend to be graphing something.
For digital drawing, create separate layers for sketch, line art, flat colors, shading, and highlights. Keep your sketch layer light and lower its opacity before inking. This makes the process much easier and prevents your final Roblox character from looking like it fought a swarm of gray pencil ghosts.
Step 1: Choose the Type of Roblox Character You Want to Draw
Before drawing, decide whether your Roblox character will be classic, modern, cute, action-style, or based on your own avatar. A classic Roblox character has a square head, rectangular body, and blocky limbs. A modern avatar may have smoother clothing, layered accessories, expressive hair, and more detailed proportions. A cute version can use a larger head, shorter arms and legs, and rounder corners.
For beginners, start with a classic blocky Roblox character. It is easier to draw and instantly recognizable. Once you understand the body structure, you can add advanced details later. Think of the blocky version as your tutorial level before the boss fight known as “drawing perfect hair.”
Step 2: Draw a Light Guideline for the Pose
Start with a simple stick-figure pose. Draw a vertical line for the body direction, a horizontal line for the shoulders, and another for the hips. Keep the pose simple at first: standing, waving, walking, or holding an item. A front-facing pose is the easiest because both sides of the body are mostly symmetrical.
If you want a more energetic drawing, tilt the shoulders slightly or raise one arm. Roblox characters can look stiff if everything is perfectly straight, so even a small angle can make the drawing feel more alive. Do not press hard with your pencil at this stage. These lines are temporary, like training wheels for your sketch.
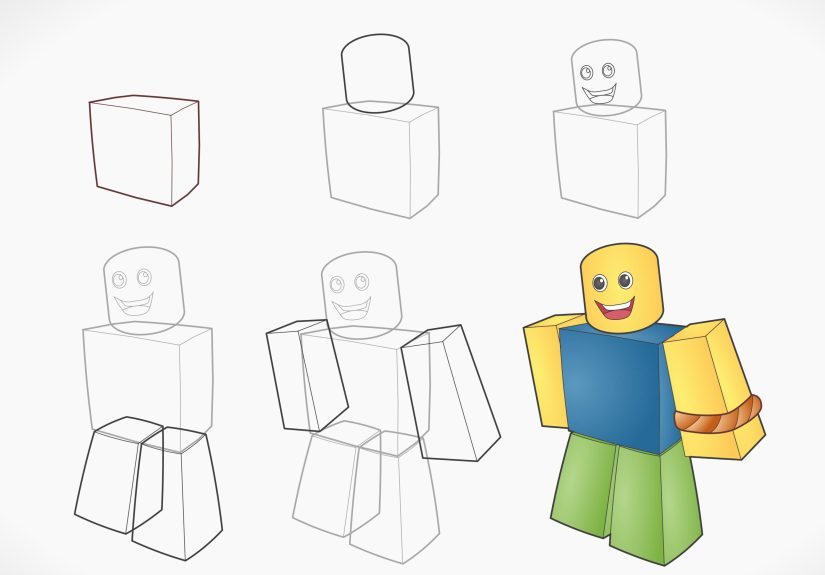
Step 3: Sketch the Head as a Rounded Square
Draw the head near the top of your guideline. For a classic Roblox character, use a square with slightly rounded corners. The head should be large enough to feel cartoonish but not so large that your character looks like it is carrying a refrigerator on its neck.
Add a light vertical center line down the face and a horizontal line across the middle. These facial guidelines help you place the eyes, mouth, and accessories evenly. If your character is turned slightly to one side, curve the center line gently toward the direction the face is looking.
Step 4: Build the Torso With a Simple Block Shape
Under the head, draw the torso as a rectangle or trapezoid. A classic Roblox torso is wider at the shoulders and slightly narrower near the waist. Keep the shape simple and box-like. This is the core of the character, so make sure it lines up with the head and pose.
Leave a small gap between the head and torso to suggest a neck, or let the head sit close to the body for a more toy-like look. If you plan to draw a hoodie, armor, jacket, or shirt graphic, keep the torso clean for now. Details come later. The sketch stage is about construction, not decorating the house before the walls exist.
Step 5: Add Blocky Arms and Hands
Draw each arm using rectangular shapes. The upper arm can angle down from the shoulder, and the forearm can continue toward the hand. For a basic Roblox style, the arms may look like long rectangular blocks. If you want a modern cartoon style, soften the edges slightly and add simple bends at the elbows.
Hands can be simple mitten shapes, small blocks, or rounded cartoon fists. Do not overcomplicate the fingers unless the character is holding something. For a waving pose, draw the arm raised with a simple open hand. For an action pose, draw one arm forward and the other back to create movement.
Step 6: Draw the Legs and Feet
Sketch the legs as two sturdy rectangular blocks connected to the bottom of the torso. Roblox legs are usually short and solid, especially in the classic style. Keep them evenly spaced, with enough room between them to show a clear stance.
Feet can be drawn as rectangular shoes or slightly wider blocks at the bottom of each leg. If your character is wearing sneakers, add a sole line, a toe cap, and small lace marks. If the character is wearing boots, make the feet chunkier and add a thicker outline. Good shoes can make a simple Roblox drawing look surprisingly polished.
Step 7: Place the Face
Roblox faces are often simple and expressive. Start with two eyes placed along the horizontal guideline. They can be dots, circles, ovals, or stylized shapes. Then add a mouth: a smile, smirk, open grin, or tiny neutral line. A simple face usually works best because the blocky body already carries a strong visual style.
For a classic cheerful Roblox face, draw two round eyes and a curved smile. For a cool avatar, try sunglasses or narrowed eyes. For a mischievous character, raise one eyebrow and curve the mouth to one side. Keep the face clean and readable. If you add too many tiny details, the expression may look crowded.
Step 8: Add Hair, Hats, or Head Accessories
Hair is where your Roblox character starts to feel unique. Use large, simple sections instead of drawing every strand. For spiky hair, sketch triangular clumps around the top and sides of the head. For fluffy hair, use rounded cloud-like shapes. For straight hair, draw clean panels that frame the face.
Hats and accessories are also great for personality. A baseball cap can be made from a curved brim and rounded crown. Headphones need two ear cups and a band over the head. Glasses can be simple circles or rectangles connected by a bridge. Horns, crowns, helmets, beanies, and animal ears can all work if they match the character’s theme.
Step 9: Design the Outfit
Now draw clothing details on the torso, arms, and legs. A T-shirt can have a collar line, sleeves, and a logo. A hoodie can include a pocket, drawstrings, and a hood shape behind the neck. A jacket can have a zipper line, cuffs, and folded edges. Keep clothing details bold and simple so they read clearly at a glance.
Roblox outfits often use strong color combinations and recognizable themes. You might draw a gamer hoodie, superhero armor, school outfit, ninja costume, pirate jacket, futuristic suit, or cozy winter avatar. Choose one main idea and repeat it across the design. For example, if your character has a space theme, add a helmet visor, star patches, metallic boots, and a small backpack shaped like a jetpack.
Step 10: Clean Up the Sketch
Once the body, face, hair, and outfit are in place, erase unnecessary guidelines. Keep the best lines and fix any uneven shapes. Make sure the arms are similar in size unless one is intentionally closer to the viewer. Check that the legs support the body and that the head is centered enough to feel balanced.
This is the stage where small corrections make a big difference. Straighten the edges of the blocky limbs, adjust the face placement, and simplify any messy areas. A good Roblox character drawing should look clean, bold, and easy to understand even before color is added.
Step 11: Ink the Final Lines
Trace over your final sketch with a black pen, marker, or digital brush. Use confident lines around the outside of the character and slightly thinner lines for internal details like clothing folds, facial features, and accessory marks. A thicker outer outline helps the character pop, especially if you plan to color it brightly.
Let the ink dry before erasing pencil marks. If you are working digitally, hide or delete the sketch layer after inking. Do not worry if the line art is not perfect. Roblox characters have a playful look, so a little charm is better than sterile perfection. In other words, your lines can have personality; they do not need to file taxes.
Step 12: Add Color
Choose a clear color palette before you begin. A good beginner palette includes one main clothing color, one secondary color, one accent color, and neutral tones for shoes or accessories. For example, try a blue hoodie, black pants, white shoes, and yellow details. Or use red armor, dark gray gloves, silver boots, and orange highlights.
Color the skin, hair, clothing, and accessories in flat tones first. Then add darker shades under the hair, below the arms, along the sides of the torso, and under the feet. Add highlights on the top edges of the hair, shoulders, shoes, and accessories. These simple shadows and highlights make the character look more three-dimensional without making the drawing too complicated.
Step 13: Add a Background or Props
A Roblox character can stand alone, but a simple background makes the artwork more complete. Draw a platform, gaming room, city street, obstacle course, grassy baseplate, or colorful gradient. Keep the background less detailed than the character so it does not steal the spotlight.
Props can also tell a story. Your character might hold a sword, paintbrush, pizza slice, skateboard, magic staff, microphone, backpack, or game controller. Use blocky shapes for props so they match the character style. A square-ish sword, chunky backpack, or simplified controller will look more natural than a hyper-realistic object next to a cartoon avatar.
Common Mistakes When Drawing a Roblox Character
Making the Body Too Realistic
Roblox characters are stylized. If you add too much realistic anatomy, the drawing may lose its recognizable charm. Keep the body blocky, simple, and playful.
Adding Too Many Tiny Details
Small details can disappear or make the drawing look cluttered. Use bold shapes and clear accessories instead. One big logo is often better than twelve tiny decorations.
Skipping the Sketch Stage
Jumping straight into final lines can create uneven proportions. A light sketch helps you test the pose, fix mistakes, and avoid the classic “why is one arm longer than the school bus?” problem.
Using Random Colors
Color can make or break the design. Pick a theme and repeat colors thoughtfully. If every part is a different bright color, the character may look less like an avatar and more like a spilled candy bag with shoes.
Easy Roblox Character Ideas for Beginners
If you are not sure what to draw, start with a simple avatar wearing a hoodie, jeans, sneakers, and headphones. This design is easy, modern, and instantly recognizable. You can add a smiling face, messy hair, and a small backpack for extra personality.
Another fun idea is a classic noob-inspired character with bright colors, a simple smile, and blocky limbs. You can also draw a ninja Roblox character with a mask, dark outfit, sword, and glowing eyes. For a cute version, draw a chibi Roblox character with a larger head, shorter body, rounder hands, and oversized accessories.
How to Improve Your Roblox Character Drawing
The fastest way to improve is to draw the same character more than once. First, draw a front view. Then draw a three-quarter view. Next, draw the character waving, jumping, running, or holding a prop. Repetition teaches you how the shapes connect.
You can also make a mini character sheet. Draw the head from different angles, test three facial expressions, design two outfits, and create one small accessory set. This helps you understand the character as a complete design instead of a one-time sketch.
Use references, but do not trace everything blindly. Study how Roblox avatars are built from simple forms, then recreate the idea in your own style. The more you practice breaking characters into basic shapes, the easier it becomes to invent new poses and costumes.
Experience Notes: What Drawing Roblox Characters Teaches You
Drawing a Roblox character is more than a quick fan-art exercise. It teaches one of the most useful art skills: simplification. Many beginners think good drawing means adding more details, more shadows, more wrinkles, more buttons, and possibly more emotional damage. But Roblox-style drawing proves the opposite. A character can be memorable with only a square head, a few clean shapes, a strong outfit, and a face that says, “I am ready to win this obby or fall dramatically trying.”
One helpful experience is starting with the classic blocky avatar before attempting modern accessories. The first time you draw a Roblox character, keep the head, torso, arms, and legs very simple. After that, add one feature at a time. Draw the same character once with a cap, once with spiky hair, once with headphones, and once with a hoodie. This shows how accessories change the personality without forcing you to rebuild the whole drawing.
Another useful lesson is that blocky characters still need balance. Even simple rectangles can look awkward if the head is too far to one side or the legs are too narrow. A good trick is to lightly draw a center line through the character from head to feet. If the body leans, make sure the feet still support the pose. This is especially important for action drawings, such as jumping, running, sword fighting, or celebrating after surviving a lava floor by approximately one pixel.
Color choices also become easier with practice. Many Roblox avatars use bold colors, but bold does not mean random. A strong design usually has a main color, a secondary color, and one accent. For example, a black-and-red ninja avatar may use red only on the scarf, eyes, and sword handle. A blue gamer avatar may repeat blue in the hoodie, shoes, and headphones. This repetition makes the character feel designed instead of accidentally assembled during a color emergency.
Digital artists can learn a lot by using layers. Put the sketch on one layer, line art on another, and colors underneath. This makes cleanup simple and lets you test outfits quickly. Traditional artists can get similar benefits by sketching lightly first and inking only after the design feels right. Either way, the process rewards patience. The best Roblox character drawings usually come from small improvements: cleaner outlines, better spacing, clearer accessories, and more confident color placement.
The most enjoyable part is personalization. A Roblox character does not need to look like everyone else’s avatar. You can draw a chef, robot, fairy, superhero, detective, dinosaur trainer, skateboarder, or sleepy gamer wrapped in a blanket like a burrito with Wi-Fi. The blocky Roblox structure gives you a simple base, but the style choices are wide open. That is why this topic is so fun for beginners and experienced artists alike. You are not just drawing a character; you are designing a tiny digital personality with shoes.
Conclusion
Learning how to draw a Roblox character starts with simple shapes and grows into creative design. Begin with a blocky head, torso, arms, and legs. Add a clear face, bold hairstyle, outfit details, accessories, and color. Keep the structure readable, the pose balanced, and the personality strong. Once you master the basic method, you can create endless Roblox avatar drawings in different themes, from cute and casual to heroic, spooky, futuristic, or completely ridiculous in the best possible way.
The best part is that Roblox characters are forgiving. Their simple shapes make them easy to sketch, while their customizable style gives you plenty of room to experiment. Practice a few poses, try different outfits, and build your own character sheet. With every drawing, your lines will become cleaner, your proportions will improve, and your avatars will look more alive. And yes, giving them cool sneakers absolutely counts as artistic growth.
Note: This article is written for educational drawing guidance and is not affiliated with or endorsed by Roblox Corporation.


