Table of Contents >> Show >> Hide
- Why Knowing Your Blood Type Matters
- Can You Really Check Your Blood Type at Home?
- What You Need Before You Start
- How to Find Out Your Blood Type at Home in 11 Steps
- Step 1: Read the full instructions before touching anything
- Step 2: Set up a clean workspace and label the card
- Step 3: Activate the test circles if your kit requires it
- Step 4: Wash and dry your hands thoroughly
- Step 5: Clean the finger and prepare the lancet
- Step 6: Prick the side of your fingertip
- Step 7: Encourage blood flow without smearing the sample
- Step 8: Apply blood to each test circle correctly
- Step 9: Mix each circle thoroughly, one at a time
- Step 10: Tilt the card and wait for the reaction to develop
- Step 11: Read, record, and double-check the result
- How to Read a Home Blood Type Card
- Common Mistakes That Can Ruin the Result
- When You Should Not Rely on a Home Result
- Other Ways to Learn Your Blood Type
- Final Thoughts
- Real-Life Experiences With At-Home Blood Type Testing
- SEO Tags
There are some things in life you probably know by heart: your coffee order, your Wi-Fi password, and exactly which streaming service keeps charging you every month. Your blood type? That one often gets a blank stare. The good news is that finding out your blood type at home is possible with a DIY blood typing kit, a steady hand, and a little patience.
If you have ever wondered whether you are A, B, AB, or O, and whether you are positive or negative, an at-home blood type test can give you a quick answer. These kits usually work by mixing a small drop of blood with dried antibodies and checking for clumping, also called agglutination. It sounds more dramatic than it is. In practice, it is more “science fair with purpose” than “medical thriller.”
Still, let’s get one thing straight right away: a home blood type test is useful for personal knowledge, but it is not a substitute for a clinical blood typing test. If your blood type matters for pregnancy, surgery, transfusion, organ donation, or any urgent medical situation, a doctor or licensed lab needs to confirm it.
Why Knowing Your Blood Type Matters
Your blood type is based mainly on two systems: the ABO blood group system and the Rh factor. The ABO system places you into one of four groups: A, B, AB, or O. The Rh factor tells whether your blood is positive or negative. Put them together, and you get one of the eight common blood types, such as A+, O-, or AB+.
Why does this matter? Because blood is not a one-size-fits-all situation. Doctors need accurate blood typing before transfusions. Rh status also matters during pregnancy, especially if a pregnant person is Rh-negative and the baby may be Rh-positive. Blood type information can also come up during surgery, donation, transplant planning, and emergency care.
For everyday life, not knowing your blood type is not exactly a disaster. Plenty of people go years without needing it. But if you are curious, planning to donate blood, or just like having useful health information handy, learning your type can be smart.
Can You Really Check Your Blood Type at Home?
Yes, with the right kit. An at-home blood typing kit typically includes a card or test surface with antibody spots, a lancet for a finger prick, mixing sticks, and instructions. Some kits also require a drop of water to activate the dried reagents before adding blood. After you apply blood to the test circles, you look for visible clumping patterns to identify your ABO group and Rh status.
The catch is simple: accuracy depends on technique. Too little blood, too much water, mixing the wrong circles, reading the card too quickly, or touching the wrong area can all throw off the result. In other words, the science works, but your kitchen-table laboratory still needs decent form.
That is why the best approach is to treat a home result as informative, not official. Think of it as learning something useful about yourself, not printing your own medical ID badge and declaring the case closed.
What You Need Before You Start
- An at-home blood type test kit that checks ABO and Rh factor
- A clean, flat, well-lit surface
- Soap and water
- A timer or phone stopwatch
- Tissues or gauze
- A glass of water if your kit requires reagent activation
- A calm five to ten minutes with no rushing
Before you begin, check the expiration date on the kit and make sure the packaging is sealed and undamaged. If the card looks compromised or the materials are missing, do not improvise. This is not the moment to become a “creative problem solver.”
How to Find Out Your Blood Type at Home in 11 Steps
Step 1: Read the full instructions before touching anything
Yes, really. This is one of those rare times when reading directions first can save you from ruining the whole experiment. Different brands are similar, but not identical. Some require water on the reagent spots. Some have slightly different timing. Some include a control circle that must stay smooth for the result to count.
Step 2: Set up a clean workspace and label the card
Put the test materials on a dry, flat surface with good lighting. If your kit includes multiple cards or spaces for names and dates, fill that out now. Separate any mixing sticks if the kit tells you to use one stick per test circle. Keeping tools organized helps prevent cross-contamination, which is a fancy phrase for “oops, I mixed the science.”
Step 3: Activate the test circles if your kit requires it
Many common home kits use dried reagents in circles labeled Anti-A, Anti-B, Anti-D, and Control. If the instructions say to add water, place the required drop carefully onto each circle without touching the card with the dropper. Avoid spilling from one circle into another. Each circle needs to stay in its own lane.
Step 4: Wash and dry your hands thoroughly
Clean hands matter for two reasons: safety and sample quality. Wash with soap and warm water, then dry your hands completely. Warm fingers can also help improve blood flow. If your hands run cold like they are auditioning for a snowman commercial, rub them together or let warm water run over them for a bit.
Step 5: Clean the finger and prepare the lancet
Use the alcohol swab or sterile wipe included in the kit, if provided, and let the finger dry fully before pricking. Then prepare the lancet according to the instructions. Many lancets involve twisting and removing a cap before pressing the device against the fingertip. Do not test-fire it in the air. One click usually means one use.
Step 6: Prick the side of your fingertip
Press the lancet firmly against the puncture site and activate it. The side of the fingertip is often more comfortable than the center pad. You only need a small sample, but it should be a decent hanging drop, not a microscopic red suggestion.
Step 7: Encourage blood flow without smearing the sample
Gently massage or milk the finger from the base toward the tip if needed. Maintain light pressure until a round drop forms. Do not squeeze like you are trying to juice an orange. Too much force can affect the sample and make the process messier than necessary.
Step 8: Apply blood to each test circle correctly
Use the kit’s collection stick or applicator exactly as directed. Most kits require a separate stick or separate blood application for each circle. Place one drop into each circle so the blood contacts the reagent. Be careful not to drag blood from one circle into another. That is the fastest route to a confusing result and a mild identity crisis.
Step 9: Mix each circle thoroughly, one at a time
Using the designated stick for each circle, stir the blood into the reagent for the required time, often around 10 seconds. Spread the mixture across the full circle, but do not let it spill over into neighboring spots. One circle, one stick, one job. Elegant and effective.
Step 10: Tilt the card and wait for the reaction to develop
Many kits instruct you to tilt the card back and forth at about a 45-degree angle, holding it briefly at each side so the blood can flow over the reagent area. This helps the agglutination pattern become visible. Do not stop the test too early. Some reactions, especially the Rh reaction, may develop more slowly than the A or B reactions.
Step 11: Read, record, and double-check the result
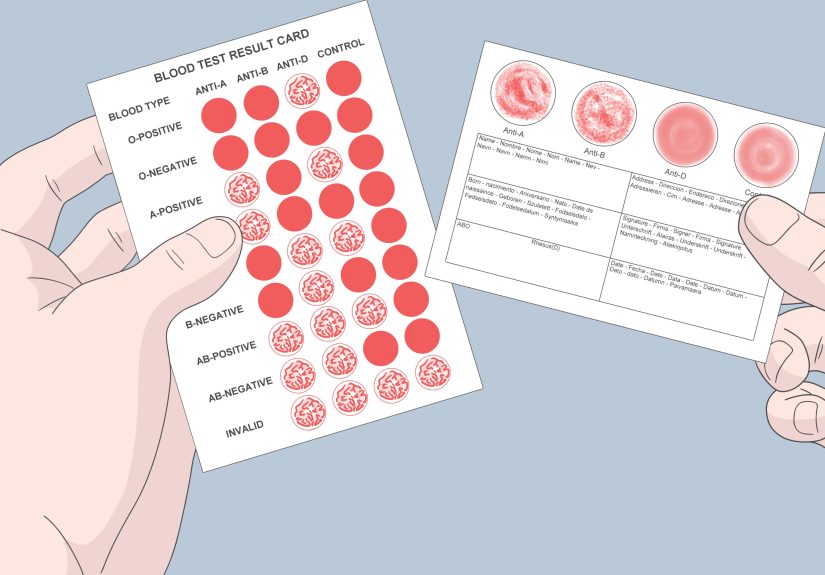
Now look at each circle. If blood clumps in the Anti-A circle, you have A antigen. If it clumps in Anti-B, you have B antigen. If both clump, you are AB. If neither clumps, you are O. If the Anti-D circle clumps, you are Rh-positive. If it stays smooth, you are Rh-negative. The control circle should remain smooth; if it clumps, the test is invalid and should be repeated with a new kit.
How to Read a Home Blood Type Card
| Reaction Pattern | What It Usually Means |
|---|---|
| Anti-A clumps, Anti-B does not | Type A |
| Anti-B clumps, Anti-A does not | Type B |
| Anti-A and Anti-B both clump | Type AB |
| Neither Anti-A nor Anti-B clumps | Type O |
| Anti-D clumps | Rh-positive |
| Anti-D stays smooth | Rh-negative |
| Control circle clumps | Invalid result; repeat the test |
Common Mistakes That Can Ruin the Result
- Using too little blood
- Letting circles mix together
- Reading the card too quickly
- Using the same stick in multiple circles
- Skipping handwashing or fingertip cleaning
- Testing with an expired or damaged kit
- Ignoring an invalid control circle
If your result looks faint, patchy, or confusing, do not guess. Repeat the test with a fresh kit or get a blood typing test through a clinic or lab.
When You Should Not Rely on a Home Result
A home blood type kit can satisfy curiosity, but there are situations where only a clinical test should count. These include blood transfusions, organ donation, pregnancy care, surgery, serious illness, or medical records that need official documentation. Hospitals and blood banks do more than just ABO and Rh testing when safety is on the line. They may also perform antibody screening and crossmatching to make sure donor blood is compatible.
So if your home card says O-positive and you are tempted to announce yourself as the household emergency donor, hit pause. Get formal testing first.
Other Ways to Learn Your Blood Type
If finger-prick science is not your thing, there are easier options. You can ask your doctor for a blood typing test, check past lab results, review prenatal records, or donate blood and see whether the donation center provides your blood type afterward. In many cases, these options are more reliable and less fussy than doing it yourself at the kitchen table next to a banana and an unpaid electric bill.
Final Thoughts
Learning how to find out your blood type at home can be quick, useful, and oddly satisfying. With a proper home blood typing kit, careful technique, and realistic expectations, you can usually get a solid idea of your ABO and Rh type in just a few minutes. The key is to move slowly, keep the circles separate, and respect the instructions like they are the boss of the room.
Just remember the golden rule: home blood type testing is great for personal knowledge, but medical decisions belong to licensed professionals and lab-confirmed results. Curiosity is excellent. Guesswork with transfusions is not.
Real-Life Experiences With At-Home Blood Type Testing
One reason this topic gets so much attention is that people often have a surprisingly emotional reaction to learning their blood type. It sounds like a small fact, but for many people it feels like uncovering a missing piece of personal information they should have known years ago. Some approach the test casually, almost like opening a trivia answer about themselves. Others get oddly dramatic about it, as if the card might reveal a secret family plot twist before dinner.
A common first-time experience goes like this: the person orders a home blood type kit online, opens the package confidently, and then realizes the instructions are more detailed than expected. Suddenly this simple task becomes a mini lab session. They clear the table, wash their hands twice, line up the sticks like surgical tools, and give the card the kind of respect normally reserved for tax forms and wedding invitations. There is usually one quiet moment of hesitation right before the finger prick, followed by the realization that it was not nearly as bad as expected.
Another common experience is surprise at how little blood is needed, followed immediately by frustration when the finger does not cooperate. People often expect a perfect drop to appear on command. Real life, of course, prefers drama. Sometimes the first prick produces almost nothing, and the next minute turns into a gentle finger massage session worthy of a spa treatment no one asked for. Once the sample starts flowing, most people settle down and get into the rhythm of the test.
Many users also mention that the hardest part is not the prick at all. It is the waiting and reading. The clumping pattern can feel obvious in one circle and annoyingly subtle in another. That uncertainty is part of the experience. Some people hold the card under brighter light, tilt it three extra times, compare it to the chart, then call over a second person for a “science witness.” It is the medical version of asking, “Do you see this too, or am I imagining it?”
There is also a practical side to these experiences. People who test at home often do so before donating blood, building a personal medical file, satisfying curiosity during pregnancy planning, or because a family conversation raised the question. Sometimes a parent tests after realizing they know everyone’s favorite pizza topping but not anyone’s blood type. Sometimes an adult child does it after hearing conflicting family stories. In those moments, the test becomes more than a novelty. It becomes a useful bit of health information.
The most positive experiences usually come from people who treat the test carefully and keep their expectations realistic. They follow the instructions, get a clear result, and then use that answer as a starting point, not a final legal ruling from the universe. The most frustrating experiences come from rushing, mixing circles, or assuming a fuzzy result is “close enough.” With home blood typing, patience is the difference between “That was neat” and “Now I need another kit.”


