Table of Contents >> Show >> Hide
- What You’ll Need
- Before You Start: Quick Tips for a Better-Looking Money Ring
- 14 Steps: How to Fold a Dollar Bill Into a Finger Ring
- How to Make the Ring Fit Better
- Common Mistakes and How to Fix Them
- Fun Variations (Same Idea, Different Vibes)
- FAQ: Dollar Bill Finger Rings
- Conclusion
- Extra: Real-World Experiences With Dollar Bill Rings (What Usually Happens)
Want to turn one dollar into one piece of jewelrywithout scissors, glue, or a trip to a craft store?
A dollar bill finger ring is a classic money-origami trick: it looks impressive, feels oddly fancy, and costs exactly what it says on the bill.
(Inflation may apply emotionally.)
In this guide, you’ll learn how to fold a dollar bill into a wearable ring in 14 simple steps.
The “1” becomes the “gem,” the rest becomes the band, and your friends will suddenly assume you’re both creative and financially responsible.
Let’s not correct them.
What You’ll Need
- One U.S. $1 bill (crisp is best; wrinkled bills fold like they’re holding a grudge)
- A flat surface (desk, table, textbook you’re pretending to read)
- Optional: a marker or pen (to shape the ring evenly), and clean hands (cash has been places)
You can technically use other denominations, but the design is happiest with a $1 because the “1” is easy to feature as the ring’s “stone.”
Plus, folding a $100 into a ring is the kind of decision that makes your future self sigh loudly.
Before You Start: Quick Tips for a Better-Looking Money Ring
Pick the right bill
A crisp bill makes sharper creases and a sturdier ring. If your dollar is soft, frayed, or looks like it survived three laundromat cycles,
the ring may feel loose and “puffy” instead of sleek.
Fold with intention (and your thumbnails)
Press each crease firmly. Use your thumbnails to “set” folds so the ring holds shape. Origami is basically polite paper bullying.
Don’t over-tighten
This is a novelty ring, not a medieval test of loyalty. If your fingertip turns red or numb, loosen the band immediately.
14 Steps: How to Fold a Dollar Bill Into a Finger Ring
These steps create the classic money origami ring where the “1” faces outward as the gem.
Read through once, then fold along with the instructions for best results.
-
Lay the bill flat. Place the dollar on a table with the George Washington side facing up. Smooth it with your hand so it’s as flat as possible.
-
Make a thin fold along the bottom edge. Fold up a narrow strip (about the width of the white border) along the long bottom edge, then crease firmly.
-
Fold the bill in half lengthwise. Fold it “hotdog style” so the top long edge meets the bottom long edge. Crease, then keep it folded.
-
Tuck the thin strip into the fold (optional but helpful). If that narrow strip from Step 2 is sticking out, tuck it inside the fold to make the strip cleaner and less floppy.
-
Fold lengthwise again. Fold the long strip in half lengthwise one more time to create a thinner band. Crease wellthis helps the ring keep its shape.
-
Turn the bill so the “ONE” side faces up. You should now have a narrow strip. Rotate it so the back side (with “ONE”) is facing you and the “1” area is easier to find.
-
Build the “gem” square around the number 1. Near one end, locate the large “1”. Fold the short end inward so the “1” sits inside a neat square/rectangle panel on top. Crease sharply.
-
Fold the opposite short edge to frame the “1.” Fold the other side inward so the “1” looks boxed-in and centeredlike a tiny paper jewel setting. This creates the ring “head.”
-
Make a right-angle fold at the base of the “gem.” Fold the “gem” section back over itself at about a 90-degree angle. The boxed “1” should remain visible on top.
-
Start forming the band. Take the long tail (the longer remaining strip) and begin wrapping it around your finger (or around a pen/marker for a more even circle).
-
Adjust the ring size as you wrap. Tighten or loosen by changing how far from the “gem” you begin the wrap. Aim for snug-but-comfylike a good handshake, not a stress test.
-
Wrap the tail fully around the band. Continue wrapping until the tail reaches the “gem” area again. Keep the wraps stacked neatly for a clean-looking ring band.
-
Lock the tail into a pocket near the “gem.” Tuck the remaining tip of the tail under an existing flap behind the “gem” square. If it resists, gently open the pocket with a fingernail, then slide the tail in.
-
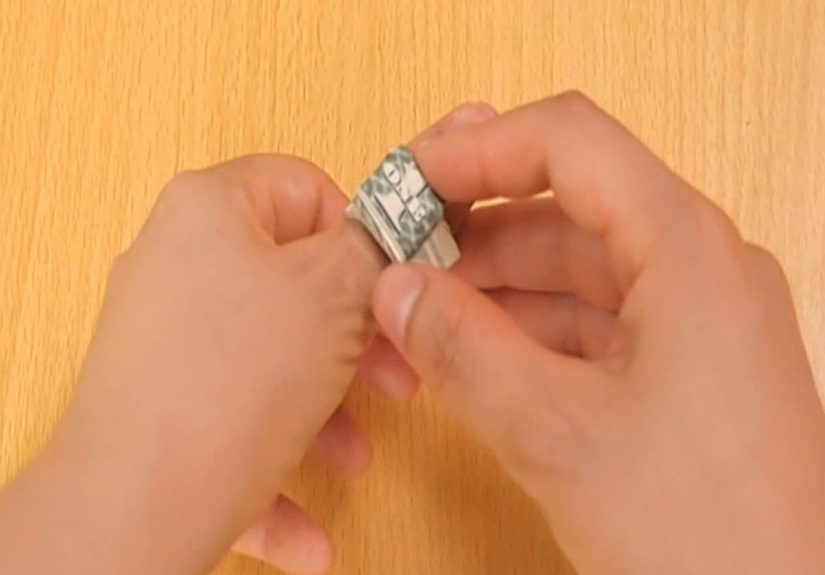
Shape and finish. Press down all creases, straighten the “gem” so the “1” faces outward, and gently round the band using your finger or a pen. Congratulationsyour dollar bill finger ring is ready for its red-carpet debut (or at least a group chat photo).
Pro tip: If the ring feels loose, unwrap one layer and rewrap tighter. If it feels tight, loosen the starting point of the wrap and try again.
Paper is forgivingyour finger, less so.
How to Make the Ring Fit Better
Use a marker as a “ring mandrel”
Jewelers size rings on a tapered tool called a mandrel. You can fake it with a marker, pen, or small flashlight handle.
Wrap the band around the tool, then slide it onto your finger for a more consistent fit.
Know where the size “lives”
The ring size is controlled mainly by how much tail you wrap and how close the wrap starts to the “gem”.
Starting the wrap closer to the “gem” usually makes a smaller ring; starting farther away usually makes a larger one.
Keep your wraps aligned
If the band looks bumpy, it’s usually because the tail drifted up or down while wrapping.
Rewrap with slow, even tension, and press each pass flat before moving on.
Common Mistakes and How to Fix Them
The “gem” looks crooked
This usually happens when the folds that frame the “1” aren’t symmetrical. Unfold just the “gem” area, recentre the “1,” and crease again.
The ring keeps popping open
Your locking tuck isn’t deep enough. Look for a tighter pocket behind the “gem,” then slide the tail further in.
Sharp creases help the pocket “grab” the tail.
The band is bulky
Bulky bands happen when the bill isn’t folded into a narrow enough strip early on. Make sure your lengthwise folds are crisp and evenly aligned.
The bill is too wrinkled
If the bill is heavily wrinkled, the ring may look soft and uneven. Flatten it under a heavy book for a while before folding,
or swap for a crisper bill.
Fun Variations (Same Idea, Different Vibes)
Use a higher denomination
A $5, $10, or $20 can work because U.S. bills are the same size. The “gem” may look different depending on where the big number lands.
If you try this, keep in mind it’s easier for part of the design to get hidden or cut off by folds.
Make it a “proposal” money gift
Put the ring in a small box and present it as a playful cash gift. It’s cute for birthdays, graduations, and celebrations
especially when you want to gift money without making it feel like you gave up and handed someone an envelope.
Try a heart-shaped money ring
Heart-ring folds are a popular money-origami variation. They’re slightly more advanced but great for Valentine’s Day, anniversaries,
or anytime you want your dollar to say, “I care,” without saying, “I panicked at the last minute.”
FAQ: Dollar Bill Finger Rings
Does folding money damage it?
Folding creates creases, and repeated creasing can make a bill less machine-friendly. If you plan to spend the bill later,
keep the folds clean and avoid tearing, taping, or gluing.
How long does it take to make a money origami ring?
After a little practice, most people can fold a dollar bill ring in about 5–10 minutes.
The first attempt may take longermostly because your fingers will insist on debating each crease like it’s a major life decision.
Can kids do this?
Yes, with supervision for younger kids (paper edges can give tiny paper cuts). It’s a fun way to teach folding skills and patience.
Will it fit any finger?
It can fit most fingers if you adjust the wrap. Very small fingers may be tricky with a $1 bill,
but using a pen to shape the band helps a lot.
Conclusion
A dollar bill finger ring is one of those crafts that’s equal parts clever, goofy, and weirdly satisfying.
You don’t need special tools, you don’t need glue, and you don’t need to be an origami wizardjust follow the 14 steps,
crease with confidence, and tuck that final flap like you mean it.
Whether you’re making a fun money gift, passing time, or just proving you can turn spare change into wearable art,
the dollar bill ring is a small trick with big “wait, how did you do that?” energy.
Extra: Real-World Experiences With Dollar Bill Rings (What Usually Happens)
Folding a dollar bill into a ring sounds simpleuntil you actually try it and realize paper has opinions. The first “experience” most people have is
discovering that a bill isn’t like origami paper. Origami paper is crisp, clean, and cooperative. Currency is… well, currency. It’s slightly thick,
slightly textured, and sometimes feels like it’s been training for a career in resisting your plans. That’s why the most common early moment is
the “Why won’t this crease stay?” stare. The fix is almost always the same: slow down, line up your edges more carefully, and press each fold
firmly before moving to the next one.
Another classic experience: the “gem” keeps drifting. You want that bold little “1” to sit front-and-center like it’s walking a runway.
But if your folds that frame the “1” aren’t even, the “gem” tilts and suddenly your ring looks like it’s winking. People usually solve this by
unfolding just the top section (not the whole ring), re-centering the “1,” and re-creasing. The funny part is that this is exactly how real life works:
you don’t need to restart everythingjust fix the part that’s causing the chaos.
Then there’s the sizing moment, which is basically the craft version of trying on jeans. Too tight? Your finger complains immediately.
Too loose? The ring spins around like it’s searching for a better hand to live on. Most folders learn quickly that ring size lives in the wrap:
where you start wrapping the tail and how snugly you wrap it. A lot of people end up using a marker as a stand-in “ring sizer,” because wrapping
around a stable cylinder helps you get a smoother, rounder band. After that, sliding it onto your finger feels less like crumpling a dollar
and more like actually wearing something intentional.
If you’ve ever seen someone fold a ring at a party, you’ve probably noticed how it becomes a mini performance. Someone asks, “What are you doing?”
and suddenly you’re surrounded by curious onlookers. The best part is that money origami is naturally suspenseful: the bill looks like a random strip
right up until the final tuck, and thenboomit’s a ring. That last step, when you lock the tail into the pocket, is usually the “wow” moment.
It’s also the moment you learn whether your creases were strong enough. If the tuck slips out, you get a quick lesson in making sharper folds.
Finally, there’s the “what now?” experience. People often take photos, wear it for a bit, and then decide whether they want to keep it or unfold it.
If it’s meant as a money gift, it usually becomes part of the presentationtucked into a small box, placed on a card, or handed over with a joke
about being “engaged” to savings. If it’s just for fun, it becomes a desk trophy: proof that you can turn an ordinary dollar into something
unexpectedly charming. Either way, the biggest takeaway is that this craft rewards practice fastyour second ring will look dramatically better than
your first, and your third will make you feel like you should be paid in tips (preferably in crisp bills).


