Table of Contents >> Show >> Hide
- What Is Fondant, Exactly?
- Before You Start: What You Need
- Step 1: Start With the Right Cake
- Step 2: Level, Fill, and Crumb Coat
- Step 3: Create a Smooth Final Base
- Step 4: Knead the Fondant Until It Behaves
- Step 5: Roll Fondant to the Right Size and Thickness
- Step 6: Drape the Fondant Over the Cake
- Step 7: Trim the Excess and Finish the Base
- Common Fondant Problems and How to Fix Them
- Expert Tips for Better Fondant Cakes
- How to Make Fondant Taste and Look Better
- Decorating Ideas Once the Cake Is Covered
- Final Thoughts
- Real-Life Experiences: What Fondanting a Cake Actually Feels Like
- SEO Tags
Fondant has a reputation. Some bakers treat it like a magical finishing cape. Others treat it like a sugary stress blanket that tears the moment you make eye contact. The truth lives somewhere in the middle. Fondant can make a cake look polished, elegant, and straight-up bakery-level gorgeous, but only if the cake underneath is solid, the surface is smooth, and you stop trying to wrestle it like a fitted bed sheet.
If you want to learn how to fondant a cake like an expert, you do not need a television studio, twelve cameras, or a whispered countdown from a judge named Nigel. You need the right prep, a little patience, and a few practical tricks that keep fondant from cracking, bulping, sliding, or turning your beautiful layer cake into a dessert-shaped cry for help.
This guide walks you through the full process, from choosing the right base and frosting to rolling, draping, smoothing, trimming, and decorating. Whether you are fondanting a birthday cake, wedding cake, baby shower cake, or simply trying to prove to yourself that you can, this step-by-step tutorial will help you get a clean finish and a lot more confidence.
What Is Fondant, Exactly?
Fondant is a pliable sugar paste used to cover and decorate cakes. Rolled fondant is the version most home bakers mean when they talk about fondant cake decorating. It creates that sleek, smooth finish you see on celebration cakes with sharp edges, perfect sides, and decorations that look almost too neat to eat.
There are different types of fondant, but for covering a cake, rolled fondant is the star of the show. You can buy it ready-made, which is the easiest route for beginners, or make marshmallow fondant at home if you want a softer, sweeter flavor and a lower grocery-store drama level.
The biggest misconception is that fondant alone makes a cake look professional. It does not. Fondant is more like the final coat of paint. If the wall underneath is lumpy, the paint is not saving the day.
Before You Start: What You Need
To fondant a cake successfully, gather your tools before the sugar circus begins. You will need a fully cooled cake, buttercream or ganache, fondant, a rolling pin or fondant roller, a cake turntable if you have one, a smoother, a sharp knife or pizza wheel, and a little cornstarch or powdered sugar for dusting your work surface.
You do not need every fancy cake gadget on the internet. But a few tools do make life easier:
Helpful tools for a smoother fondant finish
- A fondant smoother for pressing out air pockets and polishing the surface
- An offset spatula for frosting the cake evenly
- A bench scraper for straighter sides before the fondant goes on
- A turntable for easier rotation while smoothing
- A silicone mat or clean counter for rolling
- A small pin or scribe tool for popping trapped air bubbles
If your kitchen runs warm, keep that in mind too. Fondant and heat are not best friends. They tolerate each other at parties, but just barely.
Step 1: Start With the Right Cake
If you want to fondant a cake like an expert, begin with a cake that can handle being dressed for the occasion. Soft, ultra-airy cakes are lovely to eat but not always ideal under fondant. You want a cake with enough structure to hold its shape when stacked, frosted, chilled, and covered.
Good candidates include vanilla butter cake, chocolate cake, pound-cake-style celebration layers, and other sturdy bakes. Very tender sponge cakes can work, but they need more careful handling. If your cake crumbles when you look at it sideways, save the fondant for another day.
Also, never try to cover a warm cake. Warmth melts frosting, creates moisture, and turns fondant application into a glossy slip-and-slide you did not ask for.
Step 2: Level, Fill, and Crumb Coat
This is the step that separates smooth fondant cakes from cakes that look like they were upholstered in a hurry.
Level your cake layers so the top is flat. Stack them with your filling of choice, making sure the layers are aligned. Then apply a thin crumb coat of buttercream or ganache all over the cake. This locks in loose crumbs and gives the fondant something to stick to.
A crumb coat should be thin, neat, and intentional. You are not trying to frost for beauty yet. You are laying down the first tidy layer so your final finish does not pick up cake crumbs like a lint roller on a black sweater.
Buttercream vs. ganache under fondant
Both work well, but they behave a little differently:
- Buttercream is easier for most home bakers, softer to spread, and forgiving.
- Ganache firms up beautifully and can create extra sharp edges, which is why many decorators love it for polished cakes.
Whichever you use, make it smooth. Then chill the cake until the coating is firm. A chilled cake is easier to cover, easier to handle, and far less likely to sag while you work.
Step 3: Create a Smooth Final Base
After the crumb coat sets, add a second, smoother coat of frosting or ganache. This layer matters. Fondant does not magically hide dents, bulges, dips, or dramatic topography. If the buttercream looks uneven, the fondant will show it off like it is proud.
Use an offset spatula and scraper to get the surface as even as possible. Aim for straight sides and a flat top. Chill the cake again so the exterior becomes firm but not rock hard.
Professional-looking fondant cakes are built on boring excellence: even layers, clean lines, and patient smoothing. Glamour enters the chat later.
Step 4: Knead the Fondant Until It Behaves
Cold fondant can crack. Dry fondant can tear. Overly soft fondant can sag and stretch. Before rolling, knead the fondant until it feels smooth, elastic, and easy to shape. If it is stiff, warm it slightly with your hands. If it is sticky, dust lightly with powdered sugar or cornstarch. Lightly is the key word here. Too much dusting can dry the fondant out and leave a chalky finish.
If you are coloring fondant, knead in gel food coloring before rolling. Wear gloves unless you want your hands to look like you lost an argument with a highlighter.
Step 5: Roll Fondant to the Right Size and Thickness
Roll the fondant on a clean, lightly dusted surface. Turn it as you go to prevent sticking and to keep the shape even. For a round cake, aim for a round piece of fondant. For a square cake, do not roll a mysterious oval and hope for the best. Match the shape to the cake.
A good target thickness is thin enough to look elegant but thick enough not to tear when lifted. For most cakes, that means a smooth, even sheet that feels flexible rather than bulky. Too thick and it looks clumsy. Too thin and it becomes emotional.
Make sure the rolled fondant is large enough to cover the top and sides with a little extra at the bottom. Running out by one inch is the kind of tiny tragedy that becomes very loud very quickly.
Step 6: Drape the Fondant Over the Cake
Once rolled, loosely lift the fondant over your rolling pin and drape it over the chilled cake in one confident move. This is not the moment for hesitation. Center it quickly and let it settle over the top and sides.
Do not tug downward immediately. Start by smoothing the top first. Then gently work down the sides, lifting and easing the fondant outward as needed so it does not bunch up and create pleats. Think of it as encouraging the fondant into place, not punishing it into submission.
How to smooth fondant without wrinkles
- Start at the top center and work outward
- Smooth the sides gradually, a little at a time
- Lift the lower edge gently if folds form
- Use your hands first, then a smoother for refinement
- Keep rotating the cake instead of overhandling one spot
If you trap a small air bubble, prick it with a clean pin and smooth it flat. Tiny fix. Big relief.
Step 7: Trim the Excess and Finish the Base
Once the fondant is smooth, trim the excess at the base with a sharp knife or pizza wheel. Cut close to the cake without hacking at it like you are clearing jungle vines. Clean, controlled trimming gives the cake a far better finish.
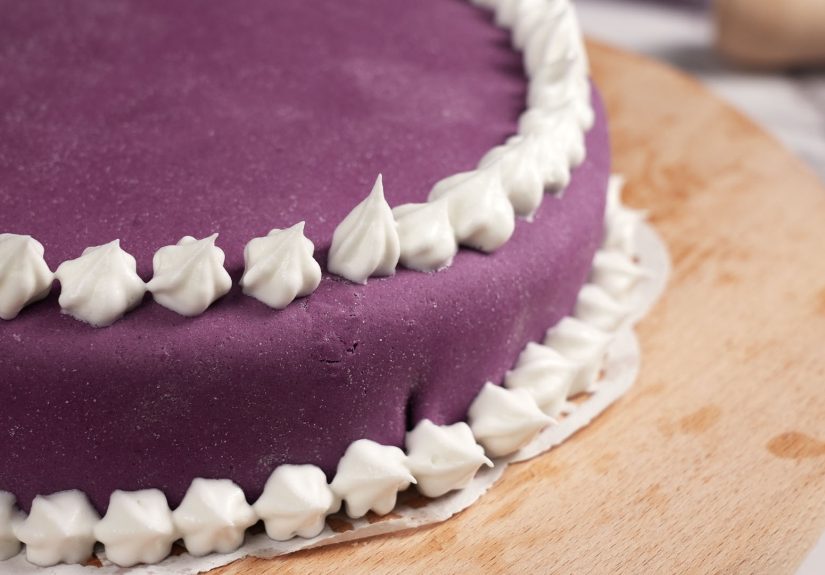
At this stage, use your smoother to polish the surface and sharpen the edges if that is the look you want. If the cake will sit on a board, you can add a fondant border, piped shell border, ribbon, or decorative trim to hide the seam at the bottom.
Common Fondant Problems and How to Fix Them
Cracks
Usually caused by fondant that is too dry, too cold, or stretched too aggressively. Knead more before using, avoid over-dusting the surface, and patch tiny cracks with a dab of shortening or gentle smoothing.
Tears
Tears often happen when fondant is rolled too thin or pulled too hard over the cake. Small tears can be patched with a bit of matching fondant and blended carefully. Large tears are your sign to re-roll and try again before things get worse.
Elephant skin texture
That wrinkled, dry look often appears when fondant loses moisture or is overworked. A little vegetable shortening on your fingertips can help soften and smooth the surface.
Bulges around the middle
Bulges may come from overfilled layers, trapped air, or a soft filling that shifts. Chill the cake well before covering and avoid overstuffing it like a suitcase before vacation.
Sticky fondant
Humidity is often the culprit. Work in a cool room, use fans if needed, and dust sparingly. Sticky fondant plus steam equals sadness.
Expert Tips for Better Fondant Cakes
- Use a turntable: It helps you smooth evenly without putting fingerprints all over the cake.
- Chill between steps: A firm cake is easier to cover cleanly.
- Keep decorations separate at first: Make bows, flowers, or figures ahead of time so they can dry and hold shape.
- Do not flood the surface with dusting powder: You want control, not a snowstorm.
- Store carefully: Keep the finished cake in a cool, dry place, protected from moisture and direct heat.
- Practice on a small cake: A six-inch round is less intimidating and far cheaper than a three-tier “learning experience.”
How to Make Fondant Taste and Look Better
Let us address the sugary elephant in the room: some people love the look of fondant more than the taste. Fair enough. You can improve the eating experience by keeping the fondant layer relatively thin, pairing it with flavorful cake and frosting, and using fondant mainly where you want structure and visual drama.
You can also add personality with texture, painted details, embossed patterns, cutouts, ruffles, or molded decorations. Fondant does not have to mean plain white perfection. It can be whimsical, colorful, modern, classic, or gloriously over-the-top.
Decorating Ideas Once the Cake Is Covered
Once your cake is smoothly covered, you have a blank canvas. A very edible, slightly bossy canvas, but a canvas all the same.
- Use cutters to add stars, flowers, hearts, or geometric shapes
- Layer strips for ribbons, bows, or quilted effects
- Dust with luster for a soft sheen
- Paint details with food color mixed into a tiny bit of clear extract
- Add piped buttercream borders for contrast
- Create a clean modern cake with almost no decoration at all
The best part of learning how to fondant a cake like an expert is realizing that “expert” does not mean “perfect.” It means intentional. It means knowing how to prep, how to fix problems, and how to make the cake look finished instead of frantic.
Final Thoughts
Fondant cake decorating gets much easier once you stop expecting magic and start respecting method. Great fondant work begins long before the sugar paste touches the cake. It starts with a stable bake, level layers, a smooth crumb coat, patient chilling, and steady hands. From there, fondant becomes less of a mystery and more of a technique.
So if your first attempt has a wrinkle, a tiny crack, or one suspicious side that looks better in low lighting, welcome to the club. That is still progress. The next cake will be easier. The one after that will be smoother. And before long, you will be casually covering cakes with the kind of confidence that makes other people say, “Wait, you made that?”
Yes. Yes, you did. And it looks fantastic.
Real-Life Experiences: What Fondanting a Cake Actually Feels Like
There is a funny gap between reading about fondant and actually using it. On paper, it sounds delightfully simple: bake cake, frost cake, roll sugar blanket, drape sugar blanket, admire masterpiece. In real life, the experience is a little more dramatic and a lot more educational.
The first time many people cover a cake with fondant, they discover that cake decorating is part baking, part sculpture, and part emotional negotiation. You roll the fondant out thinking you are in control, then suddenly it sticks to the counter, folds over itself, or lands on the cake slightly off-center and dares you to stay calm. And yet, that is exactly how skill is built. You learn by touching the material, noticing how it stretches, seeing how quickly warmth affects it, and recognizing that small movements matter.
One of the most common experiences is realizing that the cake underneath is everything. A baker can spend twenty minutes lovingly smoothing fondant only to discover the side still looks bumpy because the buttercream below was uneven. It is a humbling moment, but also a useful one. After that, the prep work stops feeling boring and starts feeling powerful. Suddenly, leveling layers and scraping smooth sides feels less like a chore and more like laying the foundation for a polished result.
Another familiar fondant experience is the moment of almost-panic when wrinkles form around the base. Every beginner thinks, “Well, this is how the cake ends.” Then they gently lift the fondant edge, smooth outward, rotate the cake, and watch the wrinkle disappear. That tiny recovery changes everything. It teaches you that fondant is not always ruined just because it misbehaves for a minute. Sometimes it just needs a calmer pair of hands.
Then there is the oddly satisfying part: the smoothing. Once the fondant settles over the cake and the surface starts to look sleek, something clicks. The cake begins to look intentional, elegant, and celebratory. Even simple decorations seem fancier on a fondant-covered cake. A plain ribbon border can look like a bakery touch. A few cutout flowers can look custom. A smooth white finish can make a home kitchen feel like a pastry studio for an afternoon.
Perhaps the best experience of all comes when you place the finished cake on the table and people react before the knife ever comes out. Fondant-covered cakes have presence. They look special. They announce that this is not an ordinary Tuesday dessert, even if it absolutely is an ordinary Tuesday and you simply chose chaos and sugar art. That reaction makes the practice worthwhile.
With time, fondant stops feeling intimidating and starts feeling familiar. You learn how thick you like to roll it, how cold the cake should be, how fast your kitchen warms up, and when to stop fussing with the surface. That kind of experience cannot be rushed, but it can be earned one cake at a time. And honestly, that is part of the fun.