Table of Contents >> Show >> Hide
- Why Bicycle Wheels Make Great Yard Art
- Tools and Materials You Will Need
- Step 1: Choose the Right Bicycle Wheel
- Step 2: Remove the Tire, Tube, and Loose Parts
- Step 3: Clean and Prep the Metal
- Step 4: Prime and Paint for Outdoor Durability
- Step 5: Pick a Design Style
- Step 6: Attach Decorations Securely
- Step 7: Make It Spin, Hang, or Stand
- Step 8: Weatherproof and Maintain Your Yard Art
- Creative Bicycle Wheel Yard Art Ideas
- Common Mistakes to Avoid
- Budget Tips for Bicycle Wheel Yard Art DIY
- Experience Notes: What Actually Makes This Project Work Better
- Conclusion
- SEO Tags
An old bicycle wheel may look like garage clutter, but in the garden it has serious star potential. With its perfect circle, delicate spokes, and built-in ability to spin, a bike wheel is practically begging to become yard art. Give it a little paint, a few beads, some recycled trinkets, and a sturdy place to hang, and suddenly you have a handmade garden feature that catches light, moves with the breeze, and makes your neighbors slow down just enough to wonder, “Wait… is that a bicycle wheel?”
This bicycle wheel yard art DIY project is inexpensive, beginner-friendly, and wonderfully forgiving. You do not need to be a professional welder, metalworker, or person who owns twelve mysterious clamps. You only need a clean wheel, outdoor-safe materials, basic hand tools, and a creative plan. Whether you want a colorful garden spinner, a boho wind chime, a fence-mounted flower, or a rustic piece of recycled yard art, the process is simple: clean it, protect it, decorate it, balance it, and display it safely.
Best of all, this project turns something headed for the scrap pile into cheerful upcycled garden decor. It is the kind of DIY that makes your yard more personal without demanding a major budget. Let’s turn that forgotten wheel into a garden conversation piece with a little style, a little sparkle, and absolutely no need to apologize for having paint on your elbows.
Why Bicycle Wheels Make Great Yard Art
A bicycle wheel is already designed for movement, symmetry, and strength. That makes it a fantastic base for outdoor art. The rim creates a strong circular frame, the spokes offer dozens of attachment points, and the hub can act as the center for hanging, mounting, or spinning. Unlike a flat board or plain wreath frame, a bike wheel has built-in structure and visual rhythm.
It also works with many garden styles. Painted white, it feels cottage-inspired. Painted black, it looks modern and sculptural. Wrapped with copper wire and beads, it becomes bohemian. Left slightly weathered and sealed, it fits a rustic farmhouse yard. Add faux flowers and it becomes a giant garden bloom. Add dangling keys, shells, spoons, washers, or bottle caps and it becomes a wind chime with personality.
Another advantage is cost. Many bike shops replace bent or damaged wheels and may be willing to sell or give away unusable ones. Thrift stores, garage sales, online marketplaces, and your own storage shed are also good places to look. For yard art, the wheel does not need to be roadworthy. It only needs to be structurally stable enough to hold decorations and hang securely.
Tools and Materials You Will Need
Before you begin, gather your supplies. Having everything nearby prevents the classic DIY migration pattern: garage, kitchen, garage, junk drawer, garage, hardware store, garage again.
Basic Materials
- One old bicycle wheel, tire and tube removed
- Dish soap, water, sponge, and rags
- Wire brush or sandpaper for rust and grime
- Outdoor metal primer
- Exterior spray paint or outdoor enamel paint
- Clear outdoor sealant, optional but helpful
- Floral wire, galvanized wire, zip ties, or UV-resistant fishing line
- Beads, bottle caps, faux flowers, keys, bells, shells, old flatware, washers, charms, or small ornaments
- S-hook, swivel hook, shepherd’s hook, fence bracket, or garden stake for display
Useful Tools
- Pliers or needle-nose pliers
- Wire cutters
- Drill with small bits, if you need holes in bottle caps or flat pieces
- Gloves and eye protection
- Drop cloth or cardboard for painting
- Masking tape or painter’s tape
Choose decorations that can survive outdoors. Glass beads, metal charms, plastic beads, acrylic pieces, and weather-resistant faux flowers usually work well. Paper, untreated fabric, and indoor-only ornaments may look great for two days and then surrender dramatically after the first rainstorm.
Step 1: Choose the Right Bicycle Wheel
Start with a wheel that is safe to handle. A little rust is fine. A dramatic wobble is fine if you are hanging it as stationary art. But avoid wheels with jagged broken spokes, sharp cracked rims, or loose metal pieces that could fall off. Yard art should be charming, not a tetanus-themed obstacle course.
A front wheel is often easier to use because it usually has a simpler hub. A rear wheel can still work, but it may have a gear cassette attached. You can leave it on for an industrial look or remove it if you have the right tool. For most beginners, a plain front wheel is the easiest starting point.
Size matters too. A small children’s bike wheel makes cute fence art or a porch accent. A standard adult wheel creates a bold garden focal point. Multiple wheels in different sizes can become a stacked flower, a kinetic wall piece, or a playful “wheel garden” mounted along a fence.
Step 2: Remove the Tire, Tube, and Loose Parts
For a clean, open look, remove the rubber tire and inner tube. Deflate the tube first if it still has air. Use tire levers or a flat tool carefully to lift the tire bead over the rim. Once the tire is off, pull out the tube and rim strip if it is worn or dirty.
You can keep the tire if you want a chunky wreath-style design, but bare metal is better for a bike wheel garden spinner because it catches the light and gives you more places to attach decorations. Bare rims are also easier to paint evenly.
Inspect the spokes. Tighten any that are wildly loose, or remove broken ones with pliers. If a spoke has a sharp end, bend it inward, file it smooth, or remove it completely. Safety is not the glamorous part of DIY, but neither is explaining to guests why your garden art bit them.
Step 3: Clean and Prep the Metal
Cleaning is the secret to a finish that lasts. Dirt, oil, and rust can prevent primer and paint from sticking. Wash the wheel with warm water and dish soap, scrubbing around the hub and spoke intersections. Rinse it well and let it dry completely.
Next, remove loose rust with a wire brush or sandpaper. You do not have to make the wheel look brand-new, but you should get rid of flaky rust and rough debris. Light sanding also helps primer grip the metal. If the wheel has old paint, scuff the glossy areas so the new coating has something to hold onto.
Wipe the wheel with a clean rag before painting. If it feels greasy, use a suitable cleaner and let it dry. Paint and moisture are not friends. Paint and grease are not friends either. Paint is picky, but when treated properly, it rewards you with a smooth, durable finish.
Step 4: Prime and Paint for Outdoor Durability
Because your bicycle wheel yard art will live outside, use products made for metal and exterior exposure. A metal primer helps the paint adhere and adds protection against rust. If the wheel is heavily rusted, choose a primer designed for rusty metal. If the wheel is clean or lightly scuffed, a clean-metal primer works well.
Set the wheel on a drop cloth or hang it from a temporary hook for easier coverage. Apply light coats rather than one heavy coat. Heavy coats drip, puddle, and create that “I panicked with a spray can” texture. Spray in steady passes, keeping the can moving and overlapping slightly. Let each coat dry according to the product directions.
After primer, add two or more light coats of exterior metal paint. Bright colors such as turquoise, red, yellow, and purple pop beautifully against greenery. Metallic copper, bronze, silver, or matte black create a more sculptural look. For a flower design, paint the rim one color and the hub another. For a sunburst effect, use yellow or gold on the rim and orange accents on the spokes.
A clear outdoor sealant can help protect decorative paint, especially if your wheel will sit in full sun or heavy rain. It is not always required, but it is useful when you have added hand-painted details, glitter paint, or multiple decorative finishes.
Step 5: Pick a Design Style
Now comes the fun part: deciding what your wheel wants to become. Yes, your bicycle wheel has opinions now. That is normal in advanced DIY.
Option 1: Bicycle Wheel Garden Spinner
For a spinner, keep the design lightweight and balanced. Attach small beads, reflective discs, acrylic gems, or narrow ribbons to the spokes. Use a swivel hook at the top so the wheel can rotate freely in the wind. You can hang it from a tree branch, pergola, shepherd’s hook, or porch beam.
Option 2: Giant Metal Flower
Paint the rim as the flower outline and the spokes as petals. Add a large decorative center to the hub using a metal lid, cabinet knob, painted wooden circle, or old saucer. Mount the wheel on a fence or attach it to a sturdy stake. Place it behind real plants for a layered garden-bed look.
Option 3: Wind Chime Wheel
Hang strings of keys, spoons, bells, sea glass, shells, washers, or bottle caps from the lower half of the wheel. Vary the lengths so the pieces move independently. Keep heavier items close to the bottom center to reduce twisting. This version adds gentle sound as well as movement.
Option 4: Stained-Glass Inspired Wheel
Use translucent plastic pieces, colored acrylic gems, glass beads, or faux stained-glass paint on clear plastic shapes. Attach them between the spokes so sunlight shines through. This style looks especially good near a patio, where morning or afternoon light can turn the wheel into a little garden kaleidoscope.
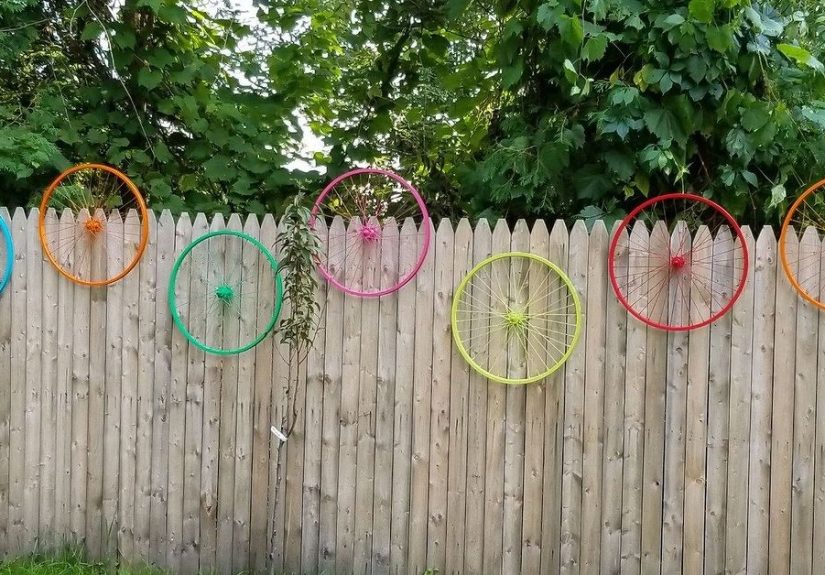
Option 5: Fence-Mounted Recycled Yard Art
If wind is strong in your area, mount the wheel flat against a fence or shed wall. Decorate it with faux flowers, small planters, painted bottle caps, or seasonal accents. This gives you a strong visual feature without worrying about swinging or spinning.
Step 6: Attach Decorations Securely
Use attachment methods that can handle wind, rain, and temperature changes. Floral wire and galvanized wire are excellent for metal-to-metal connections. UV-resistant zip ties are quick and reliable, especially for faux flowers. Fishing line creates a floating look, but choose a strong outdoor line and inspect it occasionally.
When attaching decorations, think about balance. If you place a cluster of heavy items on one side, the wheel may hang crooked or spin unevenly. That can be artistic, but it can also look like the project had a long day. Distribute weight around the circle, then hold the wheel up and see how it hangs before making final adjustments.
For bottle caps, drill small holes near the edge and wire them to the spokes. For beads, string them onto wire and twist the ends around the rim. For old flatware, drill holes in the handles or wrap wire tightly around the necks. For faux flowers, remove bulky stems and wire the flower heads directly to the spokes or rim.
Step 7: Make It Spin, Hang, or Stand
How you display your bicycle wheel yard art depends on the design. A hanging spinner needs a secure overhead support and a swivel hook. A wind chime wheel needs enough clearance so dangling parts do not hit walls, windows, or people. A fence-mounted wheel needs screws, brackets, or heavy-duty hooks that can support the weight.
For a garden stake display, attach the hub or rim to a metal pole, wooden post, or rebar stake. Make sure the stake is deep enough in the ground to resist wind. In soft soil, drive it at least several inches deeper than you think you need. Outdoor art has a way of testing your confidence during storms.
If you want the wheel to rotate on a post, you will need a more advanced setup using a bolt, washers, and a loose-but-secure connection through the hub. Keep the wheel free enough to move but not so loose that it rattles dangerously. Beginners may prefer a hanging swivel because it is simpler and usually works well.
Step 8: Weatherproof and Maintain Your Yard Art
Even good outdoor paint benefits from occasional care. Once or twice a season, check the wheel for rust spots, loose decorations, worn wires, and faded finishes. Touch up paint where needed. Replace brittle zip ties or frayed line. If your area has harsh winters, consider storing delicate versions in a garage or shed during the coldest months.
Wind is the biggest challenge for hanging yard art. If a storm is coming, take down lightweight spinners or move them to a sheltered spot. A bicycle wheel may be light, but with dangling decorations it can act like a tiny garden sail. Secure mounting keeps the art beautiful and keeps your tomato plants from experiencing a surprise bicycle-wheel ambush.
Creative Bicycle Wheel Yard Art Ideas
Once you have made one wheel, you may start seeing every round object as a future masterpiece. That is how DIY gets you. Here are a few specific ideas to try:
- Pollinator garden wheel: Paint the wheel yellow and orange, then attach metal bees, butterflies, and faux blooms.
- Moon garden wheel: Use white, silver, and pale blue decorations that glow softly at dusk.
- Farmhouse wheel: Keep the rim rustic, add jute twine, neutral faux flowers, and an old drawer pull at the hub.
- Kids’ art wheel: Let children paint wooden shapes, then wire them to the spokes for a family-made garden display.
- Bird-friendly sparkle wheel: Use reflective but secure accents near vegetable beds to add movement and shine.
- Seasonal wheel: Swap decorations throughout the year: flowers for spring, flags for summer, leaves for fall, ornaments for winter.
Common Mistakes to Avoid
Skipping Surface Prep
Paint applied over dirt, rust flakes, or oil will not last. Clean and sand first. It is less exciting than decorating, but it makes the final result look polished instead of temporary.
Using Indoor Decorations Outside
Indoor ribbon, paper flowers, untreated wood, and cheap ornaments often fade or fall apart outdoors. Choose weather-resistant materials whenever possible.
Making It Too Heavy
A bicycle wheel can hold a surprising amount, but heavy objects create stress on wires, hooks, and spokes. For hanging art, lighter is usually better.
Ignoring Sharp Edges
Cut wire ends, drilled metal, broken spokes, and bottle caps can be sharp. Bend, file, cover, or position them safely. Your yard art should attract compliments, not bandages.
Hanging It Where It Can Hit Something
Leave enough room for movement. A spinner near a window, glass door, parked car, or walkway may become a problem on windy days.
Budget Tips for Bicycle Wheel Yard Art DIY
This project can be extremely affordable if you use what you already have. Look through junk drawers, toolboxes, craft bins, and recycling containers before shopping. Old keys, buttons, beads, jar lids, washers, broken jewelry, curtain rings, and hardware scraps can all become decorative details.
Ask local bike shops whether they have damaged wheels they cannot repair. Visit thrift stores for old necklaces, metal trays, holiday ornaments, and faux flowers. Check garage sales for flatware, bells, and garden hooks. One person’s odd little box of rusty washers is another person’s modern kinetic sculpture. That is practically the constitution of DIY.
Spend money where it matters: primer, outdoor paint, sturdy hooks, and safe hanging hardware. These items determine whether your project lasts one season or several. Decorations can be playful and inexpensive, but the structure should be reliable.
Experience Notes: What Actually Makes This Project Work Better
After making and studying projects like this, the biggest lesson is that bicycle wheel yard art looks best when it has a clear personality. The wheel itself is visually busy because of all the spokes, so a random pile of decorations can quickly become confusing. Before attaching anything, place the wheel flat on the ground and arrange your pieces like a rough draft. Step back. Squint a little. If it looks balanced from six feet away, it will probably look good in the garden.
Another practical lesson is that color matters more outdoors than it does on a workbench. A soft pastel bead may look lovely in your hand but disappear completely against mulch, leaves, and shadow. Gardens are full of texture, so yard art needs contrast. Bright paint, metallic finishes, and repeated colors help the wheel stand out. For example, a turquoise rim with copper accents looks bold near green plants. A white wheel with red flowers pops against a dark fence. Black paint with silver chimes feels clean and modern.
Movement is also powerful, but it should be controlled. A wheel that spins gently is beautiful. A wheel that bangs, twists, and clatters all night will make you question your life choices at 2 a.m. If you are making a wind chime, test the sound before hanging it permanently. Keys and thin spoons create a brighter sound. Shells and beads are softer. Bottle caps are fun but can become noisy in strong wind. If your yard is breezy, hang fewer pieces and keep them shorter.
Placement can make or break the project. A bicycle wheel spinner looks wonderful where sunlight can pass through it, such as near a patio, along a garden path, or in front of a plain fence. Avoid hiding it in a crowded flower bed unless the wheel is large or painted in a strong color. The best spot is usually one with a simple background. Think of the fence, hedge, or shed wall as the stage and the wheel as the performer. Even recycled yard art enjoys good lighting.
Durability comes down to patience. Let paint cure properly before wiring on decorations. If you rush, wire can dig into soft paint and leave marks. Also, do not trust one tiny twist of wire for a heavy object. Use two connection points whenever possible. For faux flowers, remove extra plastic stems because they catch wind. For beads, use wire instead of cotton string. For anything sharp, cover the edge or place it where hands will not brush against it.
Finally, embrace imperfection. The most charming bicycle wheel yard art DIY projects do not look factory-made. They look discovered, reimagined, and loved. A slightly uneven flower, a quirky old key, or a mismatched bead can give the piece its character. The goal is not to create museum-grade sculpture. The goal is to give your garden a handmade focal point that makes you smile every time you water the basil. If it does that, congratulations: your old wheel has officially retired from transportation and started its second career as yard art.
Conclusion
Learning how to make a bicycle wheel yard art DIY project is really about seeing potential in ordinary things. A worn-out wheel becomes a spinner. A handful of bottle caps becomes color. Old keys become music. With cleaning, priming, painting, and secure decorating, you can create outdoor art that is affordable, personal, and durable enough to enjoy through the seasons.
Start simple with one wheel, one color palette, and one display spot. Once you understand how the wheel hangs, balances, and moves, you can experiment with more detailed designs. Make a flower for the fence, a wind chime for the porch, or a sun-catching spinner for the garden path. Your yard does not need expensive decor to feel special. Sometimes all it needs is an old bike wheel, a little imagination, and permission to be delightfully weird.


