Table of Contents >> Show >> Hide
- Why a Patriotic Patchwork Quilt Flag Is Such a Great Project
- Supplies You Will Need
- Choose Your Size Before You Cut Anything
- How to Make a Patriotic Patchwork Quilt Flag Step by Step
- Best Design Tips for a Beautiful Quilt Flag
- Common Mistakes to Avoid
- Where and How to Display Your Patriotic Quilt Flag
- What Quilters Often Experience While Making This Project
- Final Thoughts
Some home décor whispers. A patriotic patchwork quilt flag does not. It proudly hangs on your wall, brightens a porch bench, livens up a guest room, and announces to visitors that yes, someone in this house owns both a rotary cutter and strong opinions about fabric placement.
If you love quilting and want a project that feels festive, meaningful, and wonderfully stash-friendly, a quilted flag is a fantastic make. It combines the cozy charm of patchwork with the instantly recognizable appeal of stars, stripes, and classic Americana color. Better yet, it works for beginners and seasoned quilters alike. You can keep it simple with strip piecing and appliqué stars, or go full overachiever and piece every star like you are auditioning for the Olympics of pressing seams.
In this guide, you will learn how to make a patriotic patchwork quilt flag from start to finish, including fabric selection, cutting strategy, construction tips, quilting ideas, and finishing methods. You will also find practical advice for avoiding common mistakes, styling your finished quilt flag, and making the project feel personal rather than cookie-cutter. Because no one dreams of sewing a memorable heirloom that looks like it was assembled during a power outage.
Why a Patriotic Patchwork Quilt Flag Is Such a Great Project
A quilt flag hits the sweet spot between decorative and sentimental. It is more polished than a last-minute holiday garland, but much faster than a full-size bed quilt. It is also an ideal scrap quilt project because red, white, and blue fabrics tend to multiply in stashes like they pay rent.
Another reason this project works so well is flexibility. You can make a wall hanging, table topper, porch accent, mini quilt, or lap-size statement piece. Some quilters prefer a literal flag-inspired look with thirteen stripes and a navy canton. Others go more folk-art, using weathered prints, pieced stars, or intentionally scrappy fabrics for a vintage Americana effect. Both approaches look terrific when the color balance is strong and the construction is neat.
And let us not ignore the emotional appeal. The colors carry history and symbolism, and they also happen to look fantastic together. Red brings warmth and energy, white provides breathing room, and blue keeps everything grounded. In quilting terms, this palette is the little black dress of summer sewing: classic, flattering, and somehow always invited.
Supplies You Will Need
Basic Materials
- 100% cotton quilting fabric in red, white, and blue
- Rotary cutter, acrylic ruler, and self-healing mat
- Sewing machine with a reliable quarter-inch seam
- Coordinating thread
- Iron and pressing surface
- Batting, preferably low-loft for a crisp wall hanging
- Backing fabric
- Binding fabric
- Fabric marker or chalk pencil
- Optional fusible web for appliqué stars
- Optional hanging sleeve or corner tabs
Fabric Suggestions
For the most visually interesting result, mix solids, small-scale prints, ticking stripes, stars, ginghams, florals, or faded reproduction-style fabrics. A patriotic quilt flag looks richer when the reds are not all the same red and the blues are not all shouting at the same volume. Think choir, not traffic jam.
If you are working from precuts or scraps, sort your fabrics by value as well as color. You want enough contrast that your stripes read clearly from across the room. White or cream fabrics should be distinctly lighter than the reds and blues. If everything lands in the middle, your quilt may say “patriotic” only after a long explanation and three cups of coffee.
Choose Your Size Before You Cut Anything
Before the first strip gets sliced, decide how the quilt flag will be used. A wall hanging is the easiest place to start because it is manageable, fast, and forgiving. A good beginner-friendly size is about 39 by 26 inches. That scale gives you enough room for visual impact without forcing your dining table to become a fabric airport runway.
For this sample project, use these finished design goals:
- Finished size: 39 inches wide by 26 inches tall
- Thirteen finished stripes at 2 inches tall each
- Blue canton at 15 inches wide by 14 inches tall
- Simple appliqué or pieced stars for the upper-left section
Because quilting uses seam allowances, cut your stripe pieces at 2.5 inches tall. That extra half inch is your seam allowance doing its quiet, underappreciated job in the background, like a stage manager in black clothing.
How to Make a Patriotic Patchwork Quilt Flag Step by Step
Step 1: Plan the Layout
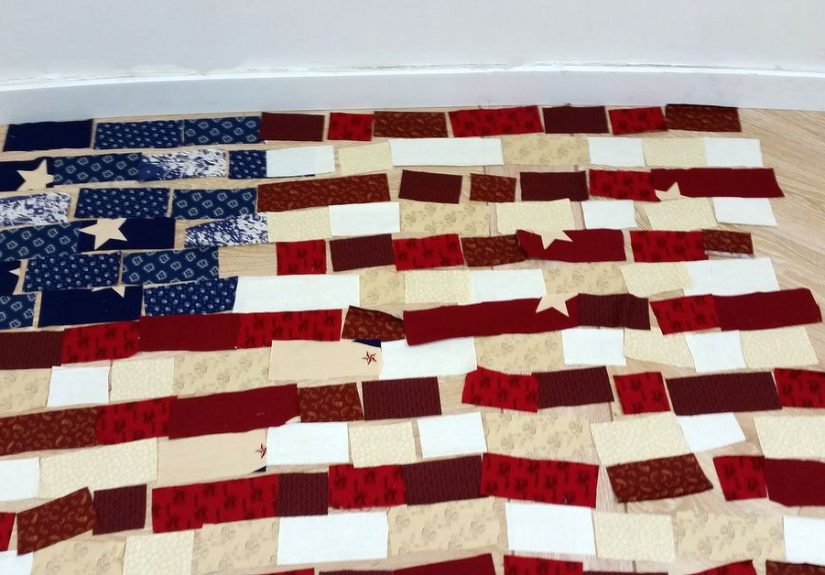
A traditional flag-inspired layout is straightforward: alternating red and white horizontal stripes with a navy blue rectangle in the upper-left corner. For a quilted version, you can either make the stripes full width and add the canton over the upper section, or piece the top in left and right sections so the blue field and shorter stripes are structurally built into the top.
The second method usually looks cleaner in patchwork. To do that, divide the top into two zones:
- The left upper section is the navy canton with stars
- The right upper section is short stripe units
- The lower portion is full-width stripes
Lay your fabrics out before sewing. Move them around until the colors feel balanced. This is the moment to rescue yourself from placing the loudest novelty print directly next to the calmest cream and wondering later why one stripe seems to be hosting its own fireworks show.
Step 2: Cut the Stripes and Canton
From your red and white fabrics, cut thirteen strips at 2.5 inches tall. Some of these will be full-width strips for the lower part of the quilt, and some will be shorter pieces for the upper right side beside the canton.
A practical cutting approach is:
- Cut several full-width strips at 39.5 inches long for the lower stripes
- Cut several shorter strips at 24.5 inches long for the top-right section
- Cut one navy rectangle at 15.5 by 14.5 inches for the canton
You do not have to follow these measurements like they were engraved on stone tablets. The beauty of a quilt flag is that it can be inspired by the classic composition without trying to become an official outdoor flag. The goal is visual harmony, not a geometry final exam.
Step 3: Make the Stars
This is where you choose your adventure level.
Beginner option: use fusible appliqué stars. Trace star shapes onto fusible web, iron them onto white fabric, cut them out, and fuse them to the blue canton. Then secure the edges with a satin stitch, blanket stitch, or small zigzag stitch.
Intermediate option: piece small star blocks. This takes more time, but it creates a classic quilt look and adds beautiful texture.
Easy-but-cute option: embroider stars, use mini star buttons for indoor décor only, or even quilt star motifs into the canton rather than adding separate fabric stars.
If you want the project to read clearly as a patriotic patchwork quilt flag, you do not need fifty tiny stars. That path leads directly to eye strain and snack-based bargaining. A smaller number of evenly spaced stars can still create a strong flag-inspired look while keeping the project enjoyable.
Step 4: Sew the Upper Section
Sew the short red and white strips together to create the upper-right striped section. Press the seams carefully after each addition. Consistent pressing matters more than people want to admit. A quilt flag is basically straight lines being judged by other straight lines, so accuracy pays off.
Then sew the navy canton to the left side of that striped section. Match heights carefully and pin well. A scant quarter-inch seam is your friend here. If your seam allowance wanders, the whole top can drift just enough to make alignment annoying later.
Step 5: Sew the Lower Full-Width Stripes
Join the remaining full-width red and white strips in order, pressing seams in alternating directions to help them nest. Once the lower section is assembled, sew it to the upper section. Step back and admire the layout. This is the moment your pile of fabric stops looking like laundry and starts looking like a project with opinions.
Trim the quilt top if necessary so the edges are square. A clean rectangle will make quilting and binding much easier, and easier is a beautiful word in any sewing room.
Step 6: Add Personal Patchwork Details
This step is optional, but it is what transforms a nice project into a memorable one. Consider adding:
- Scrappy strip piecing within each stripe
- Vintage-inspired fabrics for a weathered Americana look
- A pieced border in tiny squares
- One or two memory fabrics from family shirts, aprons, or linens
- Embroidered dates, initials, or a meaningful phrase on the back
These small touches make the quilt feel collected, not mass-produced. The best patriotic décor has personality, not just color coordination.
Step 7: Make the Quilt Sandwich
Layer the backing, batting, and quilt top. Keep the backing and batting larger than the quilt top so you have room to smooth everything properly. Baste using safety pins, spray baste, or fusible batting methods if that suits your workflow.
For a wall hanging, low-loft batting is usually a smart choice because it keeps the piece crisp and prevents bulky corners. If you want a softer, more vintage drape, cotton batting is lovely. If you want the quilt to hang very flat, avoid anything too puffy unless you enjoy wrestling with corners during binding.
Step 8: Quilt It
Quilting can be simple or decorative. Straight-line quilting works beautifully on a patriotic patchwork quilt flag because it echoes the geometry of the design. Try stitching in the ditch between stripes, adding evenly spaced vertical quilting lines, or quilting diagonal lines through the canton.
You can also quilt stars, loops, or gentle waves for a softer folk-art feel. A wavy line pattern can make the piece feel breezy and animated, especially if the quilt will hang in a summer space. Just be sure the quilting supports the design rather than competing with it.
Step 9: Bind and Hang
Trim the quilt sandwich and attach binding. Double-fold binding is durable and polished, and joining binding strips on the diagonal reduces bulk. For a patriotic look, use navy, red, cream, or a striped binding fabric.
If the quilt will hang on a wall, add a sleeve to the back before the final stitching is complete. You can also use corner pockets if you prefer a dowel or small rod. That way your finished piece hangs neatly instead of slouching like it stayed up too late the night before the Fourth of July.
Best Design Tips for a Beautiful Quilt Flag
Use More Than One Shade of Red and Blue
Monotone fabric choices can look flat. A mix of cherry red, barn red, navy, denim blue, cream, and bright white adds visual dimension and makes the patchwork feel more intentional.
Watch Your Fabric Scale
Large prints can overwhelm narrow stripes. Small florals, stars, dots, and textured solids usually work better in this type of project.
Press Early, Press Often
Yes, pressing is boring. So is flossing. Both matter anyway. Crisp seams make stripes cleaner and assembly easier.
Do Not Overcrowd the Canton
If your stars feel cramped, the quilt will look busy. Let the blue field breathe a little. The eye needs a resting place.
Common Mistakes to Avoid
- Ignoring seam consistency: uneven seam allowances distort stripes fast.
- Using fabrics with poor contrast: the design will lose definition.
- Skipping layout checks: always view the design before sewing everything together.
- Overcomplicating the stars: pick a method that matches your patience level.
- Choosing bulky batting for a wall piece: it can make the quilt puffier than you want.
Where and How to Display Your Patriotic Quilt Flag
Once finished, your quilt flag can work in more places than you might expect. Hang it in an entryway, sewing room, guest room, covered porch, mudroom, or above a mantel. Drape it over a ladder, display it on a quilt rack, or use it as a table accent for summer gatherings.
It also makes a thoughtful gift for military families, history lovers, farmhouse décor fans, and anyone who cannot resist red, white, and blue in June and July. Pair it with a handwritten label on the back and suddenly your handmade project becomes the kind of object people keep for years, not just until the sparklers burn out.
What Quilters Often Experience While Making This Project
One of the most interesting things about making a patriotic patchwork quilt flag is how quickly it teaches the difference between “simple” and “easy.” At first glance, it is mostly rectangles, stripes, and a blue box. That sounds suspiciously manageable. Then you start sewing and realize this project is a master class in precision, restraint, and the emotional consequences of one crooked stripe.
Many quilters say the first surprise is how much personality fabric selection adds. Two quilt flags can use the same basic layout and still look completely different. One might feel crisp and graphic with solid fabrics and sharp contrast. Another might feel nostalgic and almost antique when made from faded florals, ticking stripes, and creamy neutrals. That experience often changes the way people think about “theme” quilting. They stop seeing red, white, and blue as limiting and start seeing it as a playground with rules.
Another common experience is realizing that white fabric is a snitch. It reveals everything: lint, stray threads, smudges, uneven seams, and that one tiny clipping you definitely thought you brushed away. Working on this kind of quilt teaches cleaner habits fast. Suddenly the iron is wiped down, the cutting mat gets tidied, and everyone becomes deeply invested in not letting the navy fabric shed onto the cream background like it owns the place.
Quilters also learn that stripe order matters more than expected. A stripe that is slightly too bright, too dark, or too busy can throw off the balance of the whole piece. That sounds dramatic, but it is true. Since the layout is so graphic, small choices become big visual events. You start auditioning strips, swapping them around, stepping back, squinting, and pretending this is all very scientific when in fact you are just following your gut and hoping it has good taste.
Then there is the star situation. Some makers begin with noble ambitions of piecing every star perfectly, only to discover that tiny points require patience, accuracy, and perhaps stronger coffee. Others choose appliqué and feel a wonderful sense of relief, followed by the equally real satisfaction of getting the project done while still liking everyone in the household. Both experiences are valid. One of the best lessons from this quilt is that craftsmanship is not measured by how unnecessarily difficult you make your own life.
Perhaps the most meaningful experience, though, comes at the end. A patriotic patchwork quilt flag often feels more personal than expected. It may remind the maker of family gatherings, summer picnics, military service, old houses, grandparents, parades, or childhood vacations. Even when the quilt is decorative, it tends to carry memory. That emotional connection is part of what makes quilting special. You begin with fabric and measurements, and you end with an object that somehow holds mood, season, and story all at once.
And finally, nearly everyone who finishes one learns the same delightful truth: this project is hard to make only once. The minute it is hung up, someone says, “Oh, you should make another for the guest room,” or “This would be cute as a table runner,” or “My sister would love one.” That is the danger of a successful quilt flag. It is not just a finished project. It is a sequel generator.
Final Thoughts
If you have been looking for a quilting project that is festive, practical, beginner-friendly, and full of personality, a patriotic patchwork quilt flag is an excellent choice. It offers structure without being stiff, creativity without requiring advanced acrobatics, and plenty of room for personal style. You can keep it crisp and classic, make it scrappy and relaxed, or split the difference and call it “intentional charm.”
The key is simple: choose balanced fabrics, cut carefully, sew with a consistent seam allowance, and let the design breathe. Once you do that, the stripes, stars, and patchwork details do the rest. Your finished quilt will look cheerful in summer, timeless the rest of the year, and unmistakably handmade in the best possible way.
So gather your red, white, and blue fabrics, clear off the cutting table, and get started. A patriotic quilt flag is one of those projects that feels joyful while you make it and satisfying long after it is done. That is a pretty great return on a few strips of cotton and a little thread.


