Table of Contents >> Show >> Hide
- What “Quartz Look” Really Means (So You Can Fake It Like a Pro)
- The 3 Best Ways to Get “Quartz Taste” on a Formica Budget
- Before You Touch a Roller: Inspect Your Existing Countertop
- Tools & Materials (Pick Your Path)
- Step-by-Step: Paint/Coating Kit for a Quartz-Like Bathroom Countertop
- Step 1: Remove (or Mask) Fixtures
- Step 2: Clean Like You Mean It
- Step 3: Degloss / Scuff Sand
- Step 4: Repair Chips, Seams, and Dings
- Step 5: Do an Adhesion Test (Yes, Really)
- Step 6: Apply the Base Coat (Thin, Even, No Puddles)
- Step 7: Create Quartz-Like Movement (Subtle Wins)
- Step 8: Top Coat for Bathroom Survival
- Step-by-Step: Epoxy “White Quartz” Method (High-End Look, High Attention)
- Don’t Skip the “Bathroom Details” That Make It Look Expensive
- Curing & Care: How to Keep Your Faux Quartz Looking Real
- Common Mistakes (And How to Avoid a DIY Soap Opera)
- Cost Breakdown: Quartz Vibes Without Quartz Prices
- When to Skip DIY and Still Save Money
- Conclusion: Your Bathroom Can Have Expensive Taste Without the Expensive Bill
- Experiences & Real-Life Lessons (Add-On)
Quartz countertops are the “clean girl aesthetic” of bathrooms: bright, smooth, expensive-looking, and somehow always photographed with a perfect candle.
Formica (aka laminate) is the hardworking best friend: affordable, practical, and a little tired of being judged on Instagram.
The good news? You can absolutely make your bathroom countertop look quartz-y without paying quartz-y prices.
This guide walks you through three realistic, budget-friendly routes to a quartz-look bathroom vanity topplus prep, tools, common mistakes,
and how to make the finish survive toothpaste, splashes, hair tools, and that one bottle of purple shampoo that stains everything it touches.
What “Quartz Look” Really Means (So You Can Fake It Like a Pro)
Most homeowners love quartz for three reasons: it’s smooth and modern, it’s consistent (no wild stone surprises), and it’s low-maintenance.
Quartz has depth, soft movement, and a gentle speckle or “cloud” pattern that looks polished and expensive.
When people say they want a “quartz look,” they usually mean:
- A light base (white, off-white, pale gray, greige)
- Subtle movement (wispy veining, cloudy blends, or fine speckling)
- A satin-to-gloss sheen that reflects light without looking like plastic
- Crisp edges and clean caulk lines that scream “new bathroom!”
The 3 Best Ways to Get “Quartz Taste” on a Formica Budget
Your best option depends on your patience level, your budget, and whether you’re the kind of person who reads product instructions
or treats them like a “fun suggestion.”
Option A: Quartz-Look Laminate (The “Cheat Code”)
If your goal is “convincing from five feet away and low drama,” modern laminate sheets and prefabricated laminate tops can look shockingly legit.
You’re basically buying a printed quartz pattern with a tough wear layer.
- Best for: Busy households, rental refreshes, and anyone who wants predictable results
- Skill level: Intermediate (cutting, fitting, contact cement, trimming)
- Durability: Good (especially for bathrooms)
- Look factor: High if you choose a modern pattern and finish
Option B: Countertop Coating / Paint Kit (The Weekend Makeover)
Countertop kits are designed to stick to laminate and mimic stone. Many include a base coat, decorative effects (chips/speckles or veining),
and a protective top coat. This is the sweet spot for most DIYers: affordable, doable, and very “I did this myself” brag-worthy.
- Best for: Tight budgets, quick upgrades, and light-to-moderate bathroom use
- Skill level: Beginner to intermediate
- Durability: Good if you prep well and protect it properly
- Look factor: High when you keep the pattern subtle (less is more!)
Option C: White Epoxy “Quartz Method” (The Glossy Showstopper)
Epoxy can create a deep, glassy finish with layered speckle and movement that reads “stone” in a way paint sometimes can’t.
It’s also the messiest and most “respect the process” option. But if you want the most dramatic transformation, this is it.
- Best for: Maximum wow factor and a high-end look
- Skill level: Intermediate (timing matters; gravity is not your friend)
- Durability: Great when done correctly and allowed to fully cure
- Look factor: Very high (especially for bright “white quartz” styles)
Before You Touch a Roller: Inspect Your Existing Countertop
Bathrooms are humid, splashy environments. If your laminate is delaminating (peeling) or the substrate is swollen from water damage,
no fancy finish will magically fix structural problems. Start here:
- Check edges and sink cutouts: If the laminate is lifting, you may need to re-glue and clamp it before refinishing.
- Look for swelling: Puffy or crumbly areas near the sink usually mean water has gotten into the core. Consider replacement if it’s severe.
- Test for movement: If the top flexes, reinforce it. A stable surface = a finish that lasts.
- Degrease thoroughly: Hair products, lotions, and soap residue are basically adhesion poison.
Tools & Materials (Pick Your Path)
Here’s a practical checklist. You won’t need every itemonly the ones for your chosen method.
Universal Prep Supplies
- Painter’s tape and plastic sheeting
- Degreaser or strong cleaner (plus plenty of clean rags)
- Scuffing pads or sandpaper (fine to medium grit for deglossing)
- Wood filler or repair putty (for chips and seams)
- Caulk remover tool (optional but helpful)
- Vacuum + tack cloth or damp microfiber cloth
If You’re Doing a Paint/Coating Kit
- Countertop refinishing kit (base + effect + topcoat)
- Foam rollers and quality brush for edges
- Small artist brush or feathering tool for subtle “movement”
- Disposable gloves
If You’re Doing Epoxy
- Epoxy countertop kit (resin + hardener + optional colorants/chips)
- Mixing buckets, stir sticks, and a drill mixer (if recommended)
- Notched trowel or spreader
- Heat gun or torch (for bubblesused carefully)
- Drop cloths (epoxy drips are forever)
- Respirator/ventilation plan (don’t “tough it out”)
Step-by-Step: Paint/Coating Kit for a Quartz-Like Bathroom Countertop
This approach is ideal if you want a bright quartz vibe with minimal chaos.
The biggest secret is not the kitit’s the prep. Prep makes it stick. Prep makes it smooth. Prep makes it last.
Step 1: Remove (or Mask) Fixtures
- Remove the faucet if you can. It’s easier than taping around it and looks cleaner later.
- If the sink is drop-in, consider removing it for the cleanest finish. If not, tape carefully and plan a fresh caulk line.
- Protect the vanity cabinet front, floor, and nearby walls.
Step 2: Clean Like You Mean It
Wash with detergent and water, rinse, and let dry. Then go in again with a degreaser.
Bathrooms collect invisible residue from soap, lotion, hair spray, and cleaners. If your top “looks clean,” that’s adorable. Clean it again.
Step 3: Degloss / Scuff Sand
Laminate is designed to resist stains and moisture, which is great… until you want something to stick to it.
Scuff the surface evenly so it loses its shine. Focus on edges and around the sink where water lives.
Vacuum and wipe away dust.
Step 4: Repair Chips, Seams, and Dings
Fill chips and deep scratches. Smooth repairs flush once cured. If your backsplash seam is ugly, now is the time to fix it.
A quartz look demands crisp lines, not “mystery gap chic.”
Step 5: Do an Adhesion Test (Yes, Really)
Many manufacturers recommend a small test patch to confirm the coating bonds well.
It’s the DIY version of “measure twice, cut once,” except you’re measuring heartbreak.
Step 6: Apply the Base Coat (Thin, Even, No Puddles)
Work in small sections. Keep a wet edge. Roll smoothly and resist overworking it.
If your kit calls for two coats in white shades, follow that guidance. Your goal is a clean, even foundation.
Step 7: Create Quartz-Like Movement (Subtle Wins)
Quartz is rarely dramatic. For a convincing look:
- Use soft contrast: light gray, warm gray, or greige accentsnothing too black unless your inspiration is bold.
- Think “clouds,” not “lightning bolts”: dab and blur with a sponge or soft brush.
- Add fine speckle: a very light flick of color can mimic mineral variation. Less is more.
- Step back often: if it looks like marble cosplay, soften it.
Step 8: Top Coat for Bathroom Survival
Your top coat is what stands between your pretty new “quartz” and daily life.
Apply it exactly as directed. Don’t rush curing time.
Bathrooms may not have hot pans, but they do have standing water, product spills, and constant wipingso protection matters.
Step-by-Step: Epoxy “White Quartz” Method (High-End Look, High Attention)
Epoxy can look incredible, especially for bright white “quartz” styles with layered speckle.
It also punishes impatience. If you take this route, plan your workspace like you’re about to perform countertop surgery.
Step 1: Prep and Level Everything
- Follow the same deep-clean + scuff steps as above.
- Make sure the vanity top is level. Epoxy self-levels… straight into a drip waterfall if your counter is sloped.
- Mask cabinet faces and floors. Create “drip edges” protection if needed.
Step 2: Mix Correctly (No Guessing Games)
Epoxy ratios matter. Many countertop epoxies use a 1:1 ratio by volume, but you must follow your specific kit instructions.
Mix thoroughly, scraping sides and bottom, and mix for the recommended time.
Step 3: Pour and Spread
Pour in ribbons and spread with a notched trowel or spreader to an even thickness.
Work methodically. You’re aiming for full coverage without starving edges or creating thick pools.
Step 4: Build the Quartz Look (Speckle + Soft Movement)
The “white quartz” vibe usually comes from layers of:
- White base (solid and bright)
- Soft gray shading (wispy, minimal)
- Fine speckle (tiny black/gray pointsuse sparingly)
- Optional micro-chips (some kits include aggregate for realism)
Keep it restrained. If you can identify individual “art strokes,” it may read more like an art project than stone.
Real quartz is subtle and consistent.
Step 5: Pop Bubbles Carefully
Many epoxy processes use gentle heat (a heat gun or torch) to release bubbles.
Keep the tool moving, don’t hover, and protect surrounding materials. This is not the moment to experiment with fire.
Step 6: Seal Coat / Protective Top Layer
Some systems use a second clear coat for depth and durability, and certain brands recommend an additional protective topcoat
for scratch resistance. Follow your product’s schedule and cure times.
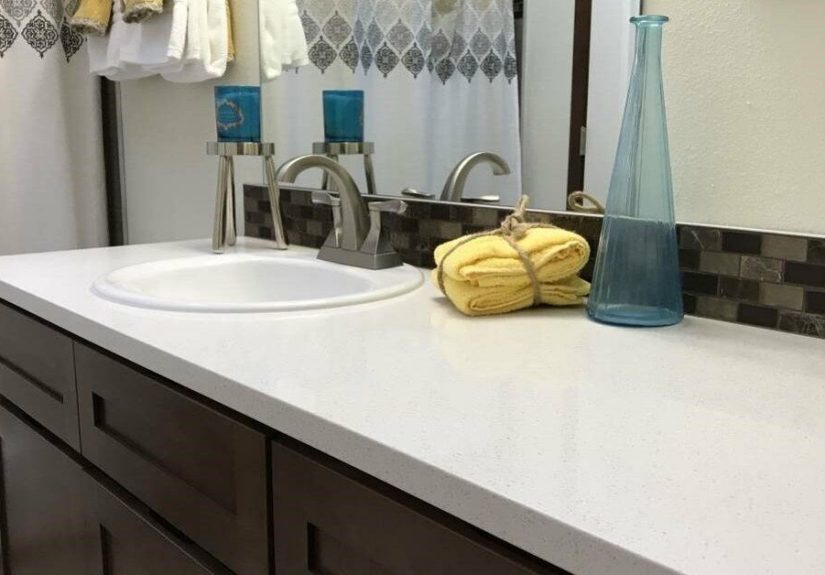
Don’t Skip the “Bathroom Details” That Make It Look Expensive
Fresh Caulk Lines
A crisp caulk line where the countertop meets the wall/backsplash is like eyeliner: it finishes the look.
Remove old caulk fully. Use a mildew-resistant bathroom caulk and tool it neatly.
Upgrade the Faucet (If You Can)
A quartz-look counter next to a tired faucet is like wearing a tux with gym socks. Even a budget faucet swap can elevate the whole vanity.
Edge Cleanup
Clean, squared edges read “new.” Sloppy tape lines read “I got hungry and stopped caring.”
Take your time on edges and cornersyour eye will go there first.
Curing & Care: How to Keep Your Faux Quartz Looking Real
- Respect cure time: “Dry to touch” isn’t “ready for daily use.” Avoid heavy use until fully cured per product instructions.
- Wipe spills promptly: Especially cosmetics, hair dye, and harsh cleaners.
- Use gentle cleaners: Mild soap and water are usually safest for refinished surfaces.
- Be kind with heat and tools: Even if your finish is durable, use a heat mat for hot tools and avoid cutting directly on the surface.
Common Mistakes (And How to Avoid a DIY Soap Opera)
- Skipping deglossing: If it’s shiny, it’s slippery. Scuff it properly.
- Not cleaning enough: Residue causes fisheyes, peeling, and sad DIY memories.
- Overdoing the pattern: Quartz is subtle. If it looks like a marble mural, soften it.
- Rushing cure time: The countertop may feel fineuntil your bottle leaves a permanent ring.
- Ignoring water damage: Swollen substrate will ruin any finish eventually.
Cost Breakdown: Quartz Vibes Without Quartz Prices
| Method | Typical DIY Cost Range | Best For | Biggest Risk |
|---|---|---|---|
| Quartz-look laminate sheet/top | $80–$300+ | Predictable, durable refresh | Cutting/trim mistakes |
| Countertop coating/paint kit | $70–$250 | Weekend makeover, low mess | Prep shortcuts = peeling |
| Epoxy “white quartz” overlay | $150–$400+ | High-end depth and shine | Drips, bubbles, timing errors |
When to Skip DIY and Still Save Money
If your countertop is badly swollen or falling apart, refinishing is like putting lipstick on a leaky boat.
In that case, you can still stay on budget by:
- Buying a prefabricated vanity top (often cheaper than you expect)
- Looking for stone remnants locally (some shops have small pieces perfect for vanities)
- Replacing only the top while keeping the vanity cabinet
Conclusion: Your Bathroom Can Have Expensive Taste Without the Expensive Bill
Making a bathroom countertop look like quartz on a Formica budget is absolutely doableand honestly, it’s one of the highest “wow per dollar”
upgrades you can make in a small space.
If you want the safest, most predictable refresh, choose a quartz-look laminate.
If you want a straightforward weekend project, use a quality countertop refinishing kit and focus on prep.
If you want maximum depth and drama, go epoxybut treat it like a real project, not a casual craft.
Whichever route you choose, remember the real luxury isn’t quartzit’s a countertop that looks clean, feels smooth,
and doesn’t make you sigh every time you brush your teeth.
Experiences & Real-Life Lessons (Add-On)
Let’s talk about the part no one glamorizes: the “experience” of turning a basic bathroom vanity top into something that looks like it belongs in a
model home. If you’re expecting a calm, spa-like journey, I support your optimism. But most DIYers report a similar emotional timeline:
confidence, doubt, determination, mild panic, and theneventuallypride.
The first experience most people notice is how much prep affects your mood. Cleaning a bathroom countertop sounds easy until you realize how many
layers of invisible product buildup exist. Hair spray mist, lotion film, dried toothpaste, and whatever that mystery sticky spot is near the soap dispenser…
all of it has to go. Many DIYers say the “real work” is the unglamorous hour (or two) of scrubbing, scuffing, and wiping. It’s also the moment where you
start thinking, “If I stop now, I’ve basically just… sanded my counter for fun.” So you keep going. Good.
Painting/coating kits tend to feel friendly at first: roll on a base coat, add a little movement, topcoat, done. The experience changes when you start
creating the quartz pattern. People often overdo it on pass one. It’s normal. Quartz in photos can look dramatic, but in real life it’s more subtle.
DIYers who end up happiest usually follow one rule: stop earlier than you think you should. They step back, look from the doorway,
soften anything too bold, and call it. The ones who keep “fixing” it sometimes end up with a countertop that looks like it’s trying to win a painting contest.
Bathrooms don’t need a masterpiece. They need believable.
Epoxy projects have their own personality. Many people describe the pour as the “point of no return.” Once you mix, the clock starts.
That can feel thrilling or terrifying depending on your relationship with deadlines. The most common experience is realizing epoxy is both magical and rude:
it self-levels beautifully, and it also drips everywhere it possibly can. DIYers who plan for dripsplastic sheeting, taped edges, drop cloths, and a strategy
report much less stress. The ones who don’t plan usually spend quality time scraping cured drips off cabinet doors while whispering, “It’s fine. I’m fine.”
Another real-life lesson: cure time tests your patience. A newly finished top can look ready long before it’s actually ready.
Lots of DIYers learn this the hard way by setting something on it too early and discovering a permanent ring, dent, or imprint.
The people who love their results most treat the countertop like it’s a freshly baked cake: they admire it, protect it, and don’t poke it every five minutes.
Waiting feels annoying, but it’s what turns “pretty for a day” into “pretty for a long time.”
Finally, there’s the experience of living with it. Most DIYers say the biggest satisfaction isn’t just the lookit’s how the whole bathroom feels updated.
A quartz-look top bounces light, makes mirrors and faucets look nicer, and gives the room that “clean and intentional” vibe.
And every time someone asks, “Wait… is this quartz?” you get to smile and say, “It’s quartz energy,” which is basically the same thing, emotionally.