Table of Contents >> Show >> Hide
- Why Pumpkin Seeds Make Surprisingly Great Poinsettia Petals
- Supplies You’ll Need
- Prep Work: Clean, Dry, and Sort Your Seeds
- Step-by-Step: Pumpkin Seed Poinsettia Ornament
- Design Variations That Look Store-Bought
- Kid-Friendly Tips (and Adult Sanity Savers)
- Troubleshooting: When Your Poinsettia Has Opinions
- Where to Use Pumpkin Seed Poinsettia Ornaments
- FAQ: Quick Answers Before You Start Gluing
- Real-World Experiences: What Makers Notice After Making a Few Dozen
- Wrap-Up: A Tiny Flower With Big Holiday Energy
If you’ve ever scooped out a pumpkin and thought, “Wow, this is basically a science experiment in slime,” you’re not alone.
But hiding in that goo is crafting gold: pumpkin seeds that can become adorable DIY poinsettia ornaments (yes, sometimes spelled “poinsetta” onlinesame festive vibe, fewer spelling debates).
These little flowers look fancy on a tree, a wreath, or a gift tag, and they’re the perfect excuse to turn “leftovers” into “look what I made!”
This guide walks you through a simple, repeatable method for making pumpkin seed poinsettia ornaments that look surprisingly polishedwithout requiring a degree in glitter management.
You’ll get step-by-step instructions, design variations, kid-friendly tips, and troubleshooting so your petals stay put and your holiday spirit stays intact.
Why Pumpkin Seeds Make Surprisingly Great Poinsettia Petals
Pumpkin seeds are basically nature’s tiny teardrop-shaped petals. They’re lightweight, easy to glue, and naturally texturedso once painted, they look like layered flower petals instead of “craft supplies that tried their best.”
Plus, using seeds is a fun, budget-friendly, low-waste craft that pairs beautifully with the holiday season (aka the season of “How did we spend that much at the store?”).
Supplies You’ll Need
Keep it simple or go full holiday maximalist. Here’s a reliable supply list that works for most versions:
Core materials
- Clean, dry pumpkin seeds (about 35–45 per ornament, depending on size and how many layers you make)
- Cardboard circle (cereal-box cardboard works great) or a small wooden circle
- Tacky glue (great for kids) or hot glue (best for fast, sturdy resultsadult use recommended)
- Acrylic paint (classic red, white, pink, or metallics)
- Small beads/beans/buttons for the flower center (gold beads look especially “holiday”)
- Ribbon, twine, or ornament hooks for hanging
Helpful extras (optional, but fun)
- Paintbrushes (one small detail brush helps)
- Toothpicks or tweezers (for seed placement and bead wrangling)
- Glitter (use responsibly… or don’t, and accept your sparkly fate)
- Clear sealer or decoupage-style topcoat (helps durability and reduces flaking)
- Felt circle (to cover the back for a clean, finished look)
Prep Work: Clean, Dry, and Sort Your Seeds
This is the unglamorous part, but it’s the difference between ornaments that last and ornaments that turn into a science fair project by New Year’s.
You want seeds that are clean and completely dry before painting and gluing.
Step 1: Rinse off the “pumpkin strings”
Pull off as much pulp as you can by hand, then rinse the seeds in a strainer under running water.
Swish them around to remove the slippery coating and any stubborn bits.
Step 2: Dry them thoroughly
Spread seeds in a single layer on paper towels or a clean kitchen towel.
Let them air-dry for at least 24 hours (longer if your kitchen is humid).
In a hurry? You can speed-dry them in a very low oven for a short timejust keep the heat low and check often so you dry them without scorching.
Step 3: Sort by size
This step is weirdly satisfying. Sort seeds into “big,” “medium,” and “small.”
Using larger seeds on the outer layer and smaller seeds toward the center helps your poinsettia look symmetrical and intentionally designed (instead of “I glued whatever I grabbed first”).
Step-by-Step: Pumpkin Seed Poinsettia Ornament
The basic idea: glue pumpkin seeds in overlapping rings around a small base, then paint and decorate.
You can paint seeds before assembly, after assembly, or both. The easiest, least fussy method is painting after everything is glued.
1) Cut and prep your ornament base
Cut a cardboard circle about 1.5–2 inches wide for a classic ornament size.
If you want a bigger statement piece, go 2.5–3 inches.
If your cardboard is thin, double it up (glue two circles together) so it stays flat.
2) Glue the first ring (the outer petals)
Add a thin line of glue near the outer edge of the circle.
Place pumpkin seeds with the pointy ends facing outward, like petals.
Keep them close together so the base doesn’t show.
Tip: Start with four seeds at the “north, south, east, west” positions, then fill in the gaps.
It helps keep spacing evenlike training wheels for symmetry.
3) Add the second and third rings (the layered look)
For the next ring, glue seeds so they overlap the first ring by about half the seed length.
Slightly rotate placement so the second row petals land between the petals below them.
Repeat for a third ring (and a fourth if you want a fuller flower).
Don’t stress perfection. Real poinsettias aren’t perfectly identical eitherthey’re just confidently festive.
4) Create the center
Traditional poinsettias have a cluster in the center (those tiny yellow structures).
For ornaments, you can glue in:
- 3–6 small beads (gold looks classic)
- a tiny button
- a few dried beans (navy beans are a popular craft option)
- a pinch of micro-glitter mixed into glue (tiny sparkle, big impact)
5) Paint your poinsettia
Once the glue is fully dry, paint the whole ornament with acrylic paint.
Use thin coats rather than one thick coatthick paint can puddle where seeds overlap.
Easy painting method: Hold the ornament by the edge, paint the top, let it dry, then paint the back edges.
If you miss a spot, call it “natural shading” and move on like a professional.
6) Seal for durability (optional, but recommended)
If you want these to last year after year, add a clear topcoat once paint is dry.
This helps prevent chipping and makes the ornament easier to dust off later.
A matte finish looks cozy and rustic; a glossy finish looks bold and bright.
7) Add a hanger
Flip the ornament over. Glue a loop of ribbon or twine near the top.
For extra security, sandwich the ribbon ends under a small piece of felt or an extra cardboard tab.
Then glue a felt circle over the back to hide everything and make it look “store-bought but better.”
Design Variations That Look Store-Bought
Once you’ve made one, you’ll want to make ten. That’s how this craft gets you.
Here are fun variations that still feel cohesive on a tree:
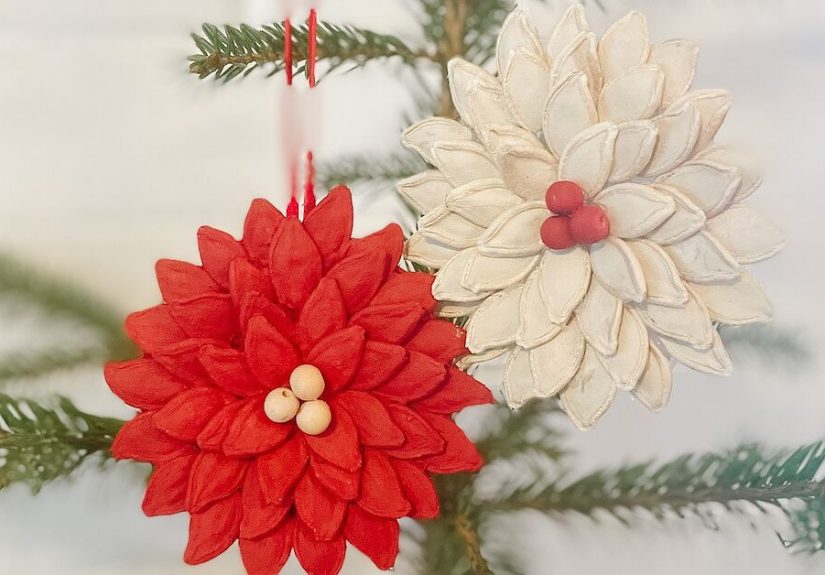
Classic Red Poinsettia
Paint petals a deep red and use gold beads in the center.
Add a tiny dusting of glitter at the tips for a “frosted” holiday look.
White “Snow Poinsettia”
Paint petals white or ivory and use pearl beads in the center.
This version looks gorgeous on minimalist trees and winter wreaths.
Glam Gold Ornament
Go full metallic gold with a shiny topcoat.
Use a dark center (navy or black bead cluster) for contrast.
This one reads “fancy holiday party” even if you’re wearing pajama pants.
Ombre Petals
Paint outer petals darker red and blend lighter toward the center.
Quick shortcut: paint everything red, then dry-brush a lighter color (like pink or white) on the inner petals.
Mini Gift Tag Poinsettias
Use a 1-inch base and only two rings of seeds.
Glue onto a gift tag or tie onto wrapped presents as a keepsake topper.
Kid-Friendly Tips (and Adult Sanity Savers)
This craft can be kid-friendly with a few smart tweaks:
- Use tacky glue instead of hot glue for little hands (it dries slower but safer).
- Pre-cut cardboard circles before craft timeinstant calm.
- Do assembly in stages: glue rings one day, paint the next day.
- Set up a “seed tray” (muffin tin or small bowls) to prevent seed chaos.
- Use tweezers for better placementkids feel like crafting surgeons (in a good way).
Troubleshooting: When Your Poinsettia Has Opinions
“My seeds keep sliding around.”
Use less glue than you think you need. Too much glue becomes a skating rink.
Tacky glue also grips better if you let it sit for 15–30 seconds before placing the seed.
“My cardboard base is warping.”
Double the cardboard, or switch to a sturdier base like a thin wood round.
Also, avoid soaking the base in gluesmall dots are enough.
“Paint is clumping in the cracks.”
Thin your paint slightly (a tiny bit of water) and do two light coats.
A small brush helps you pull paint into crevices without flooding them.
“Seeds are popping off after drying.”
That usually means either the seeds weren’t fully dry, or the glue didn’t have enough contact area.
Try adding a slightly larger glue dot to the wide end of each seed, and press gently for a second or two.
Where to Use Pumpkin Seed Poinsettia Ornaments
These aren’t limited to a Christmas tree (though they look amazing there).
Try them as:
- Wreath accents (cluster 3–5 together for a focal point)
- Garland décor (space them out for a handmade look)
- Napkin ring toppers for a holiday table
- Stocking tags or teacher gifts
- Holiday place cards (glue onto folded cardstock)
FAQ: Quick Answers Before You Start Gluing
Do I have to use pumpkin seeds?
Pumpkin seeds are ideal because they’re smooth, wide, and petal-shaped.
In a pinch, you can experiment with similar seeds, but pumpkin seeds tend to give the cleanest “poinsettia” silhouette.
How long do these ornaments last?
If the seeds are fully dry and you seal the ornament, they can last for multiple seasons.
Store them in a dry, cool place (like other ornaments) and avoid moisture.
Will they attract bugs?
Properly cleaned and dried seeds are much less likely to be an issue, especially if sealed.
If you’re worried, use a good topcoat and store ornaments in a sealed container.
Can I paint the seeds before I glue them?
Yes! Painting first can look super crisp, especially if you want clean edges.
The tradeoff is time (you’ll need to dry seeds after painting) and you’ll still want to touch up once assembled.
Real-World Experiences: What Makers Notice After Making a Few Dozen
People who try pumpkin seed poinsettia ornaments often start out thinking it’s a quick craft and end up accidentally running a tiny ornament factory.
That’s not a warningit’s a compliment to how satisfying this project feels once you get the rhythm.
A common experience is that the prep stage (cleaning and drying seeds) takes longer than expected, but it pays off every single time.
When seeds are even a little damp, they can feel slippery, paint can look streaky, and glue can take forever to set.
On the flip side, when seeds are fully dry and sorted, the whole craft suddenly feels “easy-mode.”
Another frequent observation: tacky glue and hot glue create very different crafting moods.
Tacky glue is calmer and kid-friendly, but it requires patienceseeds may drift if the glue is too wet or if the ornament gets moved too soon.
Hot glue is fast and sturdy, but it encourages speed, and speed can lead to slightly crooked petals if you don’t pause to line things up.
Many crafters end up using a hybrid approach: tacky glue for the outer rings (more wiggle room to adjust) and hot glue for the center beads and hanging loop (maximum security where it matters most).
Makers also mention that the “four-point anchor” trick (placing seeds at top, bottom, left, right first) is a game-changer.
It keeps the ornament looking balanced without constant measuring.
And once someone discovers that alternating the second ring so petals land between the petals below it creates that lush poinsettia look, it becomes the default technique.
People who craft with kids often say the sorting step becomes an unexpected favoritekids like feeling “in charge” of the big seeds versus the small seeds, and it turns into a sneaky fine-motor activity without anyone labeling it as one.
Painting experiences vary, too. A lot of crafters find that painting after assembly is less stressful because you don’t have to handle freshly painted seeds one by one.
Others prefer painting first because it gives sharper edges and avoids paint pooling where seeds overlap.
A practical compromise many people settle on: paint after assembly, then do a quick dry-brush highlight on the top edges so the petals look dimensional.
This is also where “happy accidents” show upslight color variation can make ornaments look more realistic, almost like the mottled shading you see on real poinsettia bracts.
Finally, experienced crafters often say the biggest improvement comes from finishing touches.
Adding a felt backing instantly makes the ornament feel more polished and hides the glue-and-ribbon situation on the back (which is always a little chaotic, no matter how careful you are).
A simple clear topcoat can reduce chipping and help ornaments survive storage bins, curious pets, and the annual “why is everything tangled?” ornament unpacking ritual.
And once someone tries making a set in coordinated colorslike red, white, and goldthey usually end up gifting extras because the ornaments look boutique-level, even though they started as pumpkin leftovers.
Wrap-Up: A Tiny Flower With Big Holiday Energy
Pumpkin seed poinsettia ornaments are the kind of craft that checks every box: cute, inexpensive, surprisingly elegant, and just hands-on enough to feel meaningful.
Whether you make one as a keepsake or crank out a whole set for gifts, you’re turning something ordinary into something festiveand that’s basically the entire holiday mission statement.
Clean your seeds, layer your petals, add a little sparkle, and enjoy the fact that your tree just got a handmade upgrade.


