Table of Contents >> Show >> Hide
- Why Use Bridge Instead of Opening Images Manually?
- What You Need Before You Start
- How to Open Multiple Images As Layers in Photoshop Using Bridge
- What to Do Right After the Layers Load
- Can You Use RAW Files?
- Best Situations for This Workflow
- Troubleshooting: When “Load Files into Photoshop Layers” Is Missing or Not Working
- Practical Tips to Make the Workflow Smoother
- Real-World Experience: What This Workflow Actually Feels Like
- Conclusion
- SEO Tags
If you have ever opened five photos in Photoshop one by one, dragged each into a new file, renamed nothing, lost track of everything, and quietly questioned your life choices, Adobe Bridge is here to save your afternoon. When you use Bridge to open multiple images as layers in Photoshop, you skip the clunky shuffle and go straight to a single layered document. It is faster, tidier, and far less likely to make you mutter at your monitor.
This workflow is especially useful for collages, composites, before-and-after edits, exposure blends, focus stacking prep, product mockups, mood boards, and any project where several images need to live inside one Photoshop file. Instead of opening separate files and manually moving them around, Bridge lets you gather the images first and send them into Photoshop as a neatly stacked set of layers.
Note: depending on your app version, the command wording may appear slightly differently, such as “Load Files into Photoshop Layers” or “Load Files as Photoshop Layers.” The idea is the same: Bridge sends every selected image into one Photoshop document, with each image placed on its own layer.
Why Use Bridge Instead of Opening Images Manually?
Photoshop can absolutely open several images at once, but opening them as separate documents is not the same as opening them as layers. That is the difference that matters. When you use Bridge, you are telling Adobe, “Please stop making me do the boring part.”
Bridge works as a visual file browser and asset manager, which means you can preview images, sort them, rate them, filter them, check metadata, and confirm you have the right files before you send them into Photoshop. That may not sound glamorous, but it is the kind of boring superpower that saves real time on real projects.
In practical terms, using Bridge gives you a few big advantages:
1. You can review images before opening them
You can see thumbnails, enlarge previews, and compare files in one place. That makes it easier to pick the right set for a composite or edit sequence.
2. You can control the layer stack from the start
If order matters, and it often does, Bridge helps you sort and select your files before they land in Photoshop. That is much cleaner than dragging layers up and down after the fact.
3. You avoid repetitive dragging and dropping
Manual layer building works for two images. For eight, twelve, or twenty? That quickly becomes a tiny office job with no dental plan.
4. It fits naturally into larger Adobe workflows
If you use Camera Raw, Lightroom Classic, or other Creative Cloud tools, Bridge becomes a very convenient hub for selecting, reviewing, and passing files into Photoshop.
What You Need Before You Start
Before you open multiple images as layers in Photoshop using Bridge, make sure a few basics are in place:
- Adobe Photoshop is installed and working normally.
- Adobe Bridge is installed and can see your image folders.
- Your selected images are all accessible from the same storage location or visible in Bridge.
- You have enough system memory and scratch disk space for the number and size of images you plan to load.
If Bridge shows the Photoshop submenu but the layer-loading command fails, the issue is often not your technique. It is usually a version or integration problem between Bridge and Photoshop. More on that in the troubleshooting section below.
How to Open Multiple Images As Layers in Photoshop Using Bridge
Now for the good part. Here is the straightforward workflow.
Step 1: Open Adobe Bridge
Launch Bridge and navigate to the folder containing the images you want to combine. Use thumbnails, preview panels, filters, ratings, labels, or metadata to identify the exact files you need. This is one of the main reasons Bridge is more efficient than opening files from Photoshop’s standard Open dialog.
Step 2: Select the Images
Click the first image, then hold Shift to select a continuous range or Ctrl on Windows / Command on Mac to choose individual files one by one. You can select a small set for a simple blend or a larger group for a multi-image composite.
If order matters, sort the files first. For example, if you are building a step-by-step visual sequence, a before-and-after comparison, or a time-based stack, it helps to arrange them by name, capture time, or custom order before loading them.
Step 3: Use the Bridge Command to Send Them to Photoshop
With your images selected, go to the top menu in Bridge and choose:
Tools > Photoshop > Load Files into Photoshop Layers
In some versions, the wording may be slightly different, but the destination is the same. Once you click the command, Bridge hands the selected files off to Photoshop.
Step 4: Wait for Photoshop to Build the Document
Photoshop will open automatically if it is not already running. Then it creates a new document and imports each selected image onto its own separate layer. If you selected large RAW files, this can take a little time. That is normal. This is the software being busy, not dramatic.
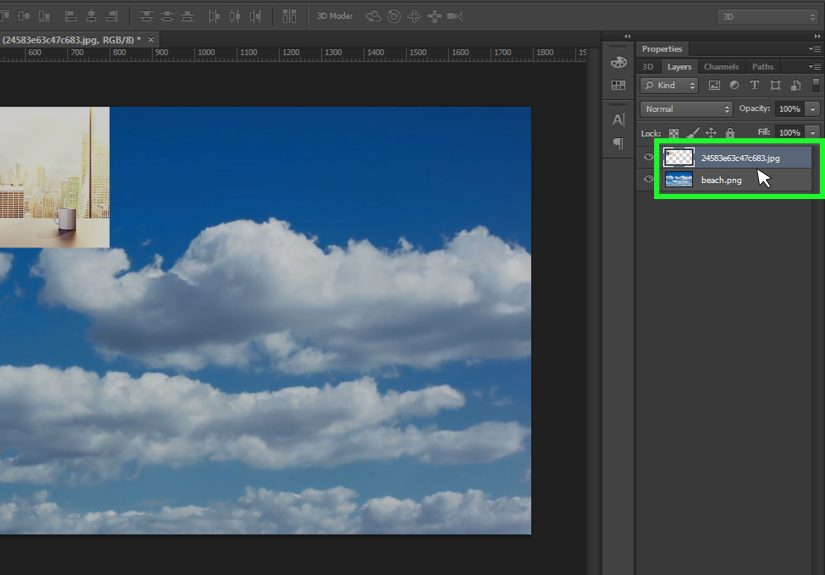
Step 5: Check the Layers Panel
Once the process finishes, look at the Layers panel in Photoshop. Each image should appear as its own layer, usually named after the original file. This is where the workflow becomes beautifully practical. You can now reorder layers, toggle visibility, add masks, transform images, or begin compositing immediately.
Step 6: Reposition or Resize as Needed
If the images are different dimensions or orientations, some may overlap in awkward ways. That is not an error. It simply means the canvas was built large enough to contain the imported images. Use the Move tool and Free Transform to reposition and resize layers where needed.
What to Do Right After the Layers Load
Opening the images as layers is only the first half of the job. What you do next depends on the project.
For collages and composites
Rearrange the layer order, resize elements, and add layer masks. This is ideal for marketing graphics, editorial image layouts, social posts, mood boards, and creative mashups.
For before-and-after comparisons
Keep each image on its own layer, align them if necessary, then toggle layer visibility to compare changes. You can also place them side by side in a larger composition.
For focus stacking or exposure blending prep
After the images are loaded, select all layers and use Edit > Auto-Align Layers if the files show the same scene with slight movement between shots. This helps Photoshop register the images more accurately before you mask, blend, or convert them to a Smart Object.
For non-destructive stack workflows
If your layers represent similar content and the same dimensions, you can convert the aligned layers into a Smart Object and experiment with stack modes. That is useful for reducing noise, removing moving distractions, or exploring specialized composite techniques.
Can You Use RAW Files?
Yes, but there is a smart way to do it.
If you are working with RAW files, Bridge pairs especially well with Adobe Camera Raw. You can review the files in Bridge, open them in Camera Raw, make initial corrections, and then continue into Photoshop. For JPEG and TIFF files, Bridge can also send them through Camera Raw if you want the same editing experience before the final layered document is built.
This is helpful when your images need matching exposure, white balance, contrast, or lens correction before compositing. In other words, you can do the cleanup before the layers arrive in Photoshop, which is much nicer than repairing every layer after the party has already started.
Best Situations for This Workflow
Not every Photoshop project needs Bridge, but several common scenarios benefit from it immediately.
Photo composites
Bridge lets you select all source images at once and send them into a single file, which is far quicker than dragging content across tabs.
Product image variations
If you are comparing colors, edits, or angles, loading the images as layers keeps everything in one place for side-by-side adjustments.
Content creation for marketing
Designers and social media teams often need multiple assets in one PSD. This method speeds up production and keeps edits more organized.
Photography workflows
Bracketed exposures, focus stacks, and near-duplicate frames all benefit from layered loading, especially when followed by Auto-Align.
Creative experimentation
Sometimes you just want to throw a few images into one file and see what happens. That is a completely respectable artistic process, even if it begins with chaos.
Troubleshooting: When “Load Files into Photoshop Layers” Is Missing or Not Working
This command is incredibly useful, which is why it is extra annoying when it refuses to cooperate. Here are the most common issues.
The Photoshop option is missing from Bridge
If the Tools > Photoshop submenu is not showing, Bridge may not be properly seeing Photoshop, or the integration may be out of sync. Updating both apps together often helps. In some cases, reinstalling Bridge after updating Photoshop restores the missing command.
The command appears, but nothing happens
Restart both applications first. If that does not solve it, check for app updates. When Bridge and Photoshop are mismatched, the command may become unreliable. This is one of the most common reasons the workflow breaks.
The files open separately instead of as layers
Double-check that you are using the Bridge command from the Photoshop submenu, not simply opening the files normally. Standard open behavior often launches each image in its own document.
The layers do not line up
If the images were shot hand-held or shifted slightly between exposures, use Edit > Auto-Align Layers after loading them. This is especially important for blends and stacks where precise overlap matters.
The document becomes huge and slow
That usually means you loaded many large images at full resolution. Consider reducing source dimensions first if the final output does not need giant pixel dimensions. Big layered files are powerful, but they can also turn your computer fan into a motivational speaker.
Your Lightroom edits are not showing correctly in Bridge
If you rely on Lightroom Classic, make sure metadata changes are written to the files or sidecar XMP files so Bridge can reflect those edits properly before you send the images to Photoshop.
Practical Tips to Make the Workflow Smoother
- Name files clearly before loading them so your Photoshop layers are easier to identify.
- Use Bridge ratings, labels, or filters to narrow down your best images before selection.
- Sort by capture time when working with image sequences.
- Use Camera Raw first if your selected images need consistent correction.
- Apply Auto-Align right after loading if the files represent the same subject shot multiple times.
- Convert aligned layers to a Smart Object when you plan to test stack-based effects.
- Save the result as a PSD early so you do not lose your layered setup.
Real-World Experience: What This Workflow Actually Feels Like
In real creative work, the biggest benefit of opening multiple images as layers through Bridge is not just speed. It is mental clarity. When you are dealing with several related images, the project instantly feels more organized because everything begins in one place. You are not hunting across tabs, wondering which version is which, or dragging layers between documents like a digital moving company.
One of the most satisfying moments comes right after Photoshop finishes building the layered file. You open the Layers panel and there they all are, neatly named, stacked, and ready to go. It feels less like file wrangling and more like actual design work. That difference matters, especially when you repeat the process over and over.
This is particularly noticeable on collage jobs, social graphics, client mockups, and quick composite edits. Without Bridge, the workflow can feel annoyingly manual. Open image. Open another image. Drag. Drop. Repeat. Resize. Rename. Repeat again. It is not difficult, but it is the kind of repetition that drains momentum. Bridge cuts through that and helps you stay in the creative part of the process longer.
Photographers also benefit because this method pairs well with image review habits they already use. You can flag your winners, sort by time, check focus in preview, then send the selected group straight to Photoshop. That means fewer wrong picks and fewer “why did I open this one?” moments. Anyone who has accidentally edited the almost-right file instead of the right file knows this pain is real.
There is also a confidence boost that comes from seeing your source material together in one document. When the files are layered, you can instantly compare framing, masking possibilities, lighting differences, or retouching choices. Even if you eventually delete half the layers, the ability to audition ideas quickly is a huge creative advantage.
Of course, the workflow is not magic. Large files can still be heavy. Mismatched versions can still misbehave. And if you load twenty high-resolution images into one PSD, your computer may briefly sound like it is preparing for takeoff. But even with those realities, using Bridge remains one of the cleanest ways to build a multi-image Photoshop document without unnecessary friction.
The best part is that once you do it a few times, it becomes second nature. Open Bridge. Select the images. Send them to Photoshop as layers. Start creating. That is the kind of repeatable habit that saves time every week, not just once. And in digital design, any habit that removes friction without removing control deserves a permanent seat at the desk.
Conclusion
If you regularly work with multiple source images, learning how to open multiple images as layers in Photoshop using Bridge is one of those small skills that pays off immediately. It reduces repetitive tasks, keeps projects organized, and gives you a cleaner starting point for composites, blends, edits, and layered design work.
The core workflow is simple: review the images in Bridge, select the ones you want, use the Photoshop command under the Tools menu, then let Photoshop build a single document with each image on its own layer. From there, you can align, transform, mask, blend, or convert the layers into a Smart Object depending on your goal.
In other words, Bridge helps you spend less time opening files and more time doing the part you actually opened Photoshop for.


