Table of Contents >> Show >> Hide
- Before You Touch Anything: Tools, Setup, and Safety
- The 9 Steps to Remove the Drain Plug (and Drain the Oil Like a Pro)
- Step 1: Warm the engine briefly (optional, but helpful)
- Step 2: Park, secure, and pop the hood
- Step 3: Lift the vehicle safely (or use ramps)
- Step 4: Locate the oil pan and drain plug
- Step 5: Position the drain pan (spoiler: oil doesn’t fall straight down)
- Step 6: Choose the right tool and seat it perfectly
- Step 7: Break the plug loose (counterclockwise… usually)
- Step 8: Remove the plug by hand without an oil shower
- Step 9: Inspect the plug, washer, and threads (then prepare for reinstall)
- Troubleshooting: What If the Drain Plug Won’t Come Out?
- After the Drain Plug: Quick Checklist for a Clean Finish
- When It’s Smarter to Call a Pro
- Conclusion
- Driveway Stories: Real-World Experience ( of Lessons Learned)
Removing an oil drain plug sounds like the kind of task a caveman could do: turn bolt, oil falls out, victory dance.
And honestly? Most of the time, it is that simple. But the one time it isn’tthe plug is stuck, rounded off,
or installed by someone whose torque wrench is apparently a medieval siege weaponyou’ll be glad you read this first.
This guide walks you through how to remove the drain plug safely (and without wearing hot oil like a cologne),
plus how to avoid the classic mistakes that lead to stripped threads, leaks, and a sudden interest in public transportation.
Before You Touch Anything: Tools, Setup, and Safety
Tools you’ll actually use (and a few you’ll be happy to have)
- Correct-size 6-point socket (preferred) or a box-end wrench for your drain plug
- Ratchet (3/8″ or 1/2″ drive) and possibly a short extension
- Breaker bar (optional, for stubborn plugs)
- Wheel chocks (or a couple of sturdy rubber wedges)
- Floor jack and jack stands (or drive-up ramps rated for your vehicle)
- Oil drain pan (big enough for your engine’s oil capacity)
- Gloves, safety glasses, shop towels
- Replacement crush washer/gasket (common on many vehicles)
- Torque wrench (recommended for reinstalling correctly)
Safety rules (non-negotiable)
- Work on level ground. A sloped driveway is great for skateboardingnot for crawling under a car.
- Never get under a car supported only by a jack. Use jack stands or ramps.
- Chock the wheels and set the parking brake.
- Warm oil drains faster, but hot oil burns faster. Aim for “slightly warm,” not “fresh lava.”
The 9 Steps to Remove the Drain Plug (and Drain the Oil Like a Pro)
-
Step 1: Warm the engine briefly (optional, but helpful)
Start the engine for 2–3 minutes, then shut it off. Warm oil flows better and carries more suspended gunk out with it.
Don’t do a full warm-up to operating temperature unless you enjoy painoil can get dangerously hot. -
Step 2: Park, secure, and pop the hood
Park on a flat surface, put the transmission in Park (or in gear for a manual), set the parking brake, and place wheel chocks
behind the tires that will stay on the ground. Open the hood and locate the oil fill cap.
You’ll loosen it later to help air flow and speed draining. -
Step 3: Lift the vehicle safely (or use ramps)
If you need more clearance, lift the vehicle using the correct jack points listed in your owner’s manual and set it down on jack stands.
Give the car a gentle shake test. If it wobbles, fix it nowyour oil change should not include an obstacle course. -
Step 4: Locate the oil pan and drain plug
Slide under the vehicle with a flashlight. The drain plug is typically on the bottom edge of the oil pan.
Some vehicles have splash shields or undertrays, so you may need to remove a panel first.
Don’t confuse the oil pan with the transmission pandraining the wrong one is a story you’ll tell forever. -
Step 5: Position the drain pan (spoiler: oil doesn’t fall straight down)
Place the drain pan under the plug, but offset it slightly toward the rear of the car.
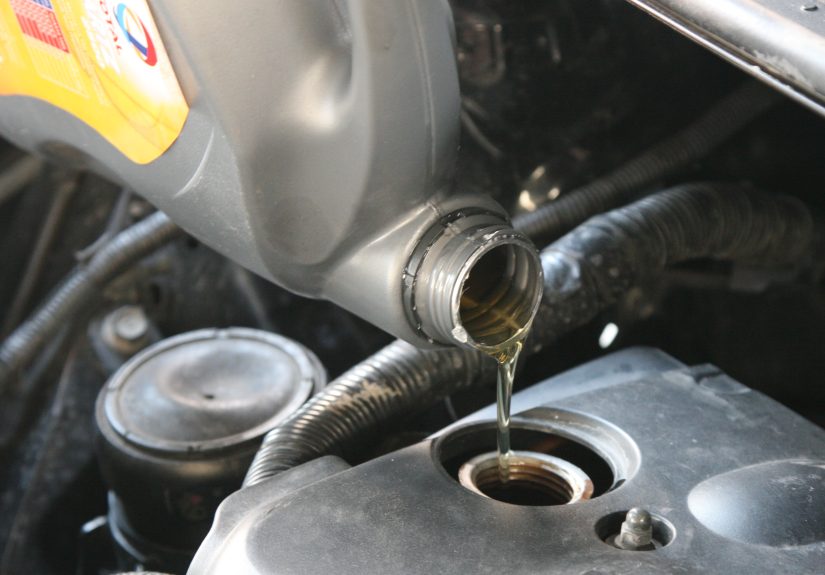
Oil often streams out at an angle when the plug comes out. Add cardboard or newspaper under the pan if you care about your driveway’s feelings.Now loosen the oil fill cap on top of the engine. This allows air in and helps oil drain more smoothly.
-
Step 6: Choose the right tool and seat it perfectly
Use the exact-size socket or box-end wrench. A 6-point socket is best because it grips the flats of the bolt head
and is less likely to round it off than a 12-point socket. Avoid adjustable wrenchesthey’re great at adjusting your stress level, not much else.Push the socket fully onto the plug. Keep it straight and square. If you’re cocked at an angle, you’ll chew up the plug head
and turn a five-minute task into a parts-store field trip. -
Step 7: Break the plug loose (counterclockwise… usually)
Most drain plugs loosen by turning counterclockwise (“lefty-loosey”). Apply smooth force.
If the plug is stubborn, try a slightly longer handle (breaker bar) for leverage. Don’t bounce on the tool like you’re trying to start a lawn mower.
Controlled pressure is how you win this fight.If it still won’t move: stop and reassess. A rounded plug head or seized threads can escalate quickly.
Jump to the troubleshooting section below before you go full Hulk. -
Step 8: Remove the plug by hand without an oil shower
Once it’s loose, switch to your fingers. Here’s the trick many pros use:
keep gentle inward pressure on the plug while you unscrew it. This delays the initial gush until you’re ready.
When it feels like the last thread is about to let go, pull the plug away quickly and confidently.Let the oil drain completely. This usually takes several minutes. While it drains, wipe the plug clean and inspect it.
-
Step 9: Inspect the plug, washer, and threads (then prepare for reinstall)
Look for:
- Damaged threads on the plug (flattened, torn, or shiny “smeared” metal)
- A crush washer or gasket that looks flattened, cracked, or deformed
- Metal shavings on a magnetic drain plug (a little “fuzz” can be normal; chunks are not)
Many vehicles use a crush washer (often aluminum or copper) that’s designed to deform once to seal properly.
Replacing it each oil change is cheap insurance against leaks and overtightening. If your plug uses an O-ring or a reusable gasket,
inspect it carefully and replace if worn.When you’re ready to reinstall later: always start threading the plug by hand to avoid cross-threading.
Tighten to the manufacturer’s torque spec if you have it. If you don’t, snug it firmlynot “gorilla tight.”
Troubleshooting: What If the Drain Plug Won’t Come Out?
Problem: The plug is stuck (won’t budge)
- Confirm you’re turning the correct direction (counterclockwise is standard).
- Use a 6-point socket and make sure it’s fully seated.
- Add leverage carefully with a breaker bar. Keep the tool square to the plug.
- Light tapping helps: a small tap on the ratchet handle can “shock” tight threads loose without brute force.
If a shop overtightened the plug, it may take more force than you expect. The goal is steady torque, not violence.
If you feel the socket slipping, stop before you round the head.
Problem: The plug head is rounding or already stripped
Once the bolt head rounds off, every extra attempt makes it worse. Options that often work:
- Extractor socket (designed to bite into rounded fasteners)
- Hammer-on a slightly smaller 6-point socket (only if appropriate and you can do it safely)
- Locking pliers (vise grips) if there’s enough bolt head to clamp firmly
Plan to replace the drain plug afterward. A damaged plug is living on borrowed time.
Problem: Threads feel “crunchy” or the plug spins weirdly
That can signal cross-threading or damaged oil pan threads (common with aluminum pans if overtightened).
If the plug won’t tighten later or keeps spinning, don’t ignore itthis can turn into a leak that strands you.
Thread repair kits, oversized self-tapping drain plugs, or oil pan replacement may be needed depending on severity.
Problem: It leaks after reinstalling
- Replace the crush washer/gasket.
- Make sure the plug is properly seated and tightened to spec.
- Confirm the sealing surface on the oil pan is clean and undamaged.
Avoid “fixing” leaks with random sealants unless a manufacturer specifically calls for it.
Sealants can complicate removal later and may cause more harm than good.
After the Drain Plug: Quick Checklist for a Clean Finish
- Wipe the area around the drain hole before reinstalling the plug.
- Thread by hand first (this prevents cross-threading).
- Tighten to spec if possible using a torque wrench and your service manual data.
- After refilling oil, start the engine and check for leaks around the plug.
- Dispose of used oil properly at an auto parts store or recycling center.
When It’s Smarter to Call a Pro
DIY is awesomeuntil it isn’t. Consider professional help if:
- The drain plug is rounded and you don’t have extractor tools
- You suspect stripped oil pan threads
- You see oil leaking but can’t identify the source
- Your vehicle has an unusual oil pan design, skid plates, or hard-to-access drain hardware
A short shop visit can be cheaper than an oil pan replacement, and definitely cheaper than an engine that ran out of oil.
Conclusion
Removing the drain plug is the heart of a DIY oil change: it’s where the mess happens, where the mistakes happen,
and where you can feel like a hero when everything goes smoothly. Use the correct tool, keep the socket square,
loosen the plug with controlled force, and remove it by hand with the “push-in then pull-away” trick to avoid an oil geyser.
The biggest secret is also the most boring: don’t overtighten when you reinstall, and replace the sealing washer when needed.
Do that, and your drain plug will keep doing its job quietlylike the best kind of coworker.
Driveway Stories: Real-World Experience ( of Lessons Learned)
The first time I removed a drain plug on my own car, I treated it like opening a jar of pickles: grip, twist, victory.
What I got instead was a hot-oil handshake and a drain plug that tried to escape into the pan like it had a tiny probation officer chasing it.
That’s when I learned lesson #1: oil doesn’t politely dribble out. It commits. If your drain pan is positioned like you’re expecting a gentle waterfall,
you’re about to decorate your garage floor in “used 5W-30.”
Lesson #2 showed up the day I grabbed a 12-point socket because it was “close enough.” It was close enough…
to round off the plug head just a little. That “just a little” becomes “why is my tool slipping?” which becomes “why am I bargaining with inanimate objects?”
A 6-point socket fits like it means it, and you can feel the difference immediately. When someone previously overtightened the plug, that extra grip can be the difference
between “done” and “now I need an extractor socket and a new personality.”
Lesson #3 is about patience. Sometimes the drain plug is stubborn, especially if a quick-lube place last tightened it with enthusiasm and a power tool.
My early instinct was to pull harder. That’s how you end up rocking the socket and damaging the plug. A better move is to reset:
seat the socket fully, keep it square, and apply steady pressure. If you have a breaker bar, use it gentlymore leverage doesn’t mean more chaos.
It means you can apply the same force more effectively, like upgrading from “trying really hard” to “using physics.”
Lesson #4: the “push-in while unscrewing” trick is not a myth. It feels silly at firstwhy am I pushing the plug toward the hole I’m trying to open?
Because it buys you control. You can unscrew to the last thread, brace yourself, and then pull away cleanly. Without it, the plug can pop free unexpectedly,
and the oil stream can shoot past your drain pan like it’s trying to win a distance competition.
And lesson #5, the quiet MVP: the crush washer. I used to think replacing it every time was overkilluntil I had a slow leak that made my oil pan look like it was sweating.
A fresh washer seals with less tightening force, which protects the threads (especially on aluminum pans) and reduces the temptation to “just give it one more crank.”
The moral: spend the couple bucks on the washer. It’s cheaper than a leak, and far cheaper than learning how to replace an oil pan on a Saturday.


