Table of Contents >> Show >> Hide
- Introduction: Your Guitar Is Not BrokenIt Is Just Being Dramatic
- Before You Start: Know the Standard Guitar String Notes
- Way 1: Use the Fifth-Fret Method
- Way 2: Tune to a Reference Note
- Way 3: Use Harmonics and Chord Checks
- Common Mistakes When Tuning a Guitar Without a Tuner
- Which Method Should You Use?
- Practical Examples for Beginners
- How to Train Your Ear for Faster Tuning
- Experience Section: What Tuning Without a Tuner Teaches You
- Conclusion: A Better Ear Starts With One String
Note: This article is written in standard American English for web publishing and focuses on practical, beginner-friendly guitar tuning methods that do not require an electronic tuner.
Introduction: Your Guitar Is Not BrokenIt Is Just Being Dramatic
Every guitarist has met the same tiny villain: an out-of-tune guitar. One minute you are ready to play your favorite song, and the next minute your beautiful acoustic sounds like a shopping cart rolling down a staircase. The good news? You do not always need a clip-on tuner, pedal tuner, phone app, or any fancy gadget to fix the problem. Learning how to tune a guitar without a tuner is one of the most useful skills a beginner can develop.
Yes, electronic tuners are convenient. They are fast, accurate, and less judgmental than your bandmates. But tuning by ear teaches you to recognize pitch, listen for string relationships, and understand your instrument better. It also saves the day when your tuner battery dies, your phone is missing, the Wi-Fi is acting like it joined a witness protection program, or you are sitting around a campfire with nothing but a guitar and questionable marshmallow technique.
In standard guitar tuning, the six strings from lowest pitch to highest pitch are E–A–D–G–B–E. The thickest string is the low E string, and the thinnest string is the high E string. Most beginner songs, chord charts, and guitar lessons assume your instrument is tuned this way. Once you understand that pattern, you can use several simple tricks to tune your guitar without a tuner.
This guide covers three quick and easy ways: the fifth-fret method, reference-note tuning, and harmonic tuning with chord checks. Each method is practical, beginner-friendly, and useful in real playing situations. You will also learn what to listen for, how to avoid common mistakes, and how to build confidence when tuning by ear.
Before You Start: Know the Standard Guitar String Notes
Before tuning anything, memorize the standard guitar string names:
- 6th string: E, the thickest and lowest-sounding string
- 5th string: A
- 4th string: D
- 3rd string: G
- 2nd string: B
- 1st string: E, the thinnest and highest-sounding string
A classic memory trick is: Eddie Ate Dynamite, Good Bye Eddie. Is it silly? Absolutely. Does it work? Also absolutely. Guitar learning is full of strange little memory tools, and this one has helped generations of beginners avoid staring at the strings like they are reading ancient runes.
When tuning by ear, your goal is to make two notes match. If one note is too low, it is called flat. If one note is too high, it is called sharp. Turn the tuning peg slowly while listening carefully. Small movements matter. A guitar string can go from “almost perfect” to “emergency banjo impression” faster than you think.
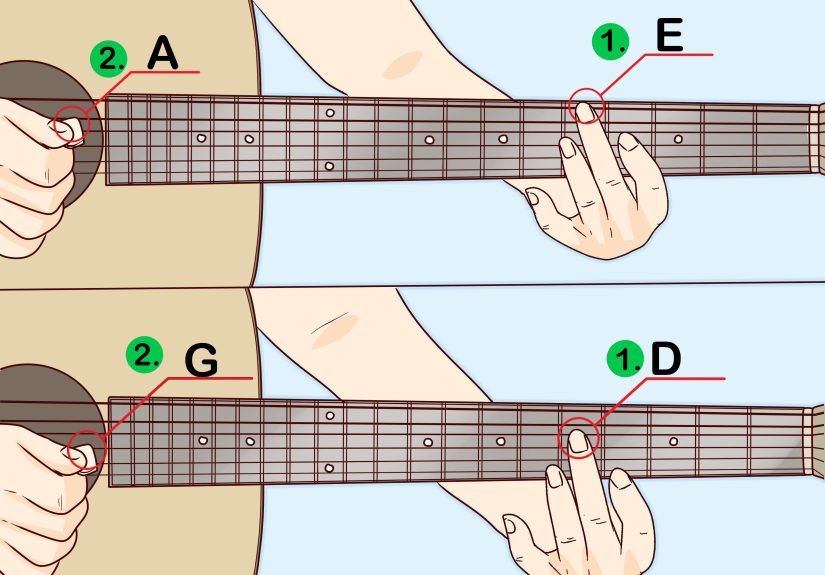
Way 1: Use the Fifth-Fret Method
The fifth-fret method is the most popular way to tune a guitar without a tuner. It works by tuning the guitar relative to itself. In simple terms, you use one string as a pitch guide for the next string. This method is quick, easy, and does not require any outside equipment.
How the Fifth-Fret Method Works
Assume your low E string is close enough to correct. It does not have to be concert-perfect if you are playing alone. Then follow this sequence:
- Press the 5th fret of the low E string. That note is A. Tune the open A string to match it.
- Press the 5th fret of the A string. That note is D. Tune the open D string to match it.
- Press the 5th fret of the D string. That note is G. Tune the open G string to match it.
- Press the 4th fret of the G string. That note is B. Tune the open B string to match it.
- Press the 5th fret of the B string. That note is E. Tune the open high E string to match it.
Notice the special exception: when tuning the B string, you use the 4th fret of the G string, not the 5th fret. This is where many beginners accidentally create a guitar that sounds like it is arguing with itself. Standard tuning is mostly built in fourths, but the G-to-B relationship is different, so the 4th fret is the correct choice.
What to Listen For
Play the fretted note and the open string one after the other. If they sound the same, you are close. If they create a pulsing, wobbling, or “wah-wah-wah” sound when played together, the strings are not matched yet. The faster the wobble, the more out of tune they are. Turn the tuning peg slowly until the wobble becomes slower and finally disappears.
For beginners, the easiest approach is to play one note, then the other. More advanced players often let both notes ring together and listen for those pitch waves. Do not rush. Tuning by ear is not a race; it is more like convincing six tiny metal ropes to cooperate.
Best Use Case
The fifth-fret method is best when you are playing alone, practicing chords, writing songs, or quickly fixing a guitar that is slightly out of tune. It may not put you exactly at concert pitch unless your starting E string is accurate, but it will make the guitar sound in tune with itself. For solo practice, that is often enough.
Way 2: Tune to a Reference Note
If you want your guitar to be closer to standard pitch without using a tuner, use a reference note. A reference note is any reliable pitch source you can match by ear. This could be a piano, keyboard, pitch pipe, tuning fork, another instrument, or even a recording of a single guitar note.
Choose Your Reference Pitch
The most common reference is the low E string or the A string. If you have a piano nearby, find the correct E or A and match your guitar string to it. If you have a tuning fork, many are tuned to A 440 Hz, which can help you tune the A string. Once one string is accurate, use the fifth-fret method to tune the rest of the guitar.
This approach is more reliable than tuning the guitar only to itself because it anchors your instrument to an outside pitch. That matters if you plan to play with singers, recordings, other guitarists, a piano, or a band. A guitar can be perfectly in tune with itself and still be too high or too low compared with everyone else. That is how jam sessions become emotional support groups.
Step-by-Step Reference Note Method
- Find a reliable reference note, such as E or A, on a piano, keyboard, pitch pipe, or another tuned instrument.
- Play the reference note and the matching guitar string.
- Adjust the guitar string until both notes sound the same.
- Once that string is tuned, use the fifth-fret method to tune the remaining strings.
- Play a few open chords to check the overall sound.
If you tune the A string first, you can work outward. Tune the D string from the 5th fret of the A string. Tune the G string from the 5th fret of the D string. Tune the B string from the 4th fret of the G string. Tune the high E from the 5th fret of the B string. Then go back and tune the low E by matching its 5th fret to the open A string.
Best Use Case
Reference-note tuning is ideal when you need to play with other musicians or along with a recording. It is also useful for singers because the guitar will sit closer to the expected key. If your guitar is tuned too low or too high, familiar songs may feel strange, vocal melodies may become uncomfortable, and chord progressions may lose their normal sparkle.
Way 3: Use Harmonics and Chord Checks
Natural harmonics create clear, bell-like tones that can make tuning easier once your ear gets used to them. This method is slightly more advanced than the fifth-fret method, but it is still beginner-friendly with practice. Harmonics are especially helpful because they ring clearly and make it easier to hear whether two strings match.
How to Play a Natural Harmonic
To play a natural harmonic, lightly touch the string directly above the fret wire without pressing the string down to the fretboard. Pluck the string, then lift your finger away. If done correctly, you will hear a bright chime instead of a normal fretted note.
The most common tuning comparison uses the 5th and 7th fret harmonics:
- Play the 5th fret harmonic on the low E string and compare it with the 7th fret harmonic on the A string.
- Play the 5th fret harmonic on the A string and compare it with the 7th fret harmonic on the D string.
- Play the 5th fret harmonic on the D string and compare it with the 7th fret harmonic on the G string.
The B string is trickier because of the guitar’s standard tuning layout, so many players use the fifth-fret method or chord checks for the G-to-B and B-to-high-E relationship.
Add Chord Checks for Real-World Accuracy
After using harmonics or the fifth-fret method, play a few familiar open chords. Good test chords include G major, D major, E major, A major, and C major. These chords reveal tuning problems quickly because they use open strings that need to blend smoothly.
For example, if your open G chord sounds sour, check the B string and high E string. If your D chord sounds tense or sparkly in the wrong way, check the high E and B strings again. The thinnest strings often drift sharp when beginners press too hard or tune too aggressively.
Best Use Case
Harmonic tuning and chord checks are best for fine-tuning after you have already gotten close. They are also great for training your ear. Over time, you will start to recognize when a string is slightly sharp or flat before you even touch the tuning peg.
Common Mistakes When Tuning a Guitar Without a Tuner
Turning the Peg Too Fast
Guitar tuning requires small, careful movements. Beginners often twist the tuning peg too far and overshoot the correct pitch. Move slowly, pluck the string again, and listen before making another adjustment.
Forgetting the G-to-B Exception
The B string is tuned from the 4th fret of the G string, not the 5th. This one detail can make or break the fifth-fret method. If everything sounds good until you reach the top two strings, check this step first.
Pressing Too Hard
When using fretted notes, press just hard enough to make the note clear. If you squeeze too hard, especially on taller frets or lighter strings, you can bend the note sharp and tune incorrectly.
Ignoring String Stretch
New strings stretch. After tuning, gently pull each string upward away from the fretboard, then tune again. Do not yank like you are starting a lawn mower. A gentle stretch helps the strings settle and stay in tune longer.
Tuning Down to the Note Instead of Up
For better tuning stability, many players tune slightly below the target pitch and then bring the string up to pitch. This helps reduce slack in the tuning mechanism and can keep the string from slipping flat right after you start playing.
Which Method Should You Use?
If you are a complete beginner, start with the fifth-fret method. It teaches the string relationships and gives you a dependable way to tune anywhere. If you need to play with other musicians, use a reference note first so your guitar is close to standard pitch. If you already have a decent ear and want a cleaner final check, add harmonics and open chords.
Think of the three methods like tools in a small guitar survival kit. The fifth-fret method gets you moving. The reference-note method keeps you connected to the outside musical world. Harmonics and chord checks polish the final result. Together, they make you less dependent on gadgets and more connected to the sound of the instrument.
Practical Examples for Beginners
Example 1: You Are Practicing Alone
You pick up your acoustic guitar and notice your open chords sound rough. You do not have a tuner nearby. Use the fifth-fret method. Start from the low E string, tune each string in order, and then test a G chord and a D chord. If the chords sound clean, you are ready to practice.
Example 2: You Are Playing With a Singer
A singer wants to practice a song in the original key. Use a piano or keyboard to tune one string to a reference note, then tune the rest of the guitar from that string. This keeps your guitar close to standard pitch, making the song more comfortable and predictable.
Example 3: You Are Around a Campfire
No tuner. No outlet. Possibly no dignity after someone requests “Wonderwall” for the eighth time. Tune the guitar to itself with the fifth-fret method, then check a few open chords. If the guitar sounds balanced, you are good to go. Around a campfire, musical confidence matters more than laboratory precision.
How to Train Your Ear for Faster Tuning
Tuning by ear gets easier with repetition. At first, you may not know whether a string is sharp or flat. That is normal. Your ear is learning a new language. The trick is to slow down and compare notes carefully.
Try this exercise: tune your guitar with a tuner first, then use the fifth-fret method anyway. Listen to how matching notes sound when they are correct. Then slightly detune one string and bring it back by ear. This builds pitch memory and helps you recognize the wobbling sound that happens when two notes are close but not perfectly matched.
Another helpful habit is singing the string names as you tune: E, A, D, G, B, E. You do not need a beautiful voice. Your guitar will not file a complaint. Singing helps connect your ear, voice, and hands, which improves overall musicianship.
Experience Section: What Tuning Without a Tuner Teaches You
The first time many guitarists try to tune without a tuner, it feels like trying to solve a mystery with six suspects and no detective training. You pluck one string, turn a peg, pluck again, and suddenly everything sounds worse. That experience is not failure; it is the beginning of learning how the guitar actually works.
One of the biggest lessons is patience. A tuner gives you instant visual feedback, but your ear asks you to pay attention. You begin to notice small changes in pitch. You hear the difference between a note that is almost right and one that truly settles into place. That kind of listening improves more than tuning. It helps with bending notes, singing melodies, learning songs by ear, and playing in time with other musicians.
Another experience most players share is discovering that “in tune” is not always as simple as it seems. You may tune every string carefully, then play a C chord and hear something slightly off. That does not always mean you made a huge mistake. Guitars are imperfect instruments. String age, fret pressure, setup, intonation, temperature, humidity, and even how hard you strum can affect the sound. Tuning by ear teaches you to make musical decisions instead of blindly chasing a display screen.
For example, many beginners press too hard when playing open chords. The tuner may say the open strings are correct, but the fretted notes sound sharp because the player is squeezing the neck like it owes them money. When you tune without a tuner and then test real chords, you start noticing how your playing technique affects tuning. That awareness is valuable.
There is also a confidence boost that comes from tuning by ear in a real-life situation. Imagine sitting with friends, picking up a slightly out-of-tune guitar, and calmly bringing it back into shape without reaching for your phone. It feels good. It makes you look prepared, but more importantly, it makes you feel connected to the instrument. You are not just following instructions; you are listening, adjusting, and responding.
Over time, the process becomes faster. At first, tuning by ear may take several minutes. Later, you may fix a drifting B string in seconds because you recognize the sound immediately. You will know that if an E major chord sounds muddy, the G or B string might need attention. If a D major chord sounds painfully bright, the high E may be sharp. These little clues become part of your musical instincts.
The best experience-based advice is simple: do not wait until your tuner disappears to practice tuning without it. Try it when you are relaxed. Tune by ear, then check yourself with a tuner afterward if one is available. Treat the tuner like a teacher, not a crutch. The more you practice, the more your ear develops. Eventually, tuning without a tuner stops feeling like a backup plan and starts feeling like a normal part of being a guitarist.
Conclusion: A Better Ear Starts With One String
Learning how to tune a guitar without a tuner is not just an emergency trick. It is a core guitar skill that helps you understand pitch, string relationships, and the sound of standard tuning. The fifth-fret method gives you a fast way to tune the guitar to itself. Reference-note tuning helps you match standard pitch when playing with others. Harmonics and chord checks help you fine-tune the result and train your ear.
You do not need perfect pitch. You do not need expensive gear. You only need patience, a quiet moment, and the willingness to listen closely. Start with one string, move carefully, and let your ear improve with practice. Your guitar will sound better, your chords will feel more satisfying, and you will be ready the next time your tuner mysteriously vanishes into the same dimension as lost picks and missing capo springs.


