Table of Contents >> Show >> Hide
- What Are “Melting Candle” Cupcakes, Exactly?
- The Game Plan (So You Don’t End Up Crying Over Ganache)
- Ingredients and Tools I Used
- Step-by-Step: How I Made Magical Melting Candle Cupcakes
- Flavor Combos That Actually Make Sense (Even If Your Cupcakes Look Cursed)
- Common Problems (and How I Fixed Them Without Moving to a New City)
- Halloween Decorating Ideas That Make These Look Store-Bought
- Make-Ahead and Storage Tips (Because October Is Busy)
- Food Safety Note: About “Real” Candle Flames
- So… Were They Worth It?
- Extra : What It Was Actually Like Making These (A Very Honest Diary)
- Conclusion
I love Halloween baking for one reason: it’s the only time of year you can proudly serve a dessert that looks
like it belongs in a haunted house and still expect compliments. Enter the internet’s newest spooky darling:
magical melting candle cupcakescupcakes decorated to look like drippy, half-melted pillar candles,
complete with “wax” drips and a little “flame” moment on top.
When I first saw Halloween candle cupcakes, I thought, “Cute! I can do that.” Then I remembered
my relationship with melted chocolate: it’s complicated, emotional, and occasionally ends with me eating frosting
out of the piping bag like a woodland creature. Still, I went for ittested a few methods bakers use for realistic
drips, tried different “candle” options, and learned exactly how many paper towels a human can use in one evening.
What Are “Melting Candle” Cupcakes, Exactly?
Picture a cupcake topped with a smooth cylinder (the “candle”), then covered in shiny, dramatic drips (the “melt”).
The candle can be made by stacking cupcakes, shaping frosting, or using a small cake roundanything that gives you
that tall, candle-like silhouette. The drips are usually a thin ganache or candy melt mixture tinted to your spooky
color palette: black, blood red, ghostly ivory, pumpkin orange, or that particular purple that screams “witch with Wi-Fi.”
The magic is in the contrast: a matte candle body plus glossy “wax” drips. When it works, it looks wildly realistic.
When it doesn’t… it looks like your cupcake had a bad day in the sun. We’re aiming for the first one.
The Game Plan (So You Don’t End Up Crying Over Ganache)
My “minimum chaos” strategy
- Bake sturdy cupcakes (chocolate, black cocoa, pumpkin spiceanything with structure).
- Build the candle shape (stacked cupcakes or a tall buttercream “pillar”).
- Chill before dripping so the drips set instead of waterfalling into sadness.
- Make a thin drip mixture and test it on one sacrificial cupcake first (RIP, Test Cupcake #1).
- Add an edible “wick/flame” topper (no actual fire required for maximum party-host peace).
Ingredients and Tools I Used
For the cupcakes
- 12 cupcakes, fully cooled (chocolate is the easiest “candle” base visually)
- Optional: black cocoa or Dutch-process cocoa for a darker Halloween vibe
For the candle body (choose one)
- Option A (fast + cute): Stack 2 cupcakes per “candle,” trimmed flat
- Option B (cleanest look): Pipe a tall buttercream cylinder on a single cupcake
- Option C (extra): Add a mini cake round on top for a true pillar-candle profile
For frosting
- American buttercream (sweet, sturdy, easy to pipe)
- Or Swiss meringue buttercream (silkier, less sweet, more “pro bakery” energy)
- Gel food color (Halloween shades), plus black cocoa if you want deep color without a gallon of dye
For the “wax” drips
- Chocolate ganache (best shine and realism)
- Or candy melts + a little fat/cream (easy color control, great for bright drips)
Edible candle toppers
- Pretzel sticks dipped in white chocolate/candy melts (my favorite “candle” look)
- Pocky sticks (already pretty, minimal effort)
- Mini wafer sticks (cute, but can soften if refrigerated too long)
- “Flame”: candy corn, a yellow/orange gummy, or a tiny buttercream teardrop
Tools that saved me
- Piping bags + a large round or large open star tip
- Offset spatula (or butter knife if you live dangerously)
- Microwave-safe bowls
- Squeeze bottle or spoon for drips
- Sheet pan + parchment
- Fridge/freezer space (aka the real luxury item)
Step-by-Step: How I Made Magical Melting Candle Cupcakes
Step 1: Bake cupcakes that can handle Halloween drama
This is not the time for a cupcake so tender it collapses when you look at it. You want a cupcake with enough
structure to support a tall frosting pillar or a stacked “candle” build. Chocolate works beautifully because it
reads as “shadowy candle base,” and the crumbs are less visually loud if you trim and stack.
Step 2: Build the candle shape
I tested two approaches:
-
Stacked cupcake candles: Trim the domes flat. Pipe a little buttercream “glue,” stack two cupcakes,
and frost the outside like you’re dressing a tiny edible column. -
Buttercream pillar candles: On one cupcake, pipe a tall cylinder of thick buttercream using a large
round tip. Smooth the sides with an offset spatula. This looks ridiculously candle-like if you keep it straight.
The buttercream pillar was cleaner and easier to portion, but stacked cupcakes were more “wow” on a platter.
(Also more “wobble,” which is a thrilling genre of fear I didn’t need.)
Step 3: Chill like you mean it
Once the candle bodies were frosted and smoothed, I chilled them until firm. This matters because warm frosting +
thin drips = your candle “melts” into a full-on landslide. Aim for firm-to-the-touch frosting before you drip.
Step 4: Make the shiny “wax” drip mixture
Option A: Chocolate ganache drips (most realistic)
Ganache is the gold standard for glossy drips. For a classic, pourable ganache, many bakers start around a
1:1 ratio by weight (chocolate to heavy cream). For thinner drips (more “melted wax”), you can nudge
it looser with a bit more cream. The key is temperature: too hot and it runs off like it’s late for a meeting; too
cool and it plops like sad pudding.
My method: Heat cream until steaming (not boiling), pour over chopped chocolate, rest, then stir until
smooth. Tint with oil-based color (or use white chocolate ganache + gel color very sparingly). Let it cool until it
pours in a ribbon.
Option B: Candy melts drips (best for bold Halloween colors)
If you want electric orange, witchy green, or “I just adopted a vampire” black drips, candy melts are a friendly
option. Melt them gently, then thin with a little cream or shortening until they drip smoothly. Candy melts set
faster than ganache, which is great for control, but you still need to test the flow.
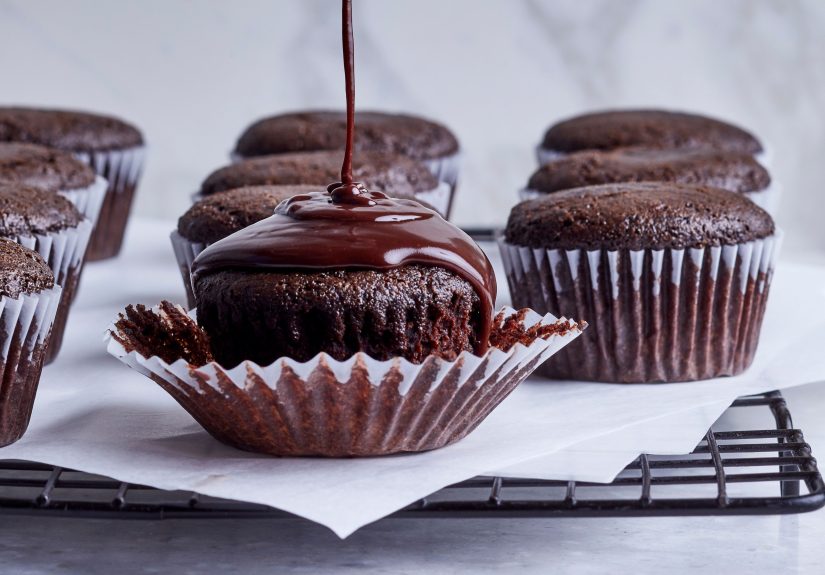
Step 5: Drip the “wax” (aka the moment of truth)
I used a teaspoon and a small squeeze bottle. Here’s the trick: do the edges first. Add a drip at the rim, let it
travel down naturally, then fill the top lightly. For candle realism, vary the drip lengthssome long, some short,
a few dramatic ones that look like they’ve seen things.
Reality check: Your first cupcake will probably look… enthusiastic. That’s why we always sacrifice a
test cupcake to the Halloween gods.
Step 6: Add the candle topper (edible, not flammable)
I made quick “candles” by dipping pretzel sticks in melted white chocolate/candy melts, then letting them set on
parchment. The pretzel gives structure, a nice salty crunch, and the illusion of a wick without encouraging anyone
to light dessert on fire. For the “flame,” I used a candy corn on topshockingly effective and very on-brand.
Insert the pretzel “candle” into the top of the cupcake candle body. If it feels loose, dip the bottom of the
pretzel in melted chocolate first and let it set in place like edible cement.
Flavor Combos That Actually Make Sense (Even If Your Cupcakes Look Cursed)
1) Black cocoa + vanilla bean buttercream + black ganache drips
This is the “goth candle centerpiece” version. Deep, Oreo-like cocoa flavor with creamy frostingspooky without
tasting like a chemistry set.
2) Pumpkin spice + cream cheese frosting + caramel-colored drips
Autumn comfort meets Halloween aesthetic. If your party crowd likes cozy flavors, this one disappears first.
3) Red velvet + vanilla buttercream + “blood” drips
Use a red-tinted drip (white chocolate ganache dyed red) for that theatrical “haunted bakery” vibe. It’s dramatic,
photogenic, and slightly unhingedin the best way.
4) Chocolate peanut butter + orange drips
The flavor is classic candy-bar energy, and the orange drip makes it scream Halloween without requiring a fog machine.
Common Problems (and How I Fixed Them Without Moving to a New City)
My drips ran all the way down
- Your drip mixture was too warm or too thin.
- Your frosting wasn’t chilled/firm enough.
- Fix: cool the drip mixture a few minutes and re-test; chill cupcakes longer.
My drips seized or looked grainy
- Chocolate can seize if it meets too much water or gets overheated.
- Fix: melt gently; keep tools dry; stir slowly; use warm (not boiling) cream for ganache.
My candy melts were too thick
- Candy melts often need thinning for smooth drips.
- Fix: add a small amount of shortening or cream, stir, and test again.
My candle shape leaned like it had one too many potions
- Stacking needs a flat base and “glue” frosting.
- Fix: trim the cupcakes flatter, chill between steps, and don’t over-stack.
Halloween Decorating Ideas That Make These Look Store-Bought
Go monochrome for instant fancy
A black candle with black drips is weirdly elegant. Add a little edible gold dust or metallic sprinkles and suddenly
your cupcake is wearing a tuxedo.
Add texture like real wax
Candles aren’t perfectly smooth in real life, especially the spooky ones. Lightly “tap” buttercream with a spatula
to create subtle waxy ridges.
Use themed accents
- Mini sugar skulls
- Chocolate “spiderweb” piping
- Black sanding sugar for a velvety base
- Orange-and-black sprinkles to scream “Halloween party treats”
Make-Ahead and Storage Tips (Because October Is Busy)
- Bake cupcakes ahead: 1–2 days in an airtight container, or freeze (unfrosted) for longer.
- Make frosting ahead: store chilled, then rewhip to restore fluff.
- Assemble the candle shapes: best the day-of or the night before, kept chilled.
- Add drips: once cupcakes are cold and stable; let drips set before boxing.
- Topper timing: add pretzel “candles” close to serving so they stay crisp.
Food Safety Note: About “Real” Candle Flames
Some versions online show cupcakes you can actually light. I’m not here to scold anyone’s fun, but I personally
went with edible toppers and zero open flame. It’s simpler, safer, and nobody has to explain to their
smoke detector why dessert is on fire.
So… Were They Worth It?
Yeswith a small caveat: these cupcakes are a “trust the process” bake. The first one is awkward. The second one is
better. By the third, you’re basically a spooky pastry architect. The end result looks wildly impressive on a
Halloween dessert table, and people will assume you have a private baking show deal. Let them think that.
Extra : What It Was Actually Like Making These (A Very Honest Diary)
If you’ve ever watched a 12-second video of someone making melting candle cupcakes and thought,
“Wow, that looks relaxing,” I have news: that video is a highlight reel edited by a wizard. My experience began
with confidence and ended with me whispering affirmations to a bowl of ganache like it was a stressed-out houseplant.
First, I chose “dramatic black candles” because Halloween, obviously. I tinted buttercream, then realized black
frosting is less a color and more a lifestyle choice. It gets on your hands, your counter, your shirt, and somehow
your elbow even if you never touched your elbow. At one point, I looked down and thought, “Cool, I’ve joined a
Victorian chimney sweep troupe.”
The cupcake stacking phase was next. I piped buttercream “glue” between cupcakes and tried to line them up neatly.
They looked perfectuntil I turned the tray slightly and watched one candle lean at a theatrical angle like it was
auditioning for a haunted cabaret. I fixed it by trimming the cupcake edges flatter and chilling between steps.
Chilling is basically the emotional support technique of this entire project.
Then came the drips: the make-or-break moment. My first drip batch was too warm, and it ran down the sides like it
was fleeing responsibility. The second batch was too cool and made blobs that looked less “melting wax” and more
“cupcake with commitment issues.” I finally nailed it by letting the drip mixture cool to a slow ribbon consistency,
testing on a single cupcake, and chilling the frosted candle bodies until they were firm. Once I got the rhythm,
I actually started having funadding varied drip lengths and pretending I was designing candles for a fancy vampire
dinner party.
The edible toppers were the most satisfying part. I dipped pretzel sticks in melted white candy coating and rolled
some in black sanding sugar. Instant witchcraft. For the flame, I used candy corn and laughed because it’s the one
time candy corn feels absolutely correct. I pushed the “candles” into the cupcakes and stepped back to admire my
work… and that’s when I realized I’d made desserts that looked like they belonged in a gothic cathedral gift shop.
In other words: perfect.
Serving them at a Halloween get-together was peak comedy. People gasped, took photos, and asked where I bought them.
One friend stared for a full ten seconds and said, “I thought those were real candles and I was concerned about the
frosting catching fire.” That’s the dream: confusion, delight, and zero actual danger. By the end of the night, the
tray was empty, my kitchen looked like a cocoa-powered crime scene, and I decided I would absolutely make them again…
after I finish removing black frosting from places frosting should never be.
Conclusion
If you want a Halloween bake that’s equal parts delicious and “how did you even do that,”
magical melting candle cupcakes are a top-tier choice. Chill your candle shapes, test your drip
consistency, keep the toppers edible (and unlit), and embrace the fact that the first cupcake is just the training montage.
By the end, you’ll have a dessert that looks like it came from a spooky bakery windowand tastes like a party.


