Table of Contents >> Show >> Hide
- Why Denim Is the Secret Weapon for Bunting
- Materials and Tools
- Design Planning: Make It Look Intentional
- Step-by-Step: How to Make Patriotic Painted Denim Bunting
- Finish the Edges So Your Bunting Doesn’t Shed Denim Confetti
- Assemble the Bunting
- Weather and Storage: Make It Reusable
- Common Mistakes and How to Fix Them
- Specific Design Examples You Can Copy
- Quick FAQ
- Conclusion: A Craft That’s Festive, Tough, and Actually Reusable
- Experiences and Real-World Lessons Crafters Share (About )
Nothing says “I’m ready for burgers, sparklers, and questionable karaoke” quite like bunting. And if you make it from
old denim? Now you’ve got decor that’s basically wearing work boots and carrying a cooler. Patriotic painted denim bunting
is one of those rare crafts that checks every box: it’s inexpensive, sturdy, customizable, and it looks great on a porch,
mantel, party table, or backyard fence. Plus, it gives worn-out jeans a second actbecause denim deserves a retirement plan.
In this guide, you’ll learn how to design, cut, paint, and finish a denim bunting that holds up well, looks intentionally rustic
(not “I spilled paint and panicked”), and can be reused year after year. We’ll also cover paint choices, stencil tricks,
heat-setting for durability, weather-friendly finishing, and a few “save it before it becomes a craft crime” fixes.
Why Denim Is the Secret Weapon for Bunting
Denim is naturally tough, which is exactly what outdoor decor needs. Lightweight cotton fabric can flutter itself into frayed
confetti; denim tends to keep its shape, hang nicely, and feel substantial. It also brings built-in texturethose subtle fades,
seams, and worn spots give your bunting that “vintage Americana” vibe without you having to fake it.
- Durability: Denim resists tearing and handles repeated hanging better than many thin fabrics.
- Texture: The weave adds depth under paint, making colors look richer and more handmade (in a good way).
- Upcycling win: Old jeans become decor instead of landfillplus you get to cut up denim without fear.
- Forgiving style: Slightly imperfect edges and brushstrokes look “rustic,” not “oops.”
Materials and Tools
You can keep this project super simple or go full “craft goblin with a glitter stash.” Here’s a practical, porch-ready list.
Denim and Cutting
- Old jeans (medium-to-light wash works best for bright paint)
- Sharp fabric scissors or rotary cutter + mat
- Cardstock or cardboard for a reusable triangle template
- Ruler or measuring tape
- Chalk or washable fabric marker
Painting
- Fabric paint or acrylic paint + fabric medium (to improve flexibility and wash durability)
- Foam brush (great for stencils), plus a small detail brush
- Painter’s tape (for crisp stripes)
- Pressing cloth (an old cotton pillowcase works)
- Cardboard inserts (to keep paint from bleeding through to your table or the other side of denim)
Assembly and Finishing
- Twine, cotton rope, bias tape, or sturdy ribbon for the banner “spine”
- Clips or clothespins (temporary holding)
- Fabric glue, sewing machine, or iron-on hemming tape (pick your finishing personality)
- Optional: pinking shears, fray-check liquid, grommets
Design Planning: Make It Look Intentional
Before you paint anything, decide your vibe. “Classic flag,” “subtle navy-and-cream,” “fireworks party,” or “I’m doing this
at 11 p.m. before the cookout” are all valid directionsjust plan enough to keep it cohesive.
Pick a Pennant Size
A common, easy-to-hang size is a triangle about 7 inches wide at the top and 9 inches tall.
Bigger triangles read well from the street; smaller ones work for dessert tables.
Choose a Layout
- Alternating pattern: Red stripe / white stripe / blue star field repeating.
- Message bunting: Spell “USA,” “BBQ,” “FREEDOM,” or “HEY NEIGHBOR” (depending on your mood).
- Patchwork look: Mix denim shades, then unify everything with repeated star stencils.
- Minimalist: White stars on indigo denim with a single red accent stripesimple, sharp, modern.
Step-by-Step: How to Make Patriotic Painted Denim Bunting
Step 1: Prep the Denim
Wash and dry your denim first, especially if it’s from old jeans. This removes residue that can interfere with paint adhesion.
Skip fabric softenersofteners can leave a coating that makes paint behave like it’s on a slip-n-slide.
Iron the denim flat so you’re not trying to paint over surprise wrinkles.
Step 2: Make a Template and Cut Pennants
Draw one triangle template on cardstock (or cut a cereal boxcrafting is just responsible snacking). Trace it onto denim and cut.
For a fuller look, aim for 9–15 pennants depending on where you’re hanging it.
- Quick math: Each 7-inch pennant plus spacing usually equals about 8–9 inches of banner length.
- Pro tip: Cut a few extras. One will inevitably become your “test triangle.”
Step 3: Decide Your Paint Strategy
You have two solid options:
- Fabric paint: Made for textiles and usually easier for beginners.
-
Acrylic + fabric medium: Great if you already own acrylics and want more control. Mixing with fabric medium
helps the paint stay more flexible and durable on fabric.
Step 4: Set Up for Clean Painting
Slide cardboard under each pennant as you paint. Denim is thick, but paint can still seep throughespecially around seams or thinner areas.
Work on a protected surface, and keep a damp paper towel nearby for quick “oops” cleanups.
Step 5: Create Crisp Stripes
Want that classic bunting look? Use painter’s tape to mark stripe boundaries. Press the tape down firmly,
especially on textured denim. Then apply paint in light coats. Thick paint + tape = peeling heartbreak.
- Clean edges tip: Use a foam brush and dab (“pounce”) rather than brush back and forth under the tape.
- Color order: Paint white first when possible. White covers better on denim if it’s the base layer.
Step 6: Add Stars Without Losing Your Mind
Stars are where bunting goes from “nice triangles” to “oh, you made that.” Try one of these:
- Stencil method: Place a star stencil and pounce white paint with a foam brush.
- Reverse-stencil trick: Apply star stickers, paint over with blue, then peel to reveal denim “stars.”
- Freehand (brave soul): Draw stars lightly with chalk, then paint with a detail brush.
Keep your stars consistent in size and spacing for a more professional look. Or intentionally mix sizes for a playful, handmade vibe.
Both workjust don’t accidentally do “random chaos” unless that’s your brand.
Step 7: Let Everything Dry Properly
Give your painted pieces time to dry fully before you do anything “final,” including heat-setting. If paint feels cool or tacky,
it’s not ready. Most fabric paint instructions recommend at least overnight drying; many crafters wait a full day.
Step 8: Heat-Set for Durability
Heat-setting helps paint become more permanent and wash-resistant. Use a dry iron (no steam) and a pressing cloth.
Typically you iron from the back side of the painted fabric or protect the front with a clotheither way, you’re aiming
for thorough, even heat without scorching the denim.
Important safety note: If you’re a younger maker, ask an adult to help with the iron or heat press. Hot tools don’t care
how patriotic you feel.
Finish the Edges So Your Bunting Doesn’t Shed Denim Confetti
Denim frays. That’s part of its charm…until it starts raining little blue strings onto your snacks. Choose a finishing method based on your patience level:
Option A: Leave It Raw (Rustic)
Works best if you cut cleanly and accept a little fringe. For slightly less fray, use pinking shears or dab fray-check on edges.
Option B: Quick No-Sew Hem
Use iron-on hemming tape to fold and seal edges. This looks neat without a sewing machine.
Option C: Sew It (Most Durable)
Fold edges to the back and stitch, or sew two denim triangles together for a double-sided pennant. This is the “heirloom bunting”
approachyour future self will thank you when you pull it out next year and it’s still intact.
Assemble the Bunting
Now you’re basically building a triangle parade.
Method 1: Clip-On Garland (Fastest)
Lay out your pennants in order and clip them to a rope or twine using mini clothespins. Great if you want to change the pattern later.
Method 2: Fold-Over Spine (Cleanest Look)
Use bias tape or wide ribbon. Sandwich the tops of the triangles inside, then sew or glue. This hides raw top edges and adds strength.
Method 3: Grommets + Rope (Porch-Ready)
Add grommets to the top corners of each pennant and thread onto a rope. This is especially nice for outdoor hanging where wind is involved.
Weather and Storage: Make It Reusable
Denim bunting is tougher than paper, but weather still matters. A little planning keeps it looking good season after season.
- Rain strategy: If heavy rain is coming, bring it in. Paint is durable when heat-set, but constant soaking is still rough on textiles.
- Sun strategy: Bright reds can fade if left outside for weeks. Hang it for the holiday stretch, then store it.
- Storage tip: Roll the bunting around a cardboard tube to prevent sharp creases and paint cracking.
Common Mistakes and How to Fix Them
“My paint bled under the tape.”
Light coats help. Also, press tape down harder and pounce paint instead of brushing. For a fix, let it dry and touch up edges with a small brush.
Worst case: add a thin outline stripe to “make it a design choice.”
“My white looks sad on denim.”
White often needs two coats on denim. Let the first coat dry before the second. You can also use an opaque fabric paint for better coverage.
“My stars look like tiny potatoes.”
Stencils or stickers are your friend. If freehand goes rogue, turn the star field into a fun patternadd dots, small spark bursts, or extra stars
until it looks intentional.
“The denim is stiff where I painted.”
That’s normal if paint is heavy. Next time, use thinner coats and consider acrylic mixed with fabric medium to keep things more flexible.
Specific Design Examples You Can Copy
1) Classic “Porch Bunting” Triangles
Make 12 triangles: 4 red-and-white striped, 4 star-field navy, 4 mostly white with a red border. Alternate them. It reads patriotic from far away
and looks charming up close.
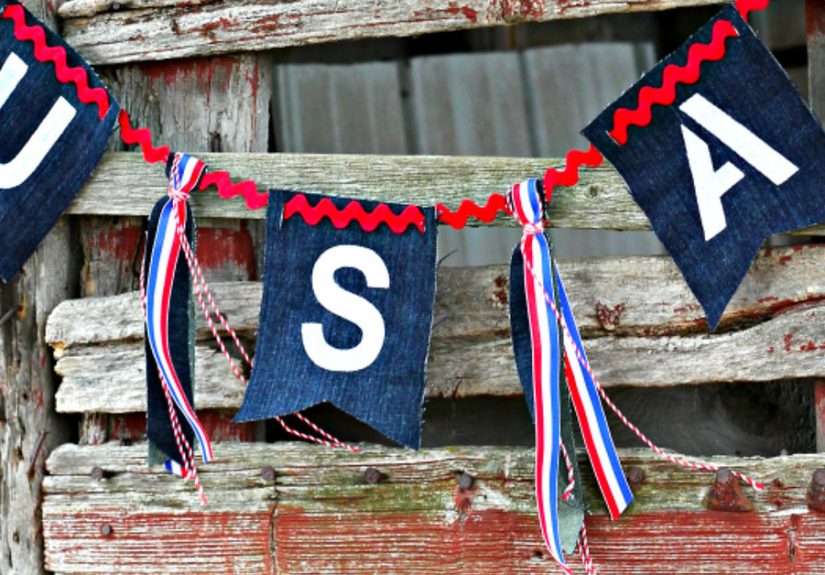
2) “USA” Statement Banner
Paint three larger pennants with bold letters: U, S, A. Add smaller triangles between them with star stencils. Hang above a snack table and watch
it become the unofficial photo backdrop.
3) Subtle Americana (Not Screaming Red-White-Blue)
Use cream paint instead of bright white, and deep navy instead of primary blue. Add a few metallic accents (tiny gold stars) for a modern twist.
This style works well for Memorial Day, Fourth of July, and even late-summer porch decor.
Quick FAQ
Can I use regular acrylic paint on denim?
Yesespecially if you mix it with a fabric medium for better flexibility and durability. Heat-setting is still important.
Do I have to heat-set?
If you want the design to last (and not flake off like a sunburn), heat-setting is strongly recommended.
Can I wash the bunting?
Many fabric paints become washable after proper drying and heat-setting. If you plan to wash it, be gentle: cold or warm water,
mild detergent, and air dry tends to be kinder to painted fabric.
Conclusion: A Craft That’s Festive, Tough, and Actually Reusable
Patriotic painted denim bunting is the sweet spot between “adorable holiday decor” and “won’t fall apart if someone sneezes near it.”
You get bold color, handmade character, and the satisfaction of turning old jeans into something that makes your space feel like a celebration.
With good prep, thoughtful painting, and proper heat-setting, your bunting can come back every summerno frantic last-minute crafting required.
(Unless you enjoy that. Some people do. Those people also probably love assembling furniture without reading instructions.)
Experiences and Real-World Lessons Crafters Share (About )
Makers who try denim bunting for the first time often expect it to behave like regular cottonthen quickly realize denim has its own personality.
The first lesson is usually about texture. Denim weave can create tiny gaps along brush strokes, especially with lighter colors.
Crafters commonly solve this by switching from “painting like a wall” to “painting like a stamp”: dabbing with a foam brush, using multiple thin coats,
and letting each layer dry before judging it. The funny part is how often someone declares the white paint “a lost cause,” walks away for a snack,
comes back, adds one more coat, and suddenly it looks crisp and bright. Denim rewards patience like that.
Another frequent experience: the stencil surprise. On smooth fabric, tape and stencils behave; on denim, edges can lift unless you press them down firmly.
People who get the cleanest stars tend to do two things: (1) they keep the paint slightly drier on the brush (less watery paint creeping under edges),
and (2) they lift stencils straight up instead of peeling sideways like a sticker. When stars go a little wonky, experienced crafters don’t scrap the pennant
they add more stars, dots, or mini “spark” lines and call it a fireworks pattern. Suddenly it looks intentional and fun instead of accidental.
Outdoor hanging teaches a practical lesson about weight and wind. Denim is heavier than quilting cotton, which makes it drape beautifully,
but it can tug on flimsy twine. Crafters often upgrade their banner spine after the first hangswitching to thicker rope, sturdy ribbon, or bias tapeand
they add a little extra spacing so triangles don’t bunch up. If someone hangs the bunting on a fence, they learn quickly that wind loves to twist pennants
into odd angles. A common fix is adding small grommets or stitching the triangles more securely into the spine so they stay facing forward.
Finally, there’s the “future me” moment. People who store bunting by stuffing it into a bin often find hard creases later, and those creases can stress painted
areas. The crafters who feel like geniuses the next summer are the ones who roll the banner around a tube, or loosely fold it with tissue paper between layers.
They pull it out, hang it up, and it looks like they just made itwithout actually making it again. That’s the real victory: decor that brings the holiday
energy without demanding annual panic crafting.


