Table of Contents >> Show >> Hide
- Why Tin Can Solar Lanterns Are So Genius
- Materials and Tools You’ll Need
- Step-by-Step Tin Can Solar Lantern Tutorial
- Step 1: Prep and Clean Your Tin Cans
- Step 2: Freeze the Cans (Optional but Very Helpful)
- Step 3: Design Your Lantern Pattern
- Step 4: Drill the Pattern
- Step 5: Add Handle Holes
- Step 6: Smooth and (Optional) Paint
- Step 7: Prep the Solar Path Light
- Step 8: Drill the Top Opening for the LED
- Step 9: Attach the Solar Head
- Step 10: Charge and Enjoy the Glow
- Design Ideas for Your Tin Can Solar Lanterns
- Troubleshooting & Safety Tips
- Real-Life Tin Can Solar Lantern Experiences & Pro Tips (Extra 500+ Words)
- Conclusion
If you’ve been saving tin cans “for some project one day,” congratulations today is that day. Tin can solar lanterns are the perfect mix of thrifty, eco-friendly, and cozy. They turn last night’s soup can into soft, twinkling outdoor lighting, and you don’t even have to remember to blow out a candle. The sun does the charging, the can does the glowing, and you get all the compliments.
This step-by-step tin can solar lantern tutorial walks you through everything: choosing the right cans, drilling pretty patterns, attaching a solar light, and keeping your DIY solar lanterns shining season after season. Whether you’re decorating a balcony, porch, or backyard, these upcycled tin can crafts deliver maximum charm for minimum cash.
Why Tin Can Solar Lanterns Are So Genius
Before we start punching holes in metal, let’s talk about why this DIY project is worth your time:
- Budget-friendly: You’re literally turning trash into lighting. The main cost is the solar path light which you can often find at dollar or discount stores.
- Low maintenance: Once your DIY solar lantern is assembled, it charges during the day and glows at night. No cords, no batteries to replace constantly, no hunting for a lighter.
- Endlessly customizable: Stars, hearts, house numbers, snowflakes, jack-o’-lantern faces if you can draw it, you can drill it.
- Earth-friendly upcycling: You’re reusing metal cans and avoiding single-use battery-powered decor.
- Year-round decor: Swap the pattern and paint color and your tin can lanterns can work for summer parties, Halloween, Christmas, or everyday mood lighting.
Materials and Tools You’ll Need
One of the best things about this tin can solar lantern project is that you don’t need a full workshop to make it happen. Here’s a solid starting list based on popular DIY methods:
Basic Materials
- Clean, empty tin cans (standard food cans, larger coffee cans, or tall cans for variety)
- Solar path lights (one for each can – the type with a removable solar head works best)
- Water (optional, for freezing the can to prevent dents while drilling)
- Spray paint or clear acrylic sealer (optional, for color or protection)
Tools & Hardware
- Cordless drill with metal-compatible drill bits in a few sizes
- Galvanized steel wire or sturdy wire for handles
- Quick-set epoxy adhesive (for attaching the solar head)
- Clear waterproof silicone caulk (to seal around the solar light)
- Pliers (for bending and twisting wire)
- Fine-grit sandpaper or metal file (to smooth any rough edges)
- Black permanent marker (for sketching your lantern pattern)
Safety Gear (Don’t Skip This Part)
- Safety glasses (metal shavings are not a good look for eyeballs)
- Work gloves (tin cans can have sharp rims and edges)
- Clamps or a non-slip surface (to hold the can steady while drilling)
Tip: Many experienced crafters recommend filling the can with water and freezing it before drilling. The ice helps the can maintain its shape and reduces dents as you punch or drill holes.
Step-by-Step Tin Can Solar Lantern Tutorial
Step 1: Prep and Clean Your Tin Cans
- Remove labels: Peel off paper labels. If adhesive lingers, use a citrus-based degreaser to dissolve the glue.
- Wash well: Clean the inside and outside with warm, soapy water and let the cans dry completely.
- Check the rim: If there are sharp edges at the top, gently file or sand them down.
This prep work may not be glamorous, but it sets you up for a smoother paint job and safer crafting later.
Step 2: Freeze the Cans (Optional but Very Helpful)
- Fill each tin can with water, leaving a bit of space at the top for expansion.
- Place them upright in the freezer until the water is frozen solid usually overnight.
- When you’re ready to drill, work with one can at a time so the ice doesn’t melt too quickly.
The ice acts as an internal support, so the can doesn’t crumple or cave in as you drill your pattern. This trick shows up in a lot of tin can lantern tutorials because it works.
Step 3: Design Your Lantern Pattern
Now the fun part planning how your tin can solar lantern will glow.
- Draw your design: Use a permanent marker to sketch dots where you want your light holes.
- Keep spacing even: Too many holes too close together can weaken the metal and create cracks.
- Start simple: For your first lantern, try:
- A simple heart or star
- A row of vertical stripes
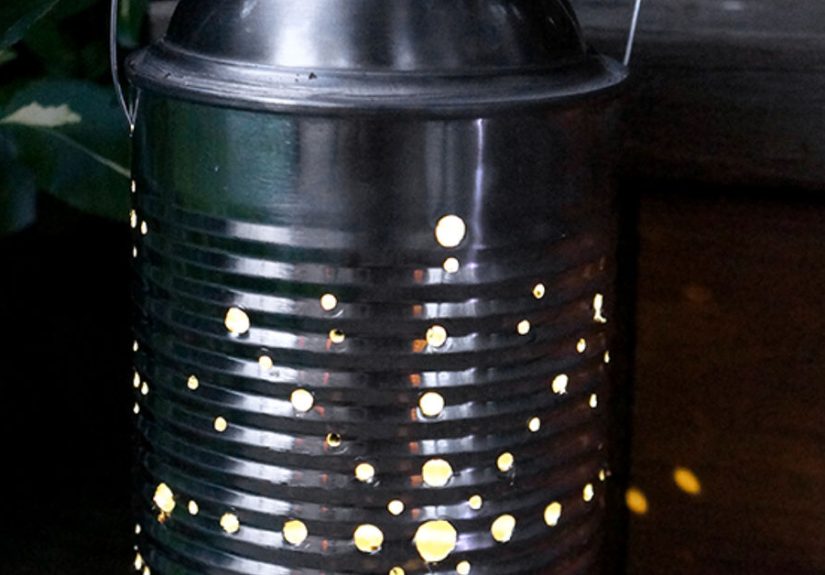
- Random “starry sky” dots around the can
- Your house number or initials
Think of the can as a mini night sky every dot becomes a tiny star once the solar light shines through.
Step 4: Drill the Pattern
- Put on safety glasses and gloves.
- Place the frozen can on a towel or non-slip surface to keep it stable.
- Use a small drill bit to create “pilot” holes at each marked dot. Start at slow speed until the bit forms a dimple in the metal, then gradually increase speed and pressure until you break through.
- If you want larger holes, follow up with a bigger drill bit using the pilot holes as guides.
- Shake out any loose ice and metal shavings as you go.
If the drill bit skates across the surface, lightly tap a tiny dent into each dot with a nail and hammer first. This gives the drill bit a place to “catch.”
Step 5: Add Handle Holes
If you plan to hang your tin can solar lanterns, you’ll need a sturdy handle.
- On the closed (bottom) end of the can, mark two dots opposite each other about 1/2 inch below the rim.
- Drill a small hole at each dot.
- Cut a length of galvanized wire long enough for your handle plus about 2 extra inches.
- Thread the wire ends through each hole from the outside and twist each end into a small loop using pliers to secure it.
Gently bend the wire into a U-shape, and you’ve got a simple, rustic handle ready for hanging.
Step 6: Smooth and (Optional) Paint
- Let the ice melt, then dry the can thoroughly.
- Use a metal file or fine-grit sandpaper to smooth any sharp edges around drilled holes.
- If you want a pop of color:
- Lightly scuff the outside with sandpaper for better paint adhesion.
- Spray with metal-friendly spray paint in thin, even coats.
- Allow to dry completely between coats.
- Alternatively, use clear acrylic sealer to keep the metal shiny or leave it bare so it can naturally weather and rust for a vintage look.
Bright white, matte black, metallic copper, or pastel colors all look great outdoors. Match them to your patio cushions or go full rainbow; there are no rules here.
Step 7: Prep the Solar Path Light
- Take apart the solar path light most styles allow you to twist the solar head off the stake and lens.
- Test that the LED turns on by covering the solar panel with your hand or taking it into a dark room.
- Remove any tags or packaging so the solar head sits flat on the can.
Choose solar lights that fit comfortably over the top of your can. You want enough overlap for good contact with the epoxy and caulk.
Step 8: Drill the Top Opening for the LED
- In the center of the can’s closed end, mark a circle roughly the diameter of the solar LED lens.
- Drill a hole large enough for the LED bulb to shine through. You can start with a small bit and gradually enlarge, or use a step bit for a cleaner circle.
- Test fit by placing the solar head on the can. Adjust the opening if needed so the LED sits centered.
You’re essentially turning the “bottom” of the can into the top of your lantern the LED shines down through the can and out through your punched holes.
Step 9: Attach the Solar Head
- Mix your epoxy adhesive according to the package instructions.
- Apply a thin, even layer around the top edge of the can where the solar head will rest.
- Press the solar head firmly into place, centering the LED over the drilled opening.
- Place a heavy book or weight on top (without covering the solar panel) until the epoxy cures fully.
Once the epoxy is hardened, run a bead of clear waterproof silicone caulk around the seam where the solar head meets the can. This helps keep moisture out and prolongs the life of your DIY solar lantern.
Step 10: Charge and Enjoy the Glow
- Place your finished tin can solar lantern outdoors in direct sun for a full day to charge the solar panel.
- As evening falls, the built-in sensor should automatically turn on the LED.
- Hang your lanterns from tree branches, shepherd’s hooks, or porch rafters or simply set them on a table or along a garden path.
That’s it! You’ve turned a basic can and a cheap solar light into a custom lantern with serious mood-lighting power.
Design Ideas for Your Tin Can Solar Lanterns
Once you master the basic DIY solar lantern build, you can create a whole series of themed lanterns. Here are a few ideas inspired by popular tin can lantern projects:
- Garden motifs: Flowers, leaves, vines, and butterflies for a whimsical backyard vibe.
- Holiday designs: Jack-o’-lantern faces for Halloween, snowflakes and stars for winter, hearts for Valentine’s Day.
- House numbers & words: Punch out your address number for your porch or spell out “WELCOME” or “JOY” across several cans.
- Starfield cans: Go completely random with dots for a galaxy effect.
- Mixed hole sizes: Use different drill bit sizes to create dimension and patterns that look extra fancy when lit.
For an even more magical effect, pair standard warm white solar lights with a few color-changing solar heads and scatter those lanterns among your plants or along windowsills. Kids especially love the shifting rainbow glow.
Troubleshooting & Safety Tips
Common Issues and Easy Fixes
- The can dents while drilling.
Make sure the water is fully frozen, or try using smaller bits first. You can also support the can with a rolled towel or sandbag underneath. - The solar light doesn’t turn on.
Remove any protective plastic over the solar panel, give it a full day of direct sunlight, and test again in a dark room. If it still doesn’t work, the unit may be faulty and need replacing. - Condensation inside the can.
Make sure the caulk seal around the solar head is complete, and store the lanterns under cover during heavy storms. - Rusting faster than you’d like.
Some patina is charming, but if you want to slow rust, add a clear protective spray and avoid letting the can sit in standing water.
Safety Reminders
- Always wear safety glasses when drilling metal.
- Handle sharp edges with gloves, especially when cleaning up metal shavings.
- If crafting with kids, let them help with design drawing and painting, while adults handle drilling and cutting.
Real-Life Tin Can Solar Lantern Experiences & Pro Tips (Extra 500+ Words)
After you make your first tin can solar lantern, you quickly discover two truths: 1) they look even better at night than you think, and 2) it’s almost impossible to stop at just one. This section gathers real-world style tips, lessons learned, and small tweaks that can make a big difference once your lanterns move from “cute craft” to “permanent part of the backyard.”
How Many Lanterns Do You Really Need?
Short answer: more than you think. One tin can lantern looks sweet on a side table, but the real magic happens in groups. Three or five clustered in the center of a patio table give you that glow-y, restaurant-terrace feeling. A row of lanterns lining your steps or walkway creates a path of tiny stars leading to your front door.
Think in odd numbers and sets. For example:
- Three larger coffee-can lanterns hung at different heights from a porch beam.
- Five smaller cans in a straight line down the center of an outdoor dining table.
- A mix of tall and short cans along a garden border for a layered effect.
Because the main materials are recycled and inexpensive, it’s easy to build a “collection” over a few weekends without wrecking your budget.
Matching Your Lanterns to Your Outdoor Style
Your DIY solar lanterns don’t have to match each other perfectly, but it does help to pick a general style. Here are a few personality profiles other DIYers often lean into:
- Rustic & weathered: Leave the metal bare or give it just a light clear coat. Over time, the cans develop a soft patina and a slightly old-world vibe that looks great in cottage gardens and farmhouse-style spaces.
- Modern & minimal: Use matte black, charcoal, or white spray paint, and choose simple geometric patterns or single-line cutouts. These look sharp on balconies and small patios with sleek furniture.
- Colorful & playful: Grab bright spray paints turquoise, coral, sunny yellow, lime and mix them up. These are perfect for family yards, play areas, or around a pool where color already dominates.
Because tin cans are so inexpensive, you can experiment freely. If you don’t like the first paint color, lightly sand and repaint. The commitment level is low; the fun level is very high.
Seasonal Swaps Without Rebuilding Everything
One of the smartest ways to use tin can solar lanterns is to treat them like a base that you refresh seasonally instead of remaking from scratch:
- Spring & summer: Flowers, leaves, birds, or swirl patterns, painted in lighter colors. These work beautifully with blooming plants and lush greenery.
- Fall: Keep the same cans but add temporary touches like twine, burlap bows, or small faux leaves around the handle. If your punched pattern is simple (like dots), just let the warm white glow do the autumn mood-setting.
- Winter & holidays: Wrap the handles with a little evergreen, add mini ornaments, or hang the lanterns from hooks on a porch rail. If you have color-changing solar lights, this is their time to shine.
Many DIY fans like to have one “neutral” pattern simple dots or starbursts that works all year, and then they style the outside of the lantern differently each season.
Practical Placement: Where They Work Best
Solar lights need sunshine, but your yard doesn’t have to be a full-sun desert for tin can solar lanterns to work. A few practical placement tips:
- Daytime charging, nighttime display: If your favorite hangout spot is shady, charge the lanterns in a sunnier area during the day, then move them to your seating area at night.
- Height matters: Hanging the lanterns at different heights from branches or pergola beams adds depth and visual interest. Lower lanterns invite people to look closely at the punched patterns; higher ones cast wider glows.
- Avoid strong competing lights: If you have very bright porch lights or security lights, the soft glow of your tin can lanterns can disappear. Either dim the main light or designate a quieter corner as your “lantern zone.”
Durability and Care Over Time
Outdoors, even the toughest DIY solar lantern needs a little love now and then. Here’s what long-term users often recommend:
- Bring them in during extreme weather: Heavy storms, hail, or snow can damage solar panels and accelerate rust.
- Wipe solar panels occasionally: Dust, pollen, or bird “gifts” on the panel can reduce how well your lantern charges. A soft cloth every couple of weeks keeps the power flowing.
- Accept a bit of character: Small scratches, light rust, or patina can make the lanterns feel more “lived in” and charming. Think of them as outdoor decor with a story, not showroom pieces.
Turning Lantern-Making Into a Social Activity
This project naturally lends itself to group fun. Set out cans, markers, and a few sample pattern ideas, and let friends or family design their own lanterns. Once the drilling is done (by a designated adult or confident DIYer), everyone can paint and style their piece.
It makes a great:
- Backyard craft night with neighbors
- Family summer project with teens
- Low-cost decor workshop for community or school events
At the end of the evening, everyone goes home with a custom tin can solar lantern that reminds them of the shared experience every time it lights up.
Conclusion
Creating your own tin can solar lanterns is the kind of DIY project that hits all the sweet spots: it’s simple, affordable, sustainable, and surprisingly beautiful. With a few tools, some recycled cans, and a handful of inexpensive solar lights, you can turn any porch, patio, or balcony into a warm, glowing retreat.
From planning your punched-tin patterns and drilling with care to sealing the solar head and choosing paint finishes, every step adds personality to your finished lanterns. And once they’re out in the yard, quietly switching on at dusk, you’ll understand why so many people become a little obsessed with making “just one more.”
Ready to raid the recycling bin? Your next favorite piece of outdoor decor might already be sitting in it.


