Table of Contents >> Show >> Hide
- 1. Make a Swarm of Paper Bats
- 2. Create Floating Cheesecloth Ghosts
- 3. Decorate No-Carve Pumpkins
- 4. Build a Halloween Wreath for the Front Door
- 5. Light the Way With DIY Luminaries
- How to Make All Your DIY Halloween Decorations Look Cohesive
- Real-Life Decorating Experiences: What Actually Works on Halloween
- Conclusion
Halloween decorating has a special talent for turning otherwise reasonable adults into people who say things like, “You know what this porch needs? More bats.” And honestly, that instinct is usually correct. The good news is that you do not need a movie-studio budget, a garage full of animatronics, or a suspiciously large fog machine to create a fun Halloween setup. With a few craft supplies, a little imagination, and the willingness to get glitter on your elbow for no clear reason, you can make decorations that look festive, clever, and delightfully spooky.
If you want your home to feel Halloween-ready without looking like a clearance aisle exploded in your living room, homemade decorations are the sweet spot. They are budget-friendly, customizable, and much easier to match to your space. You can go cute, creepy, classic, elegant, or “friendly ghost who definitely pays taxes.” Better yet, DIY decorations let you build a cohesive look instead of collecting random orange plastic objects that somehow never quite work together.
Below are five practical and creative ways to make Halloween decorations at home. Each idea is easy to adapt for apartments, porches, classrooms, offices, or full-on neighborhood glory. These projects also work well together, so you can mix and match them into one coordinated Halloween display that feels intentional instead of accidental.
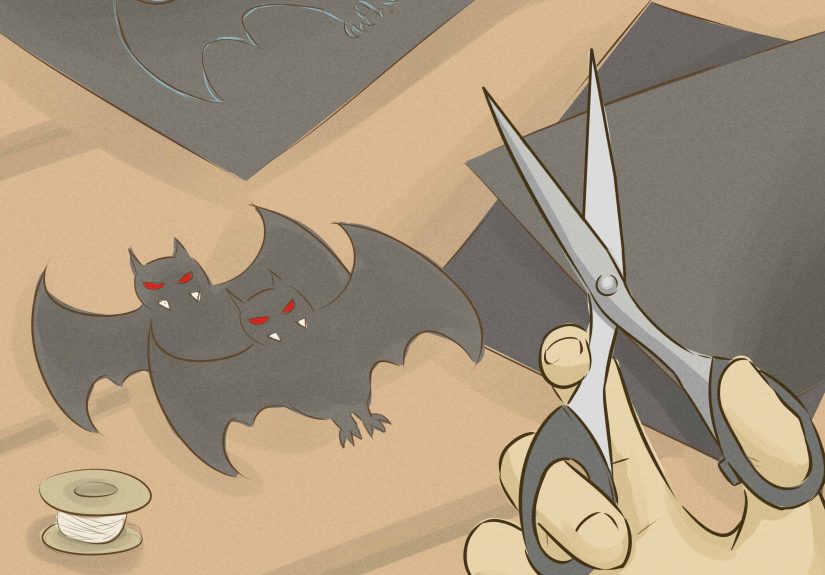
1. Make a Swarm of Paper Bats
Few Halloween decorations give you more drama for less money than paper bats. A bat display is one of the easiest ways to make a wall, doorway, staircase, mantel, or front porch look instantly seasonal. Best of all, the materials are simple: black cardstock or craft foam, scissors, a printable bat template or hand-drawn shapes, and removable adhesive.
How to Make Them
Start by cutting bat shapes in several sizes. This part is where you discover whether your scissors are faithful companions or tiny betrayal machines. Fold each bat slightly down the middle so the wings lift away from the wall. That small bend makes a huge difference because flat bats can look like forgotten paper scraps, while folded bats look like they are actually in motion.
Arrange the bats in a loose swirl, a climbing pattern up the wall, or a cloud that appears to burst from a doorway. If you are decorating outside, frame the front door or create a colony that travels along siding or a garage wall. Indoors, run them upward from the mantel to the ceiling for a classic haunted-house effect.
Why This Works So Well
This idea is popular for a reason: it is fast, visually dramatic, and flexible. You can keep it minimalist with only black silhouettes, or add dimension by mixing matte paper, glitter cardstock, or textured foam. If your style leans elegant rather than scary, keep the bats neat and directional. If you prefer full Halloween chaos, let them scatter as if they have been startled by your candy budget.
Paper bats are also one of the best choices for renters because they are lightweight and easy to remove. The trick is to test adhesives in a hidden area first and use removable products meant for your surface. Outdoors, use mounting products rated for exterior conditions rather than regular indoor tape.
2. Create Floating Cheesecloth Ghosts
If Halloween had an official uniform, it would probably be a ghost made from old fabric and a mildly judgmental expression. Floating ghosts are a DIY classic because they can be sweet or creepy depending on the face, the fabric, and where you hang them. They are especially effective in trees, on porches, in entryways, or clustered in corners where they can catch a little breeze.
What You Need
You can make a simple ghost with a foam ball, a small balloon, or a crumpled paper shape for the head, plus white cheesecloth, gauze, or thin scrap fabric. Add floral wire, fishing line, string, black felt or marker for the eyes, and glue if needed. For a sturdier version, use a wire frame or hanger underneath so the ghost keeps its shape instead of collapsing into a haunted napkin.
How to Make It Look Better Than a Last-Minute Bedsheet
Layer the fabric rather than using one stiff piece. Roughing up the edges or lightly fraying the cloth gives the ghost more movement and a softer silhouette. Make several ghosts in different sizes and hang them at different heights. That variety creates a stronger display than repeating the exact same ghost six times like a supernatural copy-and-paste error.
You can keep faces minimal with two black eyes, or skip the face entirely for a more elegant look. For nighttime decorating, tuck a battery-operated light inside some ghosts or place them near soft outdoor lighting so the fabric glows. If you are decorating outside, secure them well and use materials that can tolerate a little moisture and wind.
Where to Use Floating Ghosts
These work beautifully on porches, in shrubs, under archways, and over dining tables for parties. For a family-friendly yard, make round-eyed, smiling ghosts. For something moodier, keep them expressionless and let the draped shape do the work. One ghost is cute. A little ghost gathering looks like you planned ahead. Ten ghosts in one tree says you are emotionally prepared for October.
3. Decorate No-Carve Pumpkins
Pumpkins are the backbone of Halloween decorating, but carving is not always practical. It is messy, time-consuming, and tends to turn a cheerful Saturday afternoon into a pumpkin-gut crime scene. No-carve pumpkins solve all of that. They last longer, are easier for kids, and give you more design options than the standard triangle-eyes routine.
Easy No-Carve Pumpkin Ideas
Paint is the obvious starting point, but it is far from the only one. You can create ghost pumpkins by painting them white and adding simple black eyes and mouths. You can make bat pumpkins with adhesive shapes, moon-and-star pumpkins with metallic markers, or glamorous pumpkins with ribbon, lace, studs, or fabric. Even a plain pumpkin can look polished with a monochrome palette and one bold motif.
For a front porch, group pumpkins in different sizes and heights. Stack a few near the steps, place a couple inside lanterns, or line them beside planters and mums. If you want a coordinated display, repeat one visual element across all of them, such as black bows, bat silhouettes, or a black-and-white paint scheme.
How to Keep Them Looking Stylish
The biggest mistake people make with Halloween pumpkins is trying to put every idea on every pumpkin. Resist the temptation. Pick one theme and repeat it. A set of three white ghost pumpkins can look more expensive than a pile of twelve unrelated craft experiments. You are decorating, not auditioning every supply in your craft drawer.
No-carve pumpkins are also useful indoors. Mini versions make great centerpieces, bookshelf accents, or table decor. Add battery-operated tea lights nearby for glow, not open flame. That gives you atmosphere without risking your decorations, your table runner, or your general peace of mind.
4. Build a Halloween Wreath for the Front Door
A Halloween wreath is one of the smartest decorations you can make because it immediately tells visitors, “Yes, this house understands the assignment.” It sets the tone before anyone even rings the bell. Wreaths can be spooky, whimsical, rustic, glamorous, or modern depending on your materials, and they are an easy way to make your entry feel styled.
Choose a Base and a Theme
Start with a grapevine wreath, foam form, wire ring, or even a simple embroidery hoop if you want something lighter. Then choose a theme. A bat wreath uses black paper or felt bats. A ghost wreath uses fabric, mini figures, or soft white elements. A pumpkin-and-moss wreath leans fall-meets-Halloween. A branch wreath painted black adds a moodier, haunted-house vibe.
Once you have a theme, build in layers. Add ribbon, dried florals, faux leaves, moss, mini pumpkins, spiders, gauze, or ornaments in black, orange, purple, white, or metallics. You do not need to use everything. In fact, please do not use everything. A wreath should look curated, not like it got lost inside a craft store and panicked.
Tips for a Better-Looking Wreath
Use one large focal point, a few medium accents, and smaller fillers around them. That gives the wreath shape and balance. Keep some negative space so the design can breathe. If the wreath is for an outdoor door, make sure heavier pieces are secured well and use weather-appropriate hanging hardware.
A Halloween wreath is also a good place to blend spooky and seasonal decor. You can combine black ribbon with dried grass, faux ravens with preserved moss, or mini pumpkins with subtle spiderweb texture. That way your decor feels layered instead of cartoonish, unless cartoonish is your goal, in which case carry on with confidence.
5. Light the Way With DIY Luminaries
If you want maximum Halloween atmosphere with minimum effort, lighting is your best friend. Luminaries are especially effective because they make porches, walkways, steps, and tabletops feel festive at night. They can be made from paper bags, jars, cans, or even decorated glass containers, and they instantly make a space look more magical.
Paper Bag Luminaries
Paper bag luminaries are wonderfully simple. Use white or kraft paper bags and decorate them with Halloween shapes, stickers, paint, or cutouts. Add a little sand, rice, or pebbles to the bottom for weight, then place a battery-operated tea light inside. Line them along the porch, walkway, windowsill, or steps for a welcoming glow.
You can make themed sets such as ghosts, bats, moons, stars, black cats, or jack-o’-lantern faces. For a more polished look, keep the color scheme limited and repeat the same few shapes. If you are using them outside, set them out closer to trick-or-treat time rather than leaving them exposed to weather all day.
Jar Luminaries
If you want something sturdier, use mason jars or recycled glass jars. Frost them with spray frosting, tissue paper, or diluted glue and thin fabric. Paint ghost faces, tie ribbon around the rim, or wrap the jars like tiny mummies with gauze. Once lit with a battery candle, they make excellent mantel decor, party centerpieces, or windowsill accents.
The biggest advantage of luminaries is that they create mood without taking up much space. They are great for small homes, apartments, and anyone who wants Halloween charm without turning the living room into a haunted warehouse.
How to Make All Your DIY Halloween Decorations Look Cohesive
The secret to good Halloween decor is not buying more. It is choosing a consistent direction. Pick a color palette first. Traditional black, orange, and white is always strong. Black and cream looks elegant. Purple and green feels playful. Neutral pumpkins with dark accents feel modern and expensive, even if your actual budget says otherwise.
Repeat shapes throughout your decor. If you use bats on the wall, add a bat pumpkin or bat wreath detail. If you use ghosts outside, echo that with ghost luminaries or ghost-painted pumpkins. Repetition makes the whole setup feel intentional.
Also, think about scale. Large pieces create impact from the street, while smaller pieces reward people who come closer. A front door wreath, a few porch pumpkins, paper bats on one side of the house, and a row of luminaries can be enough for a complete look. You do not need forty-seven decorations unless you are trying to get your house added to local maps.
Real-Life Decorating Experiences: What Actually Works on Halloween
After making Halloween decorations for homes, porches, parties, and more than one last-minute gathering where someone cheerfully announced, “We can just craft something,” I have learned that the best decorations are rarely the most complicated ones. The winners are usually the projects that go up easily, photograph well, survive a little wind, and make people smile before they even knock on the door.
One of the most reliable successes is the paper bat display. It looks dramatic in photos, takes less money than almost any other project, and somehow makes people assume you are much more organized than you really are. The first time I made one, I expected it to look a little flat. Instead, folding the wings and arranging the bats in a loose swirl made the whole entryway feel animated. It was one of those rare craft moments when the result looked better on the wall than it did in my head, which felt suspicious but welcome.
Floating ghosts have also taught me an important decorating lesson: movement matters. A decoration that shifts slightly in the breeze feels more alive, or more undead, depending on your outlook. When the fabric catches the wind just enough, the whole yard suddenly looks cinematic. That said, there is a fine line between elegant floating ghosts and cloth blobs that look like laundry escaped the hamper. The difference is shape, layering, and hanging height. Once I started varying sizes and staggering placement, the display became much more convincing.
No-carve pumpkins are probably the biggest upgrade for anyone who wants Halloween style without the mess. Carved pumpkins are classic, but painted and decorated pumpkins tend to last longer and work better in polished displays. I have found that white ghost pumpkins get compliments from adults, while simple face pumpkins get instant approval from kids. And because you are not dealing with knives or pumpkin slime, the process feels much more relaxed. There is less “holiday memory-making” and more “nobody has to wash pumpkin strings off the table for an hour.”
Wreaths are the project that taught me restraint. My early attempts looked like every Halloween aisle had filed a formal complaint and attached itself to a wire ring. Over time, I learned that one main idea works better than six. A black branch wreath with one ribbon style and a few small accents looks far more memorable than a design overloaded with spiders, skulls, leaves, bows, glitter, beads, and emotional confusion. The front door needs a statement piece, not a craft intervention.
Luminaries, meanwhile, are what make everything feel finished. During the day, decorations are fun. At night, lighting turns them into an experience. A row of softly glowing bags or jars can make even a simple porch feel welcoming and magical. It is also one of the few projects that consistently makes neighbors slow down and look twice. That tiny bit of light does more heavy lifting than half the decorations people spend much more money on.
If there is one overall lesson from making Halloween decorations, it is this: choose a few strong ideas, repeat them with confidence, and let lighting tie everything together. Halloween decorating works best when it feels playful, a little theatrical, and slightly self-aware. You are not trying to fool anyone into believing a bat colony has taken over your house. You are trying to create a moment. And when someone laughs, points, takes a photo, or says, “Okay, this is cute,” you know the decorations did exactly what they were supposed to do.
Conclusion
Making your own Halloween decorations is one of the easiest ways to give your home personality without overspending. Paper bats create instant drama, floating ghosts add movement, no-carve pumpkins offer flexibility, wreaths make the entryway feel styled, and luminaries bring the whole look to life after dark. The best part is that you can tailor every project to your taste, your space, and your level of crafting bravery.
So whether you want a front porch that looks spooky, stylish, sweet, or just impressively prepared, start with a few smart DIY pieces and build from there. Halloween decor does not have to be expensive or complicated to be memorable. Sometimes all it takes is a pumpkin, a paper bat, a little glow, and the confidence to say, “Yes, this is the exact amount of spooky I ordered.”


