Table of Contents >> Show >> Hide
- Why You’ll Love These Nut-Free Rocky Road Bars
- What Makes Rocky Road “Rocky” Without Nuts?
- Ingredients for Nut-Free Rocky Road Bars
- How to Make Nut-Free Rocky Road Bars
- Tips for the Best Rocky Road Bars
- Easy Variations for Different Occasions
- How to Store Nut-Free Rocky Road Bars
- Serving Ideas
- Common Mistakes to Avoid
- Nut-Free Rocky Road Bars Recipe Card
- Kitchen Experiences and Real-Life Moments With Nut-Free Rocky Road Bars
Some desserts are elegant. Some are refined. And some show up wearing a chocolate coat, dragging marshmallows behind them, and announcing, “I’m here to have a good time.” That, friends, is the magic of a great rocky road bar. This Nut-Free Rocky Road Bars Recipe keeps all the charm of the classic treatrich chocolate, chewy marshmallows, and a satisfyingly craggy topwithout relying on nuts for crunch.
If you have ever wanted a dessert that feels nostalgic, party-friendly, lunchbox-worthy, and just a little gloriously messy, you are in the right kitchen. These bars are sweet, chewy, crunchy, and wonderfully simple to make. They are ideal for bake sales, birthday trays, holiday cookie boxes, movie nights, or those random evenings when the day has been long and only chocolate can restore order to the universe.
Best of all, this version is designed for households, schools, and gatherings where a nut-free dessert recipe matters. Instead of almonds, peanuts, or pecans, we build that classic “rocky road” texture with crunchy pretzels, crisp rice cereal, and graham cracker pieces. The result is every bit as fun as the traditional version, but far more allergy-aware and easier to share with confidence when you have carefully checked every label.
Why You’ll Love These Nut-Free Rocky Road Bars
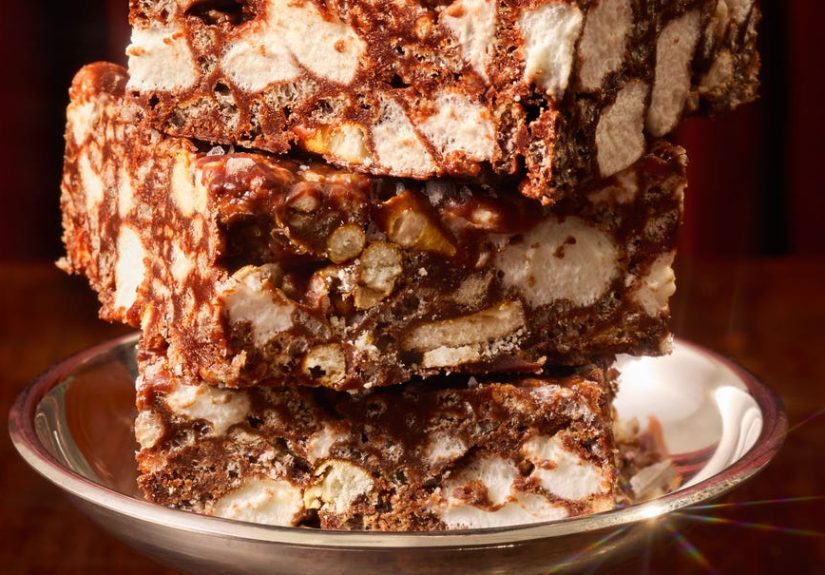
A good rocky road bar should never be boring. It should look a little wild, taste deeply chocolatey, and give you a mix of soft and crunchy textures in every bite. These bars do exactly that.
- Nut-free but still crunchy: pretzels, cereal, and graham crackers bring the texture party.
- No fancy equipment: a saucepan, a bowl, and a lined pan are enough.
- Perfect for sharing: easy to slice, stack, and transport.
- Highly customizable: you can make them extra gooey, extra chocolatey, or slightly salty.
- Beginner-friendly: even if your baking confidence is currently being held together by a spatula and optimism.
What Makes Rocky Road “Rocky” Without Nuts?
Traditional rocky road desserts usually combine chocolate, marshmallows, and nuts. In this nut-free version, the goal is not to imitate nuts exactly. That would be strange and emotionally exhausting for everyone involved. Instead, we recreate the same contrast by using crunchy elements that are naturally nut-free and easy to find in American grocery stores.
Pretzels add salty snap. Crisp rice cereal gives light crunch without heaviness. Graham crackers bring a toasty, honeyed flavor that works beautifully with chocolate and marshmallow. Together, they create bars that feel rich but not one-note.
The secret is balance. Too many crunchy mix-ins and the bars fall apart like a dramatic family argument at Thanksgiving. Too few and the texture becomes more like fudge. This recipe lands right in the sweet spot: sturdy enough to slice, soft enough to bite, and rough-topped enough to earn the name “rocky road.”
Ingredients for Nut-Free Rocky Road Bars
Main Ingredients
- 3 cups semi-sweet chocolate chips
- 1 can (14 ounces) sweetened condensed milk
- 3 tablespoons unsalted butter
- 1 teaspoon vanilla extract
- 2 1/2 cups mini marshmallows, divided
- 1 cup crushed pretzels
- 1 cup crisp rice cereal
- 1 cup roughly broken graham crackers
- 1/4 teaspoon kosher salt
Optional Mix-Ins
- 1/2 cup mini chocolate chips for extra texture
- 1/3 cup toffee bits, if nut-free and label-checked
- Holiday sprinkles for a festive finish
- A tiny pinch of espresso powder to deepen the chocolate flavor
Important nut-free note: If you are making these bars for someone with a nut allergy, read every ingredient label carefully. “Nut-free recipe” and “safe for a person with a severe allergy” are not always identical unless the ingredients have been checked for cross-contact statements and suitability for that person’s needs.
How to Make Nut-Free Rocky Road Bars
1. Prep the Pan
Line an 8-inch square baking pan with parchment paper, leaving enough overhang on two sides so you can lift the bars out later. This is one of those small steps that feels optional until you skip it and end up chiseling dessert out of the pan like an archaeologist.
2. Build the Crunch Mixture
In a large bowl, combine the crushed pretzels, crisp rice cereal, graham cracker pieces, and 1 1/2 cups of the mini marshmallows. Set the bowl aside. Mixing the dry ingredients first helps everything distribute evenly once the warm chocolate mixture goes in.
3. Melt the Chocolate Base
In a medium saucepan over low heat, combine the chocolate chips, sweetened condensed milk, and butter. Stir gently and often until smooth. Remove the pan from the heat, then stir in the vanilla and salt.
You want the mixture glossy and fully melted, not aggressively cooked. Chocolate likes calm energy. If it starts to look thick, grainy, or moody, the heat is probably too high.
4. Combine Everything
Pour the warm chocolate mixture over the bowl of pretzels, cereal, graham crackers, and marshmallows. Fold gently with a spatula until everything is coated. Work fairly quickly here, because once the chocolate cools, it starts setting up and turns less cooperative.
5. Press into the Pan
Spoon the mixture into the prepared pan and press it down lightly. Do not mash it flat with the force of a powerlifter. A gentle press keeps the bars together while preserving that classic rocky, uneven top.
6. Add the Final Toppings
Scatter the remaining 1 cup of mini marshmallows over the top. If you want a prettier finish, add a few mini chocolate chips or a small handful of extra pretzel bits.
7. Chill and Slice
Refrigerate for 2 to 3 hours, or until firm. Lift the slab out of the pan using the parchment overhang and slice into 16 squares. For the cleanest cuts, use a sharp knife and wipe it between slices.
Tips for the Best Rocky Road Bars
Use Mini Marshmallows
Mini marshmallows distribute more evenly and create better texture throughout the bars. Full-size marshmallows can work, but they tend to clump and make slicing a little more dramatic than necessary.
Keep the Heat Low
Chocolate is not impressed by impatience. Low heat prevents scorching and keeps the base silky. If you prefer, you can also melt the chocolate mixture in short bursts in the microwave, stirring between intervals.
Do Not Over-Crush the Mix-Ins
You want texture, not dust. Small chunks of pretzel and graham cracker make the bars more interesting and keep every bite from feeling too dense.
Let Them Chill Fully
If you slice too early, the bars may smear or collapse. Delicious? Yes. Photogenic? Not especially. Patience rewards you with neat squares and cleaner layers.
Easy Variations for Different Occasions
Holiday Rocky Road Bars
Add red and green sprinkles in December, pastel sprinkles in spring, or orange and black sprinkles for Halloween. The bars suddenly look event-specific with almost no extra effort, which is a very efficient kind of magic.
Extra-Salty Version
Increase the pretzels slightly and sprinkle a tiny bit of flaky salt on top before chilling. This version is excellent for people who think desserts should have personality instead of just sugar.
Cookies-and-Cream Twist
Replace part of the graham crackers with crushed chocolate sandwich cookies. The flavor becomes a little more playful and slightly more dramatic, in the best possible way.
Lunchbox-Friendly Mini Bars
Press the mixture into a larger pan for thinner bars, then cut them into small rectangles. This is especially handy when you need a crowd dessert that does not require everyone to commit to a giant square of chocolate before noon.
How to Store Nut-Free Rocky Road Bars
Store the bars in an airtight container. If your kitchen runs cool, they can sit at room temperature for a short period while serving, but for best texture and cleaner slices, refrigeration works beautifully. Separate layers with parchment paper if stacking.
These bars are excellent straight from the fridge, where the chocolate is firm and the marshmallows stay pleasantly chewy. They also freeze well. Wrap individual bars or layers tightly, then freeze for a future dessert emergency. And yes, “future dessert emergency” is a legitimate category.
Serving Ideas
Serve these rocky road dessert bars on a cookie tray, tuck them into lunchboxes, or plate them with fresh strawberries for contrast. They also pair well with coffee, hot chocolate, or a cold glass of milk.
If you are serving them at a party, cut them into small squares and arrange them on a platter with other nut-free treats. Their craggy tops and visible marshmallows make them look homemade in the best way: cozy, generous, and very likely to disappear first.
Common Mistakes to Avoid
Using Ingredients Without Checking Labels
For a truly thoughtful nut-free bars recipe, the biggest mistake is assuming an ingredient is automatically safe. Pretzels, graham crackers, marshmallows, toffee bits, and chocolate chips can vary by brand. Always check labels when baking for someone with allergies.
Overheating the Chocolate
Burned chocolate tastes bitter and can make the whole batch feel heavy. Gentle melting is the difference between glossy and glorious versus thick and suspicious.
Pressing the Mixture Too Firmly
If you compact the bars like you are laying a driveway, they can become too dense. Press just enough to help them hold together.
Skipping the Salt
Even sweet desserts need balance. A small amount of salt sharpens the chocolate flavor and keeps the bars from tasting flat.
Nut-Free Rocky Road Bars Recipe Card
Yield: 16 bars
Prep time: 15 minutes
Chill time: 2 to 3 hours
Total time: About 3 hours 15 minutes
Ingredients: semi-sweet chocolate chips, sweetened condensed milk, butter, vanilla, mini marshmallows, pretzels, crisp rice cereal, graham crackers, salt.
Method: Mix the crunch ingredients, melt the chocolate base, fold everything together, press into a lined pan, top with marshmallows, chill until firm, then slice and serve.
Flavor profile: rich chocolate, chewy marshmallow, crisp-salty crunch, and a nostalgic, crowd-pleasing finish.
Kitchen Experiences and Real-Life Moments With Nut-Free Rocky Road Bars
There is something especially satisfying about making a dessert that solves a problem without feeling like a compromise. That is exactly what happens with nut-free rocky road bars. The first time I made a version of these for a school event, I expected polite appreciation and maybe a few leftovers. Instead, the tray came back looking like it had been audited by raccoons. Not one crumb remained. What surprised people most was that nobody felt they were eating a “special diet” dessert. They just felt like they were eating a very good chocolate bar with chewy marshmallows and crunchy bits.
That is the beauty of this recipe in real life. It fits so many situations. It works for birthday parties where parents need a dessert that is easier to share. It works for neighborhood potlucks where ingredient questions start flying the second the foil comes off the pan. It works for holiday cookie boxes when you want something a little chunkier and more playful than another plain square of fudge. It even works for weeknights when the goal is less “create a masterpiece” and more “make something that disappears before people ask what is for tomorrow’s dessert.”
One of my favorite parts is how flexible the texture can be. Some people love a gooier bar, so I lean into extra marshmallows. Some want more crunch, so I increase the pretzels and graham crackers slightly. One friend described them as “a candy bar and a cereal treat shaking hands,” which honestly is a pretty accurate review. Another said they were dangerous because you can tell yourself they are small, then eat three while trimming the edges. That is not a flaw in the recipe. That is just math wearing a chocolate mustache.
I have also learned that these bars are incredibly useful when baking for mixed groups. There is always someone who loves brownies, someone who wants marshmallows, someone who insists on crunch, and someone who just wants chocolate and does not care about the details. These bars somehow keep all of them happy at once. They look casual, but they perform like overachievers. Put them on a dessert table next to more elaborate treats and watch people circle back for “just one more little square.” That sentence, by the way, has never once meant one little square.
Another real-life advantage is how well these bars travel. They do not require frosting touch-ups or delicate assembly. They hold together well after chilling, stack neatly in a container, and still look inviting when you arrive. For bake sales, class parties, road trips, and family gatherings, that matters. A dessert can taste fantastic, but if it arrives looking like a landslide, morale takes a hit. Rocky road bars are sturdy enough to survive the ride while still looking generously homemade.
Most of all, this recipe creates the kind of kitchen memory people actually keep. The sound of pretzels cracking into the bowl. The smell of warm chocolate. The tiny marshmallows trying to escape before they get folded in. The first clean slice through a chilled pan. These are not complicated culinary moments, but they are the ones that tend to stick. A simple, shareable, nut-free dessert can do more than fill a plate. It can make a table feel easier, safer, and a lot more fun.


