Table of Contents >> Show >> Hide
- What Happens When You Use Steel Wool and Vinegar on Wood?
- Why This Wood Aging Method Works So Well
- What You Need Before You Start
- Best Wood Species for Aging With Vinegar and Steel Wool
- How to Make the Steel Wool and Vinegar Solution
- How to Prepare Wood for an Even, Professional Finish
- How to Apply the Finish
- How to Control the Color
- Common Mistakes to Avoid
- Should You Seal the Wood Afterward?
- When This Technique Makes Sense
- Real-World Experiences With Aging and Weathering Wood Using Steel Wool and Vinegar
- Conclusion
- SEO Metadata
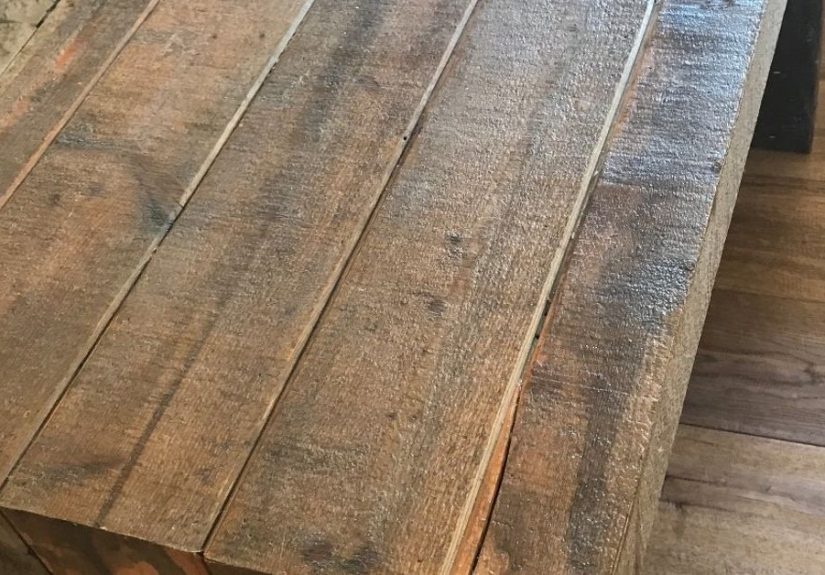
If you have ever looked at a brand-new board and thought, “You’re nice, but you have the emotional depth of a plastic patio chair,” welcome. Aging and weathering wood using steel wool and vinegar is one of the most popular DIY finishing tricks because it can turn fresh lumber into something that looks older, moodier, and far more interesting. Instead of coating the surface with a heavy pigment, this method relies on a chemical reaction that changes the color of the wood itself. That is why the result can look more natural than many off-the-shelf stains.
Done well, this finish can create anything from a soft driftwood gray to a deep weathered brown-gray or nearly black ebonized effect. Done badly, it can create blotches, fuzz, mystery streaks, and the kind of regret that sends you back to the hardware store for more sandpaper. The good news is that the process is simple, affordable, and surprisingly forgiving once you understand how it works.
What Happens When You Use Steel Wool and Vinegar on Wood?
The magic is chemistry, not wizardry, although it feels suspiciously close. When steel wool sits in vinegar, the acid begins breaking down the iron. That solution reacts with tannins in wood and darkens the surface. Because the reaction depends on tannin content, different species respond differently. Oak is usually the overachiever in the room. Walnut and mahogany also tend to react well. Pine, maple, poplar, and some other lighter or lower-tannin woods may need a little help if you want dramatic color.
This is the key reason so many people either love or hate the technique. They use the same solution on two boards and get two completely different results. The finish is not broken. The wood is simply being wood: unpredictable, opinionated, and occasionally dramatic.
Why This Wood Aging Method Works So Well
Traditional stains often sit in the grain and add color from above. A steel wool and vinegar solution works more like a reactive stain. It changes the tone through a chemical reaction, which means the grain pattern usually remains visible. That makes it especially appealing for rustic furniture, farmhouse décor, reclaimed-wood looks, accent walls, picture frames, shelving, and decorative boxes.
Another reason this method remains popular is cost. A jar, some vinegar, and a pad of steel wool can create a finish for a fraction of the price of specialty aging products. It is also easy to customize. Let the mixture sit longer, and the solution often gets stronger. Dilute it, and the color softens. Pretreat the board with black tea or tannin solution, and even pale woods can develop a richer aged appearance.
What You Need Before You Start
Basic Materials
For most projects, you only need white vinegar, fine steel wool, a glass jar, a brush or lint-free cloth, gloves, and scrap wood for testing. Distilled white vinegar is the usual choice because it is easy to find and consistent. Fine steel wool is often preferred because it breaks down faster. A glass jar is best because the solution should not be mixed or stored in a metal container.
Helpful Extras
It also helps to have coffee filters or a tightly woven cloth for straining, sandpaper in several grits, and black tea if you plan to pretreat low-tannin wood. Keep the work area ventilated and avoid sealing the jar tightly while the reaction is active. The mixture can release gas, and this is not the kind of homemade science experiment you want turning into a kitchen legend.
Best Wood Species for Aging With Vinegar and Steel Wool
If your goal is a dramatic weathered finish, start with wood that naturally contains more tannins. Oak is the classic choice and often turns beautifully gray, brown-black, or charcoal depending on the formula and number of coats. Walnut and mahogany can also respond well. Cedar may shift in interesting ways, though results vary.
On the other hand, woods such as pine, poplar, maple, and birch may produce a lighter or less consistent effect without pretreatment. That does not mean the method fails on these woods. It simply means you may need to build tannin content first. A strong coat of black tea is a common solution. Think of it as giving the wood a little chemistry tutoring before the final exam.
How to Make the Steel Wool and Vinegar Solution
Step 1: Prep the Steel Wool
Some steel wool products contain oils that can slow the reaction. Many woodworkers rinse or wash the pad first and let it dry. Then tear it into smaller pieces so more surface area is exposed.
Step 2: Combine With Vinegar
Place the steel wool into a glass jar and cover it with white vinegar. Some people use a full pad per quart jar; others make smaller batches. The exact ratio is flexible, which is part of the charm and part of the chaos.
Step 3: Let It Steep
For a lighter effect, a short soak may be enough. For darker results, leave it longer. Some makers use the solution after a day, while others wait several days or even about a week. During this time, keep the container loosely covered rather than tightly sealed.
Step 4: Strain It
Before applying the liquid to wood, strain out any remaining metal bits. This helps reduce specks and gives you a cleaner finish. Skipping this step is like making soup and keeping the ladle in it for texture. Technically possible. Emotionally questionable.
How to Prepare Wood for an Even, Professional Finish
Preparation matters more than most people expect. Sand the wood evenly, usually to a fine but not glassy smooth surface. Too rough, and the finish can grab unevenly. Too polished, and penetration may be inconsistent. Many woodworkers also raise the grain before applying the solution because the mixture contains a lot of water. Wipe the wood with a damp cloth, let it dry, then sand lightly again. This removes the fuzzy fibers before the real finish goes on.
Always test on scrap from the same species, and ideally from the same board. Different boards can react differently, even when they look similar. That tiny test piece can save an entire tabletop from becoming an accidental gothic tragedy.
How to Apply the Finish
For High-Tannin Woods
Brush or wipe the strained solution onto the bare wood, following the grain. The color may appear gradually as the reaction develops. Sometimes the change is quick; sometimes it deepens as the board dries. If the effect is too light, apply another coat after the first has dried.
For Low-Tannin Woods
Start with a strong black tea wash. Brew the tea heavily, let it cool, and apply it to the sanded wood. Once dry, apply the steel wool and vinegar solution. The added tannins often create a much richer result. This step can be the difference between “subtly aged” and “why does this look like damp cardboard?”
How to Control the Color
If you want a soft weathered gray, use a weaker solution, fewer coats, or dilute the mixture. If you want a darker aged wood finish, let the solution steep longer or add a second application. On tannin-rich woods, color can intensify quickly, so move carefully. The finish can go from charmingly antique to “Victorian thunderstorm” faster than expected.
Color also depends on the wood itself. Red oak may not look exactly like white oak. Flat-sawn boards may reflect light differently than quarter-sawn pieces. End grain darkens faster than face grain. This is why experienced woodworkers treat the process more like cooking than chemistry lab perfection. The method has rules, but it also rewards observation.
Common Mistakes to Avoid
Skipping the Test Board
This is the number one mistake. Never trust a fresh batch on a finished project before testing it first.
Using the Wrong Wood Expectations
If you apply the solution to pine and expect old barn oak, disappointment will arrive early and sit down heavily.
Forgetting About Grain Raise
Because the solution is water-heavy, the surface can get rough. Pre-raising the grain helps keep the final finish smoother.
Leaving Metal Particles in the Mix
Unstrained bits can leave streaks or specks. Strain thoroughly.
Applying Over Existing Finish
This method works best on bare wood. A sealed or finished surface blocks the reaction.
Should You Seal the Wood Afterward?
In many cases, yes. Once the wood is fully dry and the color has developed, a topcoat can protect the surface and enrich the appearance. Wax gives a soft, rustic sheen. Oil can warm the tone. Clear finishes such as shellac or polyurethane offer more protection for furniture and high-use surfaces. Keep in mind that topcoats can slightly deepen the color, so your test sample should include the finish coat too.
If you want a very natural, matte, weathered wood look for decorative pieces, you may choose little or no build at all. For tabletops, shelving, benches, and anything touched by real humans instead of admired from a distance like museum pottery, protection is usually a smart move.
When This Technique Makes Sense
This finish is ideal when you want rustic character, farmhouse style, reclaimed wood vibes, or visible grain with an aged tone. It is excellent for decorative furniture, accent pieces, frames, trays, signs, and craft projects where a hand-made appearance adds charm.
It is less ideal when you need exact color matching across many species or want highly uniform production results. Because the finish reacts naturally with the wood, variation is part of the package. That is often a benefit, but for some projects it can be a headache wearing suspenders.
Real-World Experiences With Aging and Weathering Wood Using Steel Wool and Vinegar
One of the most useful lessons from real-world projects is that this technique teaches patience whether you asked for that lesson or not. The first time many people try it, they expect instant perfection. They brush the liquid on pine, wait thirty seconds, and wonder why the board does not look like a hundred-year-old beam from a New England barn. Then they try it on oak and suddenly get a deep gray-black tone that looks like it has seen wars, winters, and at least one interesting ghost. The experience quickly reveals that wood species matter more than internet bravado.
Another common experience is discovering how much surface prep changes everything. A board that is sanded evenly tends to age more gracefully. A board with mill glaze, fingerprints, glue residue, or random scratches ages like a sleep-deprived raccoon. The reaction highlights inconsistencies instead of hiding them. That can be frustrating at first, but it becomes one of the best teaching tools in the shop. The finish is honest. It tells you exactly how careful you were.
Many DIYers also report that the black tea pretreatment feels optional right up until the moment it saves the whole project. On pale woods, tea can turn a weak, washed-out result into something far richer and more believable. It is one of those small steps that sounds too simple to matter, and then quietly becomes the hero of the afternoon.
There is also the issue of timing. Some batches seem ready overnight, while others take days to develop the color strength you want. Temperature, steel wool type, and even how well the oils were cleaned off can affect the reaction. That unpredictability is why experienced makers keep notes. Not glamorous notes, either. More like: “Oak looked amazing. Pine looked confused. Next time strain twice.”
People who stick with the process usually end up liking the imperfections. A slightly uneven gray, a darker edge, or a board that shifts from brown to charcoal can make the finished piece feel more authentic. That is especially true on rustic shelves, decorative trays, benches, and frames. The finish often looks better once it is topcoated too. What seems flat or cloudy while wet can turn rich and layered when dry and sealed.
Perhaps the most relatable experience is this: after the first successful project, you start looking around the house for more wood to age. A crate becomes a candidate. Then a shelf. Then a frame. Then suddenly you are standing in the garage holding a piece of scrap oak like a treasure hunter who has discovered a new religion. That is the charm of aging wood with steel wool and vinegar. It is inexpensive, hands-on, a little messy, and genuinely satisfying when the chemistry lands just right.
Conclusion
Aging and weathering wood using steel wool and vinegar is one of the simplest ways to give ordinary lumber depth, character, and a convincingly old appearance. The biggest secret is not the recipe. It is understanding the wood. Once you know that tannins drive the reaction, everything makes more sense: why oak darkens beautifully, why tea helps pale species, and why testing is non-negotiable.
For DIY furniture, rustic décor, and handmade woodworking projects, this method offers a rare mix of low cost and high personality. It does not produce a factory-perfect finish, and that is exactly why people love it. When you want wood to look less fresh off the shelf and more like it has stories to tell, a jar of vinegar, a bit of steel wool, and some patience can take you surprisingly far.


