Table of Contents >> Show >> Hide
- Why a Pergola Is the Secret Sauce of Backyard Design
- Start With the Plan, Not the Power Tools
- Pick Materials That Can Handle Real Weather
- Build for Strength First, Style Second
- A Smart DIY Pergola Game Plan
- How to Make the Pergola Feel Like a Backyard Oasis
- Common Mistakes That Can Ruin the Look
- Budget Expectations for a DIY Pergola
- Maintenance That Keeps It Looking Good
- Final Thoughts
- Real-Life Experiences: What It’s Actually Like to Build a Backyard Oasis With a DIY Pergola
- SEO Tags
If your backyard currently feels more like “patchy grass and a lonely grill” than “private resort with excellent snacks,” a DIY pergola can change the mood fast. Few outdoor projects do such a good job of adding structure, shade, and style all at once. A pergola creates the feeling of an outdoor room without fully boxing you in, which is exactly why it works so well for patios, poolsides, dining areas, and that corner of the yard where you keep saying you’ll make something “really nice” one day.
The beauty of a pergola is that it pulls double duty. It adds architectural interest, yes, but it also gives your backyard a purpose. Suddenly there is a place to sip coffee, host dinner, hang string lights, train climbing vines, or hide from the sun while pretending you are the kind of person who always remembers to water herbs. Better yet, a thoughtfully designed pergola can be a realistic DIY project for homeowners who plan carefully, choose the right materials, and respect the structural side of the job instead of winging it with a tape measure and blind optimism.
This guide walks through how to build a backyard oasis with a DIY pergola, from layout and materials to design decisions that make the finished space feel polished instead of half-finished. Whether you want a simple freestanding structure over a patio or a statement piece that turns your yard into an outdoor living zone, the key is building smart first and decorating second. Pretty is important. Not wobbly is even more important.
Why a Pergola Is the Secret Sauce of Backyard Design
A pergola sits in the sweet spot between open sky and full cover. Unlike a gazebo, it usually has an open or slatted roof, which means you still get airflow and natural light while creating filtered shade. That makes a pergola ideal for homeowners who want definition without losing the airy feel of the yard.
It also helps solve a common backyard problem: space without identity. A patio alone can feel flat. Add a pergola, and the same square footage suddenly reads as a destination. Put a dining table underneath it and it becomes an outdoor dining room. Add a sofa, rug, lanterns, and planters, and now you have a lounge. Hang a swing, install curtains, or drape a canopy, and the whole space starts looking suspiciously expensive.
From an SEO-friendly practical standpoint, pergolas are popular because they can be customized for almost any backyard style. A cedar pergola feels warm and classic. A painted wood pergola can look crisp and coastal. A modern pergola with dark stain and streamlined hardware leans contemporary. The frame itself is simple, but the finish choices make it wildly flexible.
Start With the Plan, Not the Power Tools
Choose the Right Location
Before you think about rafters, think about how the sun moves across your yard. A pergola should improve comfort, not just occupy real estate. Watch where the harsh afternoon sun lands, where wind tends to blow through, and how traffic moves from the house to the patio, garden, or pool. A pergola works best when it feels connected to the way people already use the space.
For example, placing a pergola just off the back door can make outdoor dining easier because you are not carrying plates across a lawn obstacle course. Setting one near the garden may create a more peaceful retreat. Building one over an existing patio can save hardscape costs and instantly make the area feel finished.
Check Permits, Setbacks, and Utilities
This is the least glamorous part of the project and also the part that can save you from future regret. Depending on your area, a pergola may require a permit, especially if it is attached to the house or anchored with substantial footings. Property setbacks, HOA rules, and utility lines can all affect placement. Before digging, contact utility-locating services and confirm local requirements for foundations, anchoring, and structural dimensions.
Decide Between Freestanding and Attached
A freestanding pergola is the most flexible option. It can sit over a patio, on a lawn-adjacent gravel pad, or beside a pool. It also creates a standalone focal point, which is great if your backyard needs a visual anchor. An attached pergola can save space and feel like a natural extension of the home, but it usually requires more careful structural planning where it meets the house.
For many DIY homeowners, a freestanding pergola is the easier route because it avoids tying directly into exterior walls and lets you design the structure around the yard instead of the siding.
Pick Materials That Can Handle Real Weather
Wood Is the Classic Choice
Pressure-treated lumber is often the budget-friendly starting point for a DIY pergola. It is widely available, strong, and suitable for outdoor use when properly finished. Cedar and redwood cost more, but they are naturally rot resistant, attractive, and loved for a reason. If you want the pergola to look good even before stain touches it, cedar is the overachiever of the group.
The right choice depends on budget, climate, and the aesthetic you want. A backyard pergola meant to feel rustic or timeless often looks best in cedar or stained pressure-treated wood. If your goal is a clean, painted finish, pressure-treated wood can work beautifully after it dries sufficiently and is properly prepped.
Hardware Is Not the Place to Get Cheap
Outdoor structures fail in boring ways. Usually it is not because someone picked an ugly stain. It is because the wrong fasteners rusted, the post bases were flimsy, or the connectors were not rated for exterior structural use. Use exterior-rated screws, anchors, post bases, and brackets made for outdoor structural projects. This is the part of the budget that deserves seriousness.
Think of hardware as the orthopedic shoes of the pergola. Not exciting, but absolutely doing the work.
Think Beyond the Frame
If your goal is an actual backyard oasis, plan your shade and comfort features early. A pergola can support retractable fabric panels, shade cloth, hanging planters, privacy curtains, string lights, and carefully chosen vines. Deciding on those features in advance helps determine spacing, orientation, and how open or shaded the finished structure should feel.
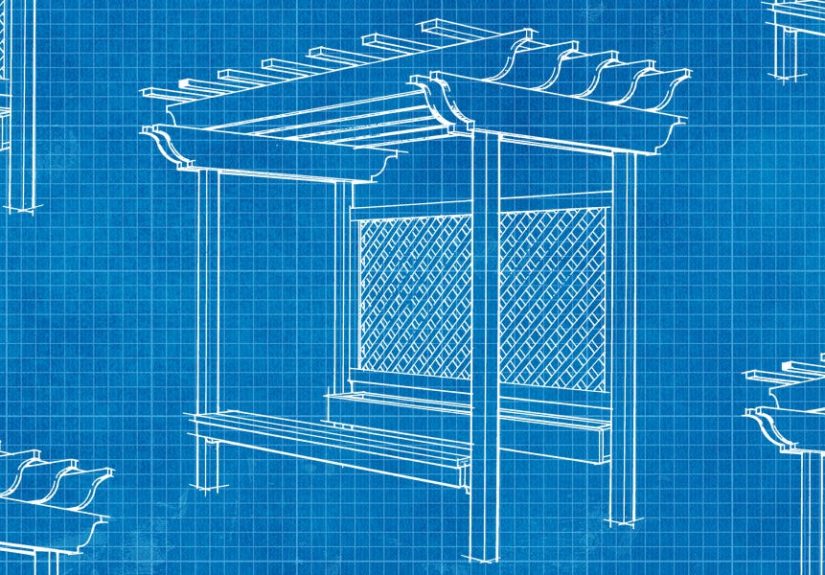
Build for Strength First, Style Second
Footings Matter More Than Instagram
A pergola may look lightweight, but it still catches wind and carries loads through posts and beams down into the ground. That is why the foundation matters so much. In many climates, footings need to extend below the local frost line to reduce movement from freeze-thaw cycles. Posts should be secured with appropriate bases or anchors rather than simply wishing for the best.
If you are building over a patio or deck, verify that the existing surface and framing can support the structure and anchoring method. Not every slab or deck is automatically pergola-ready. A beautiful pergola attached to a questionable base is just a very ambitious future repair bill.
Keep It Square, Plumb, and Braced
The best-looking pergolas are not just stylish. They are square. Layout is everything. Mark the footprint carefully, double-check diagonals, and use string lines and levels so your post locations are accurate before installation begins. Once the posts go up, temporary bracing helps hold everything steady while beams and rafters are installed.
Diagonal braces or structural connectors can help reduce sway, especially in exposed yards. This is one of those details that separates a pergola that feels permanent from one that politely shivers every time the wind shows up.
Rafter Spacing Changes the Entire Look
The spacing and size of rafters affect both shade and style. Wider spacing creates a lighter, more open look. Tighter spacing increases overhead pattern and sun control. Decorative rafter tails, end cuts, and top slats can also make a simple pergola feel more custom. This is where function meets curb appeal.
If you want the structure to eventually support climbing vines or a canopy, plan the top framing with those future additions in mind. Your pergola should not just look finished on day one; it should get better as the space evolves.
A Smart DIY Pergola Game Plan
1. Map the footprint
Measure the area and define the pergola size based on furniture, circulation, and surrounding landscape. Common backyard pergola sizes include 10-by-10, 10-by-12, and 12-by-16, but the right size depends on what you want underneath it. A dining setup usually needs more room than a pair of lounge chairs and a side table.
2. Confirm clearances
Make sure doors swing freely, pathways stay comfortable, and the pergola does not overwhelm the yard. A structure that looks elegant on paper can feel oversized if it pinches the usable space around it.
3. Prepare the base and footings
Install footings or approved anchors according to local code and soil conditions. This is the foundation of the foundation, literally and emotionally.
4. Set the posts
Install posts carefully, check for plumb, and brace them before moving on. If the posts are off, everything that follows will be a long argument with gravity.
5. Add beams and structural connections
Secure the main beams with exterior-rated hardware. This stage defines the overall shape and visual heft of the pergola, so proportion matters. Chunky beams create presence. Too-thin members can make the structure feel flimsy even when it is technically upright.
6. Install rafters and top slats
Lay out rafter spacing evenly for a balanced look. If you are going for an airy feel, leave more open sky between members. If your priority is filtered shade, tighten the rhythm of the rafters or add additional top slats.
7. Sand, stain, or seal
Finish the wood with a quality exterior stain or sealant suited to your climate. UV exposure and moisture are relentless, so protecting the lumber is not optional if you want the pergola to age gracefully.
8. Add shade features
Retractable canopies, fabric panels, or outdoor curtains can dramatically improve comfort during the hottest part of the day. These features make the difference between “nice to look at” and “actually used every weekend.”
9. Layer in lighting
String lights, pendant lights, lanterns, or recessed outdoor-rated fixtures turn a pergola into an evening space. Lighting also softens the structure visually and makes the entire yard feel more inviting.
10. Finish with furniture and plants
Once the frame is done, the oasis part begins. Add seating, an outdoor rug, planters, and greenery to give the structure warmth and personality. The pergola is the bones. The styling is the pulse.
How to Make the Pergola Feel Like a Backyard Oasis
Use Layers Instead of One Big Statement
The most inviting backyard spaces rarely rely on a single flashy feature. They work because multiple smaller elements cooperate. Under a pergola, that means combining shade, texture, lighting, and planting. A simple wood frame becomes an oasis when it includes soft seating, layered fabrics, a little privacy, and something green enough to make the space feel alive.
Bring in Shade Without Killing the Breeze
A pergola is naturally breezy, which is part of its charm. To keep that benefit, avoid over-closing the space. Retractable canopy panels are a smart choice because they let you adjust for time of day. Outdoor curtains can also add privacy and soften the structure, especially on one or two sides rather than all four.
Let Plants Do Their Thing
Climbing vines can make a pergola feel magical, but choose them with intention. Fast-growing plants create quick effect, while flowering vines add seasonal beauty. Edible vines such as grapes can add shade too, though they come with pruning and maintenance considerations. Pair vertical growth with large pots, trailing plants, or raised planters around the base for a lush look.
Choose Furniture That Matches the Structure
A sturdy pergola deserves furniture that looks equally grounded. A tiny bistro set under a large pergola can feel lost, while oversized sectionals may crowd a smaller frame. Match scale carefully. A dining pergola benefits from a long table, comfortable chairs, and maybe a serving cart. A lounge pergola feels best with low seating, side tables, cushions, and a central coffee table or fire feature nearby.
Do Not Forget the Floor
The ground under the pergola matters almost as much as the frame above it. A pergola over a worn patch of dirt will not magically become a resort. Pavers, gravel, decking, or an existing patio help define the space. Add an outdoor rug to warm it up and unify the furniture arrangement.
Common Mistakes That Can Ruin the Look
One of the biggest mistakes is building the pergola too small. Homeowners often focus on lumber costs and forget that furniture needs breathing room. Another common problem is weak proportion: skinny posts with oversized beams or oversized posts with a tiny top. Balance matters.
Skipping the finishing step is another classic misfire. Raw wood left exposed can weather unevenly, and a half-finished pergola tends to look like a project instead of a destination. Poor lighting also hurts the final result. A pergola without evening light misses half its magic.
And then there is the urge to decorate too quickly. Give the structure a clean design foundation first. Then add layers slowly. A backyard oasis should feel curated, not like the outdoor aisle exploded.
Budget Expectations for a DIY Pergola
Costs vary widely based on size, lumber choice, hardware, site prep, and how fancy you get with finishes. A simple pressure-treated wood pergola can be much more affordable than a large cedar build with decorative hardware, privacy panels, lighting, and canopy systems. The smartest approach is to budget in phases: structure first, comfort upgrades second, styling third.
If money is tight, do not cut corners on footings, structural hardware, or lumber quality. Save on accessories instead. You can always add curtains, planters, and dramatic lantern energy later. A solid pergola with folding chairs beats a glamorous wobbly one every single time.
Maintenance That Keeps It Looking Good
Outdoor living structures need routine care. Inspect the pergola at least once or twice a year for loose hardware, surface wear, water damage, or movement at the base. Reapply stain or sealant as needed for your climate and material. Trim vines so they do not trap excess moisture or overwhelm the frame.
Regular cleaning helps more than people think. Hose off dirt, clear debris from the top, and wipe down canopy fabric or curtains before they turn into science fair projects. A well-maintained pergola continues to feel intentional. A neglected one starts auditioning for a ghost story.
Final Thoughts
Building a backyard oasis with a DIY pergola is really about creating a place people want to linger. The pergola itself is only part of the story. The bigger win is what it does to the yard. It introduces rhythm, creates shade, frames activity, and gives the backyard an identity. Done well, it turns ordinary outdoor space into an extension of the home.
Start with a strong plan, respect the structural details, choose materials that can handle your climate, and design the finished space for real life. Add comfort, greenery, and lighting in layers. Do that, and your pergola will not just look good in photos. It will become the place where coffee tastes better, summer evenings last longer, and your backyard finally starts pulling its weight.
Real-Life Experiences: What It’s Actually Like to Build a Backyard Oasis With a DIY Pergola
One of the most surprising things about building a DIY pergola is how quickly it changes the way people see the backyard, even before the project is fully finished. At the start, the yard usually feels like open space without much personality. It may have a patio, some grass, maybe a grill parked off to the side like it is waiting for better days. But once the pergola posts are set and the top frame starts taking shape, the entire area suddenly reads differently. You can stand underneath it and instantly understand where the table will go, where the lights will hang, and where people will naturally gather. That emotional shift happens long before the cushions, planters, or pretty accessories show up.
There is also a very real satisfaction that comes from building something that feels permanent. A lot of outdoor purchases are temporary by nature. Umbrellas tear. Foldable canopies wobble. Cheap patio furniture gives up after a few seasons and starts looking like it has seen things. A pergola feels different. It becomes part of the property. It adds structure to the yard in a way that makes everything around it look more deliberate, even if the rest of the landscaping is still a work in progress.
People who take on pergola projects often talk about how the build pushes them to think more intentionally about outdoor living. Before the pergola, the question might be, “What can we fit out here?” After the pergola, the question becomes, “How do we want to use this space?” That is a major mindset upgrade. Some homeowners realize they want an outdoor dining area because they love hosting. Others discover they would rather create a quiet reading corner with lounge chairs, a fan, and layered plants. Some families end up treating the pergola like a second living room for most of the year.
The experience is not all dreamy string lights and sunset lemonade, of course. There are practical moments too: measuring twice, adjusting layouts, rechecking level lines, and trying not to develop a personal grudge against whichever board decided to crown in a dramatic direction. But even those moments become part of the reward. The finished pergola usually carries memories of the build itself. You do not just see the structure. You remember the weekend it went up, the first dinner under it, the first rainy afternoon when the yard still looked beautiful, and the first compliment from a guest who asked, “Wait, you built this?”
Another common experience is that the pergola becomes a catalyst for improving the rest of the yard. Once one section looks polished, the surrounding areas start asking for attention too. Maybe that means adding gravel or pavers underfoot, upgrading the landscaping, planting vines, or finally replacing those sad plastic chairs that survived purely on optimism. In that way, the pergola often becomes the anchor for a broader backyard transformation.
Most of all, people tend to appreciate how a pergola creates atmosphere without feeling overly formal. It offers enough structure to feel special, but it still keeps the openness that makes outdoor living enjoyable. Morning coffee feels calmer there. Dinner feels more like an event. Even an ordinary Tuesday evening gets upgraded when there are lights overhead, a little breeze moving through the slats, and a space that feels intentionally made for relaxing. That is the real experience of a DIY pergola. It is not just a carpentry project. It is a lifestyle upgrade disguised as lumber.


