Table of Contents >> Show >> Hide
- Why put a clamp rack on a mobile workbench?
- Step 1: Take inventory (yes, this matters)
- Step 2: Choose the best rack layout for a rolling bench
- Step 3: Plan for balance and “rolling reality”
- Tools and materials
- Build option 1: Side-mounted rack with heavy lower brackets
- Build option 2: Under-top pipe clamp cradle (compact and clever)
- Hardware and fastening choices (what holds up long-term)
- Common mistakes (and how to dodge them)
- Dialing in your rack for different clamp types
- Quick test: “The Roll, Stop, and Grab” drill
- Conclusion
- Real-World Experiences and Lessons Learned
If clamps are the “extra hands” of woodworking, then clamp storage is the part where your shop either looks like a
professional workspace… or like a metal octopus had a meltdown. The good news: adding a clamp rack to a mobile
workbench is one of those upgrades that feels small on paper and huge in real life. You stop walking across the
shop mid-glue-up, you stop stacking clamps like Jenga, and you stop discovering a surprise clamp on the floor
(usually with your toe).
In this guide, you’ll build a practical clamp rack that mounts to your rolling workbenchstrong, balanced, and
organized enough to handle the heavy hitters (parallel clamps, pipe clamps, bar clamps) plus the grab-and-go crowd
(F-style, spring, and trigger clamps). I’ll cover design choices, weight distribution, hardware, and a few “learn
from my totally-hypothetical mistakes” examples so your rack doesn’t become a rolling chaos chandelier.
Why put a clamp rack on a mobile workbench?
- Speed during glue-ups: clamps live where you use themright at the bench.
- Cleaner workflow: fewer piles, fewer trips, fewer “where did I put the 24-inchers?” moments.
- Safer shop: clamps off the floor = fewer stumbles and fewer bent clamp bars.
- Better use of space: a rolling bench already owns some square footagemake it earn rent.
Step 1: Take inventory (yes, this matters)
Before you cut anything, do a quick clamp “roll call.” Put every clamp you own in one place and sort by type:
parallel-jaw, pipe, bar, F-style, trigger/ratcheting, C-clamps, spring clamps, corner/angle clamps. This tells you:
- What needs deep, strong supports (pipe/parallel/bar clamps).
- What can hang on dowels or pegs (trigger and smaller F-style clamps).
- What needs special cradles (corner clamps, long-reach clamps, oddballs).
Pro tip: weigh (or estimate) your “maximum clamp load.” A handful of 48-inch parallels plus pipe clamps can get
heavy fast. Your rack design should assume you’ll eventually buy more clamps, because that’s how this hobby works:
you never “finish” buying clamps. You just take breaks.
Step 2: Choose the best rack layout for a rolling bench
A mobile workbench has two special challenges: stability and clearance. You’re not mounting to a wall studyou’re
mounting to something that moves, turns, bumps, and occasionally gets pushed too enthusiastically.
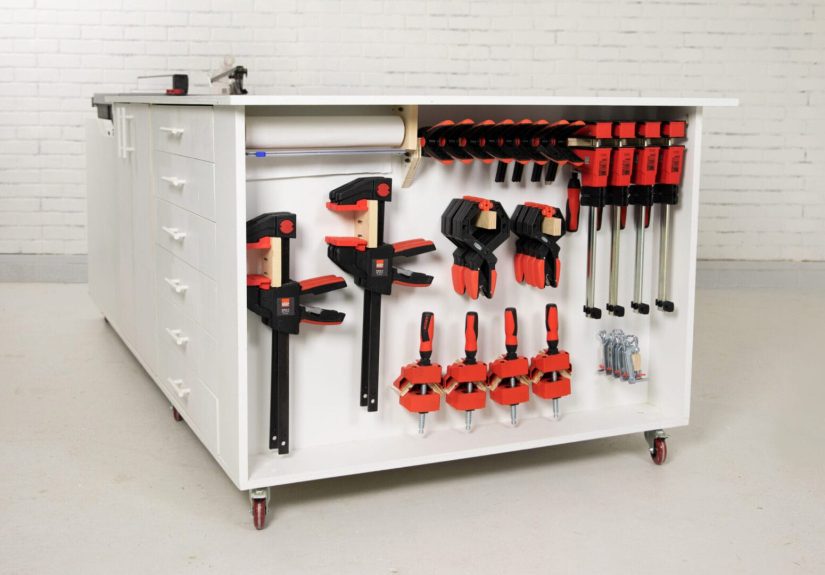
Layout A: Side-mounted “multi-zone” rack (best all-around)
This is the most common and practical approach: mount a rack to one long side of the workbench. Use separate zones:
a heavy zone low for big clamps, and a lighter zone higher for trigger/spring clamps. The key is keeping the
center of gravity low so the bench doesn’t feel tippy.
Layout B: Under-top clamp cradle (best for pipe clamps)
Perfect if you have pipe clamps you want instantly accessible without eating up side space. The cradle mounts under
the benchtop or under the stretchers. Great for long clamps; also great for knee-bumping if you mount it too low.
Layout C: End-cap rack (best for small shops)
If your bench lives against a wall sometimes, an end rack can be less intrusive. You’ll store fewer long clamps,
but you can still keep trigger clamps, spring clamps, and small F-style clamps close.
For most people, Layout A + a small under-top cradle is the sweet spot: heavy clamps down low on the side,
pipe clamps tucked under, and quick clamps up top.
Step 3: Plan for balance and “rolling reality”
Clamps are awkward weights. On a wall, gravity is the only boss you answer to. On a rolling bench, you also have
inertiatranslation: when you stop the bench, the clamps want to keep going like they’re late for a meeting.
Three rules that keep the bench from feeling sketchy
- Keep heavy clamps low: store long parallel/pipe clamps below the benchtop, not up high.
- Don’t load one side only: if you mount clamps on one side, offset with shelves/tools on the other.
- Use mechanical fastening: glue is great, but bolts + washers are your best friends for heavy racks.
Tools and materials
You can build this rack from basic lumber and plywood. Adjust sizes to your bench and clamp collection.
Common materials
- 3/4″ plywood (rack backer, brackets, gussets)
- 1×4 and 1×2 boards (hanger rails)
- 2×4 or 2×6 (heavy clamp brackets or under-top cradle)
- 3/4″ dowel rod (trigger clamp pegs)
- Bolts, washers, nyloc nuts (or lock washers)
- Wood screws (construction or cabinet screws)
- Optional: pocket-hole screws, T-nuts, threaded inserts
- Optional: rubber bumpers, bungee cord/retaining strap
Tools
- Drill/driver + bits
- Square, tape measure, pencil
- Circular saw or table saw (or a miter saw + jigsaw combo)
- Clamps (yes, you will use clamps to build clamp storagelife is poetic)
- Optional: pocket-hole jig, router (round-overs make racks nicer to live with)
Build option 1: Side-mounted rack with heavy lower brackets
This design gives you a strong lower section for parallel/pipe/bar clamps and an upper section for trigger clamps.
It’s modular, easy to expand, and friendly to different clamp types.
1) Mark your mounting zone
- Pick the long side of the bench that won’t interfere with vises, dog holes, or drawers.
- Identify solid structure: legs, stretchers, or internal framing. Avoid mounting heavy loads to thin panels.
- Mark a rectangle where the rack backer will sit (for example, 10–14″ tall and 36–48″ long).
If your bench has a thin skin (like 1/2″ plywood sides), add an internal backing plate or mount through the legs.
The goal is to transfer load to the frame, not to “hope and vibes.”
2) Cut and prep the backer panel
- Cut 3/4″ plywood to your planned size.
- Round over the edges (optional but feels nice and reduces splinters).
- Pre-drill mounting holes for bolts/screws where they’ll hit structure.
3) Build heavy clamp brackets (the “big clamp parking garage”)
For long parallel clamps and pipe clamps, you want bracket pairs that create slots. The slot spacing should match
your clamp bar width/pipe diameter plus a little breathing room so clamps slide in and out without snagging.
- Cut bracket blanks from 2x material or stacked plywood (sturdy matters here).
- Cut a shallow U-shape or notch in each bracket face to help clamps seat consistently.
- Attach brackets in pairs to the lower half of the backer, leaving consistent spacing between pairs.
- Add a diagonal gusset or a back cleat if you’re storing truly heavy clamps.
Example spacing approach: measure your clamp bar or pipe outside width, then add a small margin so clamps
don’t bind. If you have mixed clamps, group similar bar widths into zones rather than trying to make one slot fit
everything.
4) Add an upper hanger rail for trigger/ratcheting clamps
Trigger clamps love dowels. You can drill holes through a 1×4 and glue in short dowel pegs, or run a continuous dowel
rod through the board like a “coat rack” for clamps.
- Cut a 1×4 to match the backer width.
- Lay out peg positions (2–3″ spacing is common, but match your clamps).
- Drill clean holes for dowels (slightly deeper than the dowel length for good glue surface).
- Glue dowels in place and let cure.
- Mount the rail to the upper portion of the backer.
For ratcheting clamps with wide handles, a slimmer 1×2 rail (mounted slightly proud from the backer with spacers)
can keep handles from colliding.
5) Add corner clamp “pockets” (optional, but satisfying)
Corner/angle clamps are always shaped like they were designed by a committee. Small L-shaped blocks or corner
pockets keep them from sliding around.
- Cut two small blocks per clamp (think: simple “bookends”).
- Mount them so the clamp body nests between blocks.
- Leave finger clearance so you can grab the clamp without doing yoga.
6) Mount the rack to the bench (the “don’t skip this” part)
For a mobile bench, I strongly recommend through-bolts with washers and lock nuts wherever possible. Screws into
thin plywood can loosen over time from vibration and rolling.
- Hold the backer in place and mark hole locations onto the bench frame.
- Drill through the frame (and add an internal backing plate if needed).
- Bolt the rack on with washers on both sides.
- Test with a few clamps before you fully load it like a clamp buffet.
Build option 2: Under-top pipe clamp cradle (compact and clever)
Pipe clamps are long, heavy, and somehow always the ones you need right now. An under-top cradle stores them
directly under the benchtop so they’re close but not in the way.
How it works
You drill a line of large holes down the center of a 2x board, then rip the board lengthwise so each half becomes a
series of semicircular “seats.” Mount two of these rails parallel to each other, and your pipe clamps rest in the
cradles.
Steps
- Cut a 2×6 to the length you want (often 24–36″).
- Draw a centerline and mark hole locations every 3–5″ depending on clamp spacing needs.
- Drill large holes (sized to your clamp pipes) along the line.
- Rip the board lengthwise through the hole centers to create two matching cradle rails.
- Mount the rails under the benchtop or under the stretchers, aligned so pipes rest evenly.
- Add a retaining strap (bungee or webbing) if you roll over uneven floors.
Clearance check: store clamps far enough inboard that they don’t catch on doorways, tool carts, or your hipbecause
nothing ruins a productive day like getting clotheslined by a pipe clamp.
Hardware and fastening choices (what holds up long-term)
Best fasteners for clamp racks on mobile benches
- Through-bolts + washers + lock nuts: strongest and most vibration-resistant.
- Lag screws into solid wood: fine if you’re hitting thick legs/stretchers.
- Threaded inserts or T-nuts: great for modular racks you may remove or reconfigure.
Add anti-rattle and “keep it tidy” upgrades
- Retaining lip: a small strip along the bottom edge keeps clamps from shifting outward.
- Rubber bumpers: reduce banging noise and protect clamp bars.
- Label zones: yes it’s nerdy; yes it makes glue-ups faster.
Common mistakes (and how to dodge them)
1) Mounting too high
If the heavy clamps are high, the bench feels top-heavy and more likely to wobble or tip when you roll it.
Store the big clamps low and the light clamps high.
2) Ignoring doorways and hips
A clamp rack that sticks out too far turns your rolling bench into a shop snowplow. Keep the rack profile slim,
and avoid mounting clamps where you naturally stand or walk.
3) Underbuilding the brackets
Thin plywood tabs may hold for a while, then gradually loosen. Use thick stock for heavy brackets, add gussets,
and rely on bolts for the main attachment.
4) No plan for “clamp growth”
Your clamp collection will expand. Leave some empty slots or design the rack so you can add a second backer panel
later without rebuilding everything.
Dialing in your rack for different clamp types
Parallel clamps
Store them in consistent slots so they don’t tangle. Keep handle clearance in mindparallel clamp handles like to
fight each other when packed too tightly.
Pipe clamps
Under-top cradles are ideal. If you store them vertically, make sure the heads are restrained so they don’t slide
when the bench moves.
F-style and bar clamps
F-style clamps can share the heavy bracket zone if you keep spacing reasonable. Smaller ones can hang on pegs.
Trigger/ratcheting clamps
Pegs, dowels, and hanger rails work great. Just ensure the peg diameter is strong enough and the board is mounted
securelytrigger clamps are lighter, but you’ll grab them constantly, so the mount sees repetitive stress.
Quick test: “The Roll, Stop, and Grab” drill
- Load a few clamps across each storage zone (not all of them yet).
- Roll the bench 10–15 feet and stop firmly.
- Watch for shifting, rattling, or anything that looks eager to fall.
- Grab clamps one-handed as if you’re mid-glue-up. If it’s awkward, adjust spacing now.
If clamps move around when you stop, add a strap, lip, or tighter slots. If you can’t grab clamps easily, you’ll
stop using the rackthen it becomes decorative clutter, which is not the vibe we’re going for.
Conclusion
Adding a clamp rack to a mobile workbench is a high-impact, low-drama upgrade that improves workflow immediately.
Keep heavy clamps low, mount to real structure, plan clearance for rolling, and build the rack in zones so each
clamp type has a “home.” Once your clamps live on the bench, glue-ups feel smoother, your shop stays cleaner, and
you’ll spend more time building projects instead of playing hide-and-seek with a 36-inch parallel clamp.
Real-World Experiences and Lessons Learned
Here’s the funny thing about clamp racks on mobile benches: they seem like a simple storage add-on, but they
change how you move through a project. The first “experience” most people have is the sudden disappearance of
clamp-related walking. You know that routineapply glue, realize you need two more clamps, jog across the shop,
trip over the air hose, return to find the glue already getting grabby. Once the rack is on the bench, the whole
glue-up rhythm shifts. You clamp faster, you adjust alignment sooner, and you’re less tempted to “make do” with
the wrong clamp because the right one is inconvenient.
Another common lesson: weight distribution is not theoretical. It’s not an engineering lecture; it’s the moment
you load six long parallels on one side, push the bench, and feel that tiny, unsettling lean. Even if it never
tips, that feeling makes you baby the benchand anything that makes you cautious about moving the bench reduces
the point of having a mobile bench. The fix is usually easy: store the heaviest clamps low, move some tools or a
shelf to the opposite side, or split long clamps between two zones (a few on the side rack, a few under-top).
The best setups feel “neutral” when you roll themlike the bench wants to go where you point it, not where gravity
suggests.
Then there’s the “first doorway problem.” If you’ve never rolled your bench through tighter shop spaces, you might
not realize how far clamps can stick out once they’re hanging. The first time a clamp handle snags a door jamb or
catches a shop-vac hose, you’ll immediately become a fan of low-profile racks. This is why a backer panel with
brackets that keep clamps close to the bench is so helpful. It’s also why many people add a simple retaining strap:
not because clamps always fall, but because rolling over a threshold or a rough spot can bounce a clamp just enough
to rotate outward and become a snag hazard.
A big quality-of-life upgrade that shows up in real use is “zoning.” At first, it’s tempting to build one generic
racksame slots, same pegs, everything evenly spaced. But after a few projects, you’ll notice patterns. You reach
for trigger clamps constantly for jigs and quick holds. You reach for medium F-style clamps for edge banding, stops,
and temporary fences. You reach for long parallels for panels and carcasses. When the rack matches those patterns
quick clamps at shoulder height, medium clamps at hand height, heavy clamps lowerthe bench feels like it’s helping
you instead of just storing stuff.
Finally, there’s the “clamp growth” experience. The rack makes your clamps more visible, which makes it easier to
notice gaps in your clamp lineup. Suddenly you realize you have plenty of 12-inch clamps but almost nothing in the
24–36-inch range, or you have pipe clamps but not enough small clamps for fixtures. A good rack anticipates this:
a little empty space, a modular add-on panel, or a second rail you can install later. The best clamp rack isn’t the
one that perfectly fits what you own todayit’s the one that still works when your clamp collection inevitably
multiplies like it’s being fed after midnight.


