Table of Contents >> Show >> Hide
- Before You Start: A 90-Second Setup That Makes Everything Easier
- Easy Way #1: The 2–5 Minute Daily Reset (Warm Water + Dish Soap)
- Easy Way #2: The Pantry Deep Clean (Baking Soda Scrub + Optional Vinegar Mist)
- Easy Way #3: The Safe Disinfecting Finish (Because Handles Are High-Touch)
- Bonus: Make the Faucet and Drain Look “New” Again (Without Replacing Anything)
- What Not to Do (Your Sink Deserves Better Than Viral “Hacks”)
- A Simple Cleaning Schedule That Actually Sticks
- FAQ: Bathroom Sink Cleaning Questions People Actually Ask
- Real-World Sink-Cleaning Experiences (The Stuff You Learn the Hard Way)
- Conclusion: Pick the Method That Matches Your Sink’s Mood
- SEO Tags
Your bathroom sink is basically the busiest tiny stage in your house. Toothpaste performs. Makeup takes a bow.
Soap scum shows up uninvited. And hard-water minerals? They’re like glitteronce they land, they commit.
The good news: you don’t need a cabinet full of mystery sprays to get a sink that looks (and smells) normal again.
Below are three easy, effective ways to clean a bathroom sinkfrom quick daily resets to a deeper scrub
and a safe disinfecting finish. You’ll also get practical tips for faucets, drains, and those sneaky grime lines where
“clean” goes to hide.
Before You Start: A 90-Second Setup That Makes Everything Easier
1) Identify what your sink is made of
Most bathroom sinks are porcelain/vitreous china, enamel-coated cast iron, solid surface, stainless steel, acrylic,
or natural stone (like marble). The cleaning method is similar, but the “what not to do” changesespecially for stone
and specialty faucet finishes.
2) Grab a few basics (no fancy shopping required)
- Microfiber cloths or soft sponges (non-scratch)
- Dish soap
- Baking soda
- White vinegar (optional, not for stone)
- Old toothbrush or small soft brush (for seams, drain ring, and faucet crevices)
- Disinfectant (store-bought, or properly diluted bleach for hard, nonporous surfaces)
- Gloves (recommended) and good ventilation (always)
3) Clear the clutter
Remove toothbrush cups, soap dishes, razors, and the mysterious “small cap” that no one claims. A clear surface means
you can actually reach the grimebecause dirt loves company.
Easy Way #1: The 2–5 Minute Daily Reset (Warm Water + Dish Soap)
This is the “keep it from getting gross” method. It’s fast, gentle, and works on nearly every sink material.
If you do this consistently, the other two methods become occasional instead of urgent.
Best for
- Everyday toothpaste splatter, hand soap film, makeup residue
- Porcelain, stainless steel, solid surface, enamel (and most acrylicuse a soft touch)
Steps
- Rinse with warm water to loosen residue and wash away loose grit (grit is what causes scratches).
-
Add a few drops of dish soap to a damp microfiber cloth or soft sponge.
Wipe the basin, rim, and backsplash area. -
Hit the high-touch spots: faucet handles, underside of spout, drain ring, and the front rim where
everyone leans while contemplating life. - Rinse thoroughly so soap doesn’t dry into a film.
- Dry with a clean microfiber cloth for a streak-free shine and fewer hard-water spots.
Quick pro tips (small effort, big payoff)
-
Drying is half the battle. If hard water is your home’s love language, wiping the sink and faucet dry
keeps mineral spots from building up. -
Use a toothbrush for the “sink seam.” The thin line where the basin meets the counter/caulk is where
residue collects and pretends it’s “shadow.” -
Skip abrasives. Steel wool and gritty powders can dull porcelain and scratch finishes. If you need more
power, move to Easy Way #2.
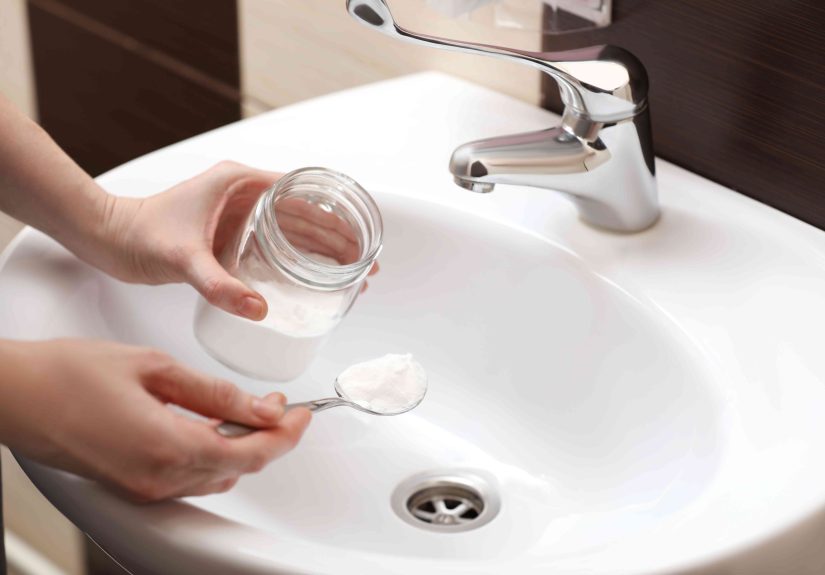
Easy Way #2: The Pantry Deep Clean (Baking Soda Scrub + Optional Vinegar Mist)
When your sink looks clean… but still looks kind of dirty (hello, dull film and ring-around-the-drain),
this is your upgrade. Baking soda is a mild abrasive that helps lift stuck-on gunk without the drama of harsh scrubbers.
Best for
- Soap scum, toothpaste “fossils,” makeup residue, dullness, light stains
- Porcelain/vitreous china and stainless steel (use gentle pressure)
- Hard-water haze on the basin surface (not the faucet finishsee the faucet tips below)
Important material note
If your sink or counter is natural stone (marble, limestone, travertine, some granite),
avoid vinegar and other acids. Use dish soap + warm water and a stone-safe, neutral cleaner instead.
You can still use baking soda carefully in some cases, but test a hidden spot and be gentle.
Steps
- Rinse the sink with warm water and leave it slightly damp.
-
Sprinkle baking soda across the basin and around the drain ring.
For targeted grime, put baking soda on a damp sponge directly. -
Scrub gently in circles (or with the “grain” if your sink is stainless steel).
Let the baking soda do the workno need to audition for an arm-wrestling tournament. -
Optional (not for stone): Lightly mist with a 50/50 vinegar-water mix.
Let it fizz for about 5–10 minutes to help loosen buildup. - Detail the edges with an old toothbrush: caulk line, faucet base, drain ring, and overflow opening.
- Rinse thoroughly until no grit remains.
- Dry and buff with a microfiber cloth.
Targeted fixes for common “why won’t this come off?” problems
-
Gray/dirty-looking drain ring: Sprinkle baking soda around the ring, scrub with a toothbrush, rinse well.
(This area gets constant moisture plus product runoffbasically a spa day for grime.) -
Makeup stains: Try dish soap first, then baking soda. If it’s stubborn, let the baking soda sit damp
for a few minutes before scrubbing. -
Toothpaste crust: Soften it with warm water first, then use baking soda and a microfiber cloth.
Toothpaste dries like cement because… it kind of wants to.
Easy Way #3: The Safe Disinfecting Finish (Because Handles Are High-Touch)
Cleaning removes grime. Disinfecting is a separate step meant to reduce germs on hard, nonporous surfaces
especially faucet handles and the areas everyone touches after touching everything else.
When disinfecting makes sense
- Someone in the house is sick (or just got over being sick)
- You share a bathroom with roommates, kids, or frequent guests
- You want a regular “monthly reset” on high-touch surfaces
Step-by-step: disinfect without turning your bathroom into a chemistry lab
-
Clean first. Disinfectants work better on a surface that isn’t coated in soap film and toothpaste.
Use Easy Way #1 or #2, then rinse. -
Choose your disinfectant: a store-bought disinfectant labeled for bathroom/hard surfaces, or a properly
diluted bleach solution for hard, nonporous materials. -
Apply to high-touch areas: faucet handles, faucet neck, drain stopper knob, front rim, and nearby counter edge.
Follow label directions for contact time (how long it must stay wet to work). - Rinse if required (especially on areas that might contact skin often), then dry for a clean finish.
If using diluted bleach (only for hard, nonporous surfaces)
Follow product directions. If you don’t have them, a common household dilution is:
5 tablespoons (1/3 cup) bleach per 1 gallon of room-temperature water, or
4 teaspoons bleach per 1 quart of water.
Bleach safety rules (non-negotiable)
- Never mix bleach with vinegar, ammonia, or other cleaners.
- Ventilate the bathroom and wear gloves.
- Use on appropriate surfaces only (avoid natural stone; be cautious on metals and specialty finishes).
- Make fresh solution as needed and store chemicals safely.
Bonus: Make the Faucet and Drain Look “New” Again (Without Replacing Anything)
If your sink is clean but the faucet still looks spottyor the water flow is spraying sideways like a tiny lawn sprinkler
you probably have mineral buildup in the faucet aerator.
Faucet aerator refresh (great for hard water)
-
Try a gentle wipe first: warm soapy water on a microfiber cloth, then dry.
Many spots vanish when you stop letting water air-dry on the finish. -
For mineral crust (not for stone counters and not for sensitive finishes):
soak the aerator in white vinegar for 30–60 minutes, then brush gently with a soft toothbrush.
Rinse and reattach. -
Finish-care note: some specialty finishes (and certain darker finishes) can be more sensitivetest first
or use plain soapy water if you’re unsure.
Pop-up stopper quick clean (because hair happens)
Pop-up stoppers collect toothpaste, soap, and hair like it’s their job (because it kind of is). If the sink drains slowly
and you see gunk around the stopper, remove it according to your sink’s design, wipe it clean, rinse, and reinstall.
If you’re not sure which type you have, look up your stopper style before forcing anything.
What Not to Do (Your Sink Deserves Better Than Viral “Hacks”)
- Don’t mix cleaners. Especially anything involving bleach + acids (like vinegar) or bleach + ammonia.
- Don’t use abrasive pads on glossy porcelain or specialty faucet finishes.
-
Don’t use vinegar on natural stone (marble, limestone, travertine; some granite surfaces can also be affected).
Acid can etch stone and damage sealants. - Don’t let products sit forever unless the label says so. “More time” isn’t always “more clean.”
- Don’t ignore drying. If you live with hard water, air-drying is basically inviting mineral buildup to stay.
A Simple Cleaning Schedule That Actually Sticks
The best bathroom sink cleaning routine is the one you’ll do without bargaining with yourself. Here’s a realistic plan:
| Frequency | What to do | Why it matters |
|---|---|---|
| Daily or every other day | Quick wipe (Easy Way #1) + dry faucet | Prevents buildup and water spots before they become “projects” |
| Weekly | Full sink clean (Easy Way #1 or #2) | Removes film, soap scum, toothpaste, and makeup residue |
| Monthly | Disinfect high-touch spots (Easy Way #3) | Keeps handles and frequently touched surfaces fresher |
| Every 2–3 months (or as needed) | Aerator/stopper detail | Improves water flow, reduces odor, stops “mystery grime” from returning fast |
FAQ: Bathroom Sink Cleaning Questions People Actually Ask
How do I remove hard-water stains in the sink?
Start with the least aggressive approach: dish soap + warm water, then dry. If the basin still looks cloudy,
try baking soda with a damp sponge (Easy Way #2). For hard-water spots on faucets, drying after use helps a lot,
and a careful vinegar approach may workunless you have a sensitive finish.
Can I use vinegar on a marble bathroom sink?
No. Avoid vinegar and other acidic cleaners on marble and many other natural stones. Stick to warm water, a small amount
of dish soap, and stone-safe, neutral cleaners.
My sink smells “off.” Is that the drain?
Often, yes. Gunk around the drain ring or stopper can hold odors. Clean the visible drain area with baking soda and a toothbrush,
rinse well, and keep the sink dry when possible. For persistent odors or slow draining, consider checking the stopper and trap
or call a plumber if it seems beyond a simple clean.
What if my sink has scratches or dull patches?
Scratches usually come from abrasives (or grit left behind while scrubbing). Switch to microfiber cloths, avoid harsh pads,
and focus on gentle cleaners. If the finish is damaged, cleaning can help it look better, but it won’t fully restore a worn surface.
Real-World Sink-Cleaning Experiences (The Stuff You Learn the Hard Way)
Here’s what tends to happen in real bathroomswhere people are late, tired, and trying to brush their teeth while thinking
about everything except “surface maintenance.”
Experience #1: Toothpaste is not innocent. It starts as minty foam and ends as a chalky crust that looks like
it’s trying to become part of the sink’s permanent architecture. The trick most people discover is that
scrubbing dry toothpaste is harder than softening it first. A warm rinse and a damp cloth turn “cement” back into “mess,”
and then baking soda can lift the remaining film without scratching.
Experience #2: Water spots are a lifestyle, not a surprise. In hard-water areas, a faucet can look “dirty”
even five minutes after cleaning because droplets dry and leave minerals behind. People who finally win this battle usually
don’t add stronger chemicalsthey add a dry towel. Wiping the faucet and rim after the last use of the day dramatically
reduces buildup, which means you don’t have to do dramatic weekend scrubs that feel like you’re negotiating with the sink.
Experience #3: The grime line has feelings, and it’s clingy. That thin seam where the sink meets the counter
(or where the faucet base meets the sink) collects soap, makeup, and moisture. It’s also where people tend to miss during quick
cleanups because the area is narrow and inconvenient. Once someone tries a toothbrush therejust oncethey usually have a
“wait, was that always that color?” moment. It’s one of the fastest ways to make the whole sink look noticeably cleaner.
Experience #4: “Natural” doesn’t mean “safe for everything.” Lots of people learn this the hard way with stone.
Vinegar is great for many mineral deposits, but it can damage marble and other soft stone surfaces. The takeaway most homeowners
end up sharing is simple: match the cleaner to the material. Dish soap and warm water are boring, but boring is exactly
what you want when your sink costs more than your first car.
Experience #5: The faucet aerator is the plot twist. Someone cleans the sink perfectly, but the water still sprays
sidewaysor the flow seems weak. That’s when they discover the aerator (the little mesh piece at the tip of the faucet) can clog
with mineral deposits. A careful soak and gentle brushing can fix the problem quickly, and it’s oddly satisfying because the result
is immediate: water behaves again.
Experience #6: Over-cleaning can backfire. A common cycle goes like this: someone gets annoyed, uses something too
abrasive, and then the sink looks dull or scratched. After that, grime sticks faster because the surface isn’t as smooth. The lesson
most people land on is: gentle and consistent beats aggressive and occasional. Daily resets keep the sink clean without wearing
it down, and deep cleaning becomes an easy refresh instead of an exhausting “project.”
Experience #7: Disinfecting is not a substitute for cleaning. People often spray disinfectant onto visible grime
and hope it magically fixes everything. But the “aha” moment is learning that disinfectants work best on surfaces that are already
cleaned. Once someone starts doing a quick wipe first, then disinfecting handles and high-touch spots, the sink stays cleaner longer
and looks better with less effort.
Conclusion: Pick the Method That Matches Your Sink’s Mood
If your sink just needs a refresh, use the daily reset (dish soap + warm water + dry). If you’re dealing with dull film,
stubborn residue, or light stains, go with the baking soda deep clean. And if you want that “everything feels fresher” finish,
add a safe disinfecting step focused on handles and other high-touch spots.
The secret isn’t owning the strongest cleaner. It’s using a gentle routine often enough that your sink never gets the chance to
become a whole personality.


