Table of Contents >> Show >> Hide
Ribbon roses are one of those magical little crafts that look fancy enough for a wedding table but are simple enough to make while wearing fuzzy socks and half-watching a movie. With a strip of ribbon, a little patience, and a tiny amount of glue, you can create soft, romantic flowers that never wilt, never demand water, and never judge your snack choices.
Whether you want to decorate a gift box, make a handmade bouquet, embellish a headband, upgrade a scrapbook page, or add a sweet detail to party decor, learning how to make a rose out of ribbon is a skill worth keeping in your creative toolbox. The best part? You do not need professional floral training, a sewing machine, or a secret crafting degree from the University of Hot Glue.
This guide covers two simple DIY methods: a twisted no-sew ribbon rose and a folded-petal ribbon rose. The first method is quick, soft, and organic-looking. The second method creates a more structured rose with individual petals and works beautifully for bouquets, hair accessories, and keepsake crafts.
Before You Start: Choosing the Right Ribbon
The ribbon you choose will shape the personality of your rose. Satin ribbon gives a shiny, elegant finish, making it perfect for wedding decorations, gift wrapping, corsages, and romantic crafts. Grosgrain ribbon has a ribbed texture and holds its shape well, so it is a friendly option for beginners. Fabric ribbon creates a softer, more handmade look, especially if you want a rustic or vintage-style flower.
For most beginner ribbon roses, choose ribbon that is about 1 inch wide. Narrow ribbon makes tiny roses, which are adorable but slightly fiddly. Wide ribbon makes dramatic roses, but it can feel like wrestling a very shiny noodle if you are new to the process. A 1-inch ribbon gives you a nice middle ground: big enough to handle, small enough to control.
Supplies You May Need
- Satin, grosgrain, or fabric ribbon
- Scissors
- Hot glue gun and glue sticks
- Needle and thread, optional for washable projects
- Floral wire, pipe cleaner, or craft stem
- Green ribbon or floral tape for leaves and stems
- Small clips or clothespins, optional for holding glued areas
- Ruler, optional but helpful
A quick safety note: hot glue is useful, but it is also basically molten craft lava. Use a low-temperature glue gun if possible, protect your fingers, and place your glue gun on a heat-safe surface. Younger crafters should work with adult supervision, especially when using scissors, wire cutters, or hot glue.
Method 1: The Twisted No-Sew Ribbon Rose
This is the easiest way to make a ribbon rose if you want fast results. It uses one continuous length of ribbon, a rolling motion, and small dots of glue on the back. The final rose looks natural because the folds are slightly irregular, just like real petals. Nature does not use a ruler, and frankly, neither should your first ribbon rose.
Best For
This method is ideal for gift toppers, scrapbook decorations, wreaths, party favors, shadow boxes, and home decor. If the rose will be attached to clothing, bags, pillows, or anything that may be washed, use small stitches instead of hot glue or choose a flexible fabric adhesive designed for fabric projects.
Step 1: Cut Your Ribbon
Cut a piece of ribbon about 30 to 36 inches long for a medium rose. If you want a smaller rose, use 18 to 24 inches. For a fuller, dramatic rose, use 40 inches or more. The longer the ribbon, the fuller the bloom.
Trim the ribbon end at an angle to reduce fraying. If your ribbon frays easily, add a tiny amount of clear-drying fabric glue or fray-prevention product to the cut edge. Keep it light; the goal is to seal the ribbon, not give it a shiny plastic helmet.
Step 2: Create the Center Bud
Lay the ribbon horizontally with the shiny or finished side facing down. Fold one end diagonally so it forms a slanted flap. Roll that folded end tightly three or four times to create a small tube. This tube is the center of your rose.
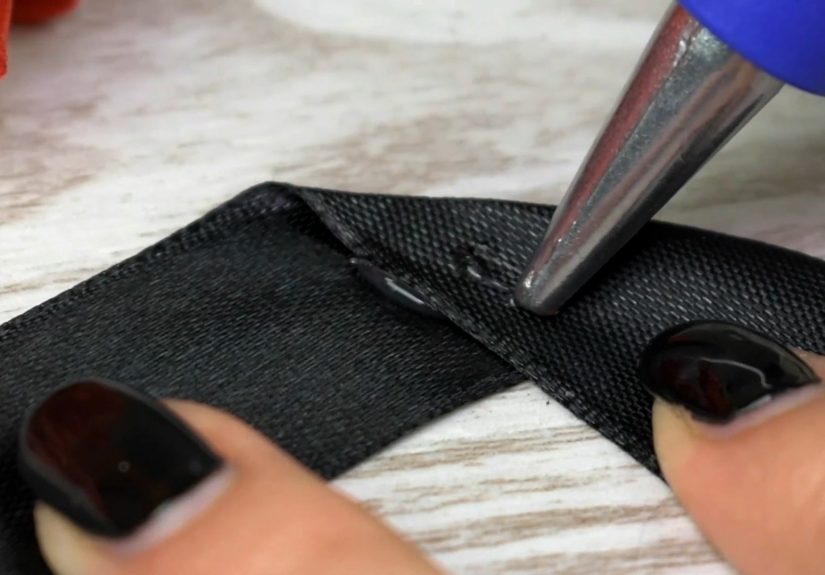
Add a tiny dot of hot glue near the base on the back side and press gently until it holds. Do not flood the ribbon with glue. Too much glue can seep through thin satin and create stiff spots. Small dots are your friend. Giant glue puddles are how crafts become emotional support objects.
Step 3: Twist, Fold, and Wrap
Hold the center bud in one hand. With your other hand, fold the long ribbon tail backward, away from the center, then wrap it around the bud. As you wrap, the folded edge becomes a petal. Add a small dot of glue on the underside every few turns to keep the rose from unwinding.
Continue the rhythm: fold the ribbon back, wrap around the center, glue underneath, rotate the rose, and repeat. Keep the top edge a little loose so the flower opens naturally. Keep the bottom edge tighter so the rose has a stable base.
Step 4: Shape the Bloom
As the rose grows, adjust the angle of each fold. Some folds can sit higher, while others can sit slightly lower. This variation creates a more realistic handmade ribbon flower. If every fold is identical, the rose may look more like a cinnamon roll wearing lipstick. Cute, yes. Rose-like, maybe not.
Do not panic if the first few wraps look strange. Ribbon roses often look suspiciously unimpressive until the outer petals appear. Keep going. The rose usually reveals itself halfway through the process, like a tiny craft-store miracle.
Step 5: Secure the End
When the rose is full enough, fold the remaining ribbon tail to the back. Glue or stitch it securely to the base. Trim any extra ribbon. Hold the base for a few seconds until the glue sets.
If you want a flat rose for gift wrapping or scrapbooking, leave the back as flat as possible. If you want a stemmed rose, add a pipe cleaner, floral wire, or wrapped craft stem to the base with hot glue, then cover the joint with green ribbon or floral tape.
Method 2: The Folded-Petal Ribbon Rose
The folded-petal ribbon rose takes a little more preparation, but it gives you a polished flower with defined petals. Instead of using one long strip, you cut several short ribbon pieces, fold them into petal shapes, glue them in a curved row, and roll them around a stem. It is a great method when you want multiple roses that look consistent.
Best For
Use this method for handmade bouquets, centerpieces, hair clips, brooches, corsages, gift decorations, and keepsake roses. It is also excellent for using up ribbon scraps, especially if you have leftover pieces from wrapping gifts or sewing projects.
Step 1: Cut the Petal Pieces
Cut 10 to 14 pieces of ribbon, each about 3 inches long. Use fewer pieces for a small rose and more pieces for a fuller rose. Satin ribbon works especially well because it curves softly, but grosgrain ribbon creates a crisp, modern flower.
For a more realistic rose, cut a few pieces slightly shorter for the inner petals and a few pieces slightly longer for the outer petals. This is optional, but it helps the flower look more natural.
Step 2: Fold Each Petal
Place one ribbon piece horizontally in front of you. Fold the top right corner down toward the bottom edge, creating a diagonal fold. Add a tiny dot of glue under the fold and press it flat. Then fold the top left corner down in the same way, so the piece forms a soft point or shallow triangle at the top.
Repeat this process with all petal pieces. Keep the bottom edge mostly straight because that edge will be glued into the base of the rose. If your petals are not perfectly identical, congratulations: they are now more realistic.
Step 3: Glue the Petals in a Row
Take one folded petal and add a small dot of glue to the lower right side. Place the left side of the next petal over that glued area, slightly overlapping the first petal. Continue overlapping petals from left to right. The strip will naturally curve, which is exactly what you want.
Think of this step like making a tiny ribbon caterpillar that is about to become a rose. Keep the folded edges facing the same direction and line up the bottom edges as neatly as possible.
Step 4: Prepare the Stem
Cut a piece of floral wire or craft wire about 8 inches long. Bend a small hook at the top with pliers. Wrap the wire with green floral tape or narrow green ribbon, securing the top and bottom with glue. The hook gives the rose something to grip so it does not slide off the stem.
If you are making roses for a flat project, skip the stem and roll the petals into a bloom by themselves. You can glue the finished flower directly onto a card, frame, wreath, or gift box.
Step 5: Roll the Petal Strip Around the Stem
Turn the petal strip so the glued side faces inward. Add glue to the bottom edge of the first petal and place the wire hook into the glue. Start rolling the petal strip around the hook. Keep the base tight and let the top petals flare slightly outward.
As you roll, add tiny dots of glue along the bottom edge to hold the flower together. Do not glue the upper petal edges unless they are sticking out in a way you dislike. The top should remain soft and open.
Step 6: Add Leaves or Greenery
Cut three small pieces of green ribbon, about 2 to 3 inches each. Trim one end of each piece into a point to create a leaf shape. Fold or pinch the base of each leaf and glue it to the underside of the rose. Cover the base with floral tape or a narrow strip of green ribbon for a clean finish.
This final detail makes the rose look complete. Without greenery, the underside can look like a tiny ribbon traffic jam. Leaves hide the construction and make the flower feel intentional.
Helpful Tips for Better Ribbon Roses
Use Less Glue Than You Think
Most ribbon rose mistakes come from using too much glue. A small dot is usually enough. If glue oozes out, wait until it cools and carefully remove the extra with small scissors or tweezers.
Keep the Base Tight
The top of the rose should look open and soft, but the bottom needs to stay tight. A loose base makes the flower wobble, twist, or collapse. Hold the base firmly as you work.
Try Different Ribbon Textures
Satin creates romance, grosgrain creates structure, velvet creates drama, and cotton fabric strips create rustic charm. You can even use patterned ribbon, but remember that some printed ribbon only has the design on one side. That can create a two-tone effect as you fold the petals.
Practice With Cheap Ribbon First
Before using expensive ribbon, practice with discount ribbon or leftover scraps. Your first rose may look like it survived a small craft tornado, and that is completely normal. By the third or fourth rose, your hands will understand the rhythm.
Common Mistakes and Easy Fixes
The Rose Looks Too Tight
Gently pull the outer petals outward with your fingers. For the twisted method, loosen your wraps as the rose grows. For the folded-petal method, overlap the outer petals less tightly.
The Rose Is Falling Apart
Add glue or stitches at the base. If the center is loose, secure it before continuing. Ribbon roses need a strong center, just like a good sandwich needs bread that does not surrender.
The Ribbon Is Fraying
Trim the ends cleanly and seal them with a small amount of clear fabric glue. You can also fold raw ends under before gluing them to the back.
The Rose Looks Flat
Use wider ribbon, add more wraps, or gently lift the outer petals. A rose gains dimension from layered folds, not from being pressed like a bookmark.
Creative Ways to Use DIY Ribbon Roses
Once you learn how to make a rose out of ribbon, you may start seeing blank surfaces everywhere. Gift boxes? Add a rose. Plain headband? Add three roses. Boring lampshade? Carefully add roses. Pet costume? Maybe ask the pet first.
Ribbon roses are beautiful on handmade cards, wedding favors, baby shower decorations, wreaths, hair clips, picture frames, bookmarks, corsages, and table centerpieces. You can glue them to napkin rings, attach them to wrapped presents, or cluster them into a bouquet that lasts for years.
For elegant decor, make roses in one color family, such as blush, ivory, and champagne. For cheerful party decorations, mix bright colors like coral, yellow, lavender, and turquoise. For a vintage look, use muted ribbon shades and add lace, pearls, or antique-style buttons.
Experience Notes: What Making Ribbon Roses Teaches You
Making ribbon roses is one of those crafts that teaches your hands before your brain fully catches up. The first attempt often feels awkward. The ribbon slips. The glue lands somewhere it was not invited. The center bud looks less like a rose and more like a confused burrito. But then something clicks. Your fingers learn how tightly to roll, when to loosen the petal, and how to hide the messy bits underneath like a true craft magician.
One helpful experience-based lesson is to make several roses in one sitting. The first rose is the warm-up. The second rose is the “okay, I see what is happening” rose. The third rose is usually where confidence arrives wearing sunglasses. By the fourth or fifth, you will naturally start changing the angle of the petals, adjusting the fullness, and experimenting with ribbon texture.
Another useful observation is that ribbon roses look better when they are not too perfect. Real roses have uneven petals, subtle curves, and tiny imperfections. If one fold sits higher than the others, leave it. If an outer petal flares dramatically, it may become the feature that makes the rose look handmade instead of factory-stamped. Perfection can make ribbon flowers look stiff; a little irregularity gives them charm.
Color also changes the mood of the finished rose more than many beginners expect. Red satin feels classic and romantic. Pink looks soft and sweet. White or ivory works beautifully for weddings, baptisms, memorial keepsakes, and elegant gift wrapping. Burgundy, navy, and emerald feel rich and dramatic. Patterned ribbon can be playful, especially for birthdays or holiday crafts, but it may show the plain back side during folding. That is not a flaw; it simply creates a more casual look.
Glue control is another lesson learned quickly. Too much hot glue makes the ribbon stiff and bulky. Too little glue lets the rose unwind at the worst possible moment, usually right when you proudly hold it up for inspection. The sweet spot is a tiny dot on the underside, pressed for a few seconds before moving on. If you plan to use the rose on something wearable or washable, stitching is more reliable than hot glue. A few tack stitches through the base can make a huge difference.
Finally, ribbon roses are excellent confidence builders. They are inexpensive, forgiving, and useful. Even the practice roses can decorate a notebook, a gift tag, or a small jar. Once you understand the basic motion, you can scale the project up or down: tiny roses for cards, medium roses for hair clips, large roses for bouquets and wreaths. That is the beauty of this craft. A simple strip of ribbon becomes something dimensional, decorative, and surprisingly satisfying. It is proof that a small handmade detail can make an ordinary object feel thoughtful, personal, and a little bit fancy.
Conclusion
Learning how to make a rose out of ribbon is simple, affordable, and wonderfully flexible. The twisted no-sew method is perfect when you want quick, soft, natural-looking roses. The folded-petal method is better when you want structure, consistency, and a polished bloom that can be attached to a stem. Both methods use basic supplies, and both can be customized with different ribbon widths, textures, and colors.
Start with inexpensive ribbon, keep your glue dots small, and do not worry if your first rose looks a little quirky. Handmade charm is part of the appeal. With a little practice, you can turn ribbon scraps into romantic decorations for gifts, parties, weddings, accessories, and home decor. No watering required. No thorns. No dramatic vase accidents. Just ribbon, creativity, and a flower that politely lasts forever.


