Table of Contents >> Show >> Hide
- Why You Might Need to Remove a PS5 Cover
- Before You Start: Safety First, Hulk Strength Second
- How to Take Off the Cover on the Original PS5
- How to Take the Cover Off a PS5 Slim
- How to Take the Cover Off a PS5 Pro
- Common Mistakes to Avoid
- What to Do After the Cover Is Off
- Troubleshooting: If the PS5 Cover Won’t Come Off
- Final Thoughts
- Extra Experience: What It’s Really Like the First Time You Remove a PS5 Cover
- SEO Tags
If your PlayStation 5 is looking dusty, getting an SSD upgrade, or begging for a color makeover, removing the cover is the first move. The good news? Sony actually designed the PS5 so the outer panels can come off without turning your living room into a tiny electronics graveyard. The less-good news? The first time you do it, it can feel like you’re either solving a puzzle or committing a very expensive mistake.
This guide walks you through how to take your PS5 cover off for every major model: the original PS5, the PS5 Slim, and the PS5 Pro family. You’ll learn the safest way to remove the panels, how to put them back on, what to avoid, and what to do if the cover seems weirdly stubborn. No drama. No unnecessary force. No “well, that snap sounded expensive” moments.
Why You Might Need to Remove a PS5 Cover
There are a few perfectly good reasons to take the PS5 cover off. The most common one is cleaning. Dust loves game consoles the way cats love sitting on laptops: aggressively and without permission. Popping off the panel gives you better access to the fan area and helps you clean visible dust more carefully.
Another reason is storage expansion. If you want to install an internal M.2 SSD on a compatible PS5, one of the covers has to come off first. On newer models, cover removal may also be part of installing or removing the optional disc drive. And of course, some people just want to swap the white panels for another color because their setup deserves better than “stormtrooper chic.”
Before You Start: Safety First, Hulk Strength Second
What to do before removing the cover
- Power the console all the way off. Don’t use Rest Mode.
- Unplug the power cable, HDMI cable, and accessories.
- Wait for the PS5 to cool down if you were just playing.
- Place it on a soft cloth or clean, flat surface.
- Remove the stand, base, or feet if your model uses them.
You do not need a pry tool to remove the main PS5 covers. That is an excellent way to turn a simple maintenance job into a regrettable plastic-scraping project. On some original PS5 setups, you may need a coin or flathead screwdriver to remove the base screw first, but the actual side panels are designed to unclip and slide off by hand.
How to identify your PS5 model
Before you start, check the model number on the back of the console. In broad terms, you’re dealing with one of these groups:
- Original PS5: CFI-1000 series and similar full-size launch-style models with two large side panels.
- PS5 Slim: CFI-2000 series with four smaller cover pieces.
- PS5 Pro family: CFI-7000 series, which follows the newer cover-removal style rather than the original two-panel setup.
This matters because the original PS5 cover removal method is different from the PS5 Slim cover removal process.
How to Take Off the Cover on the Original PS5
The original PlayStation 5 uses two large plastic panels: one with the PlayStation logo and one without it. Each side comes off in a slightly different orientation, so positioning the console correctly makes the job much easier.
Remove the top cover
- Turn the PS5 off, unplug it, and let it cool.
- Remove the base or stand.
- Place the console so the PS logo is facing up and the power button is facing away from you.
- Grip the bottom-left corner of the cover.
- Gently lift that corner up while pulling it slightly to the right.
- The cover should unclip and lift away.
The motion is part lift and part slide. If it feels awkward, that’s normal. The PS5 has a flair for the dramatic. You’re not trying to peel the cover straight upward like a cereal box flap. You’re lifting one corner just enough to release the clip, then letting the panel slide free.
Remove the bottom cover
- Flip the PS5 so the PlayStation logo is facing down.
- Make sure the power button is facing toward you.
- Grip the top-left corner of the cover.
- Lift gently and pull slightly to the right.
- The bottom cover should release and come off.
Once you’ve done one side, the second one usually feels much less scary. That first pop is the psychological boss battle. After that, you realize Sony didn’t build the console out of sugar glass.
How to put the original PS5 cover back on
To reattach the panels, line the cover up slightly off-center, then slide it back into place from right to left until it clicks. If it doesn’t click, don’t force it downward. Check that the edges are aligned and try again. A cover that’s properly seated should feel secure and flush, not wobbly or lifted at one end.
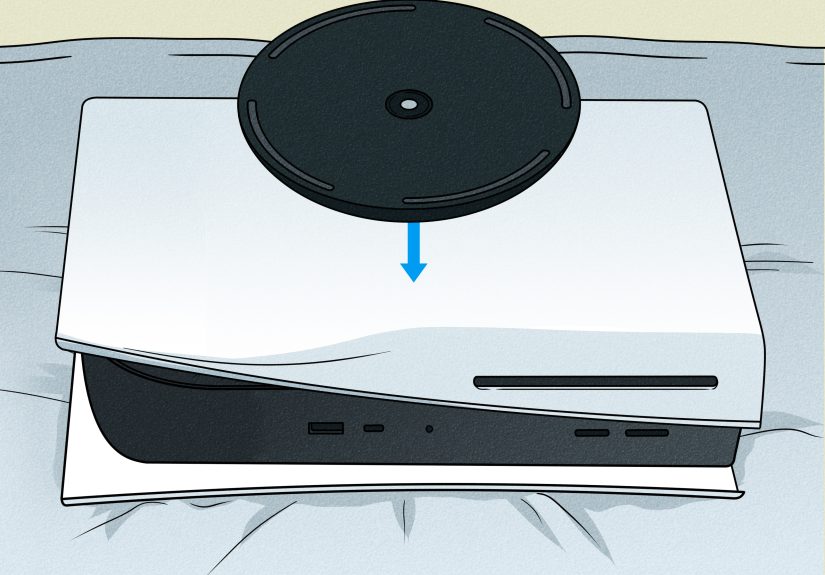
How to Take the Cover Off a PS5 Slim
The Slim model changes things up. Instead of two large faceplates, you get four smaller cover sections. The process is simpler in one way and slightly more confusing in another, because now you may stare at the console for a moment thinking, “Why does my PlayStation look like modular luggage?”
PS5 Slim cover removal steps
- Power the console off completely and unplug all cables.
- Let it cool down.
- Place the console on a soft cloth with the bottom facing up and the front side facing you.
- Remove the horizontal feet if attached.
- Choose the cover you want to remove first.
- Grip the cover along the edge closest to you.
- Lift that front edge away from the console until the clips release.
- Pull the cover away to remove it fully.
All four Slim covers remove in basically the same way. Sony also marks the inside of the covers with the familiar controller symbols, which helps you match each panel to the right position during reassembly. That’s useful because trying to reattach the wrong panel is a terrific way to waste five minutes and question your spatial reasoning.
How to reattach a PS5 Slim cover
Line up the cover’s clips and hooks with the corresponding slots on the console, then press it in until you hear a click. If a panel refuses to sit flat, it’s probably misaligned rather than broken. Take it off, reposition it, and try again with calm, non-vindictive hands.
How to Take the Cover Off a PS5 Pro
If you’re working with a PS5 Pro-family console, the cover-removal process follows the newer style Sony uses for the CFI-2000/7000 group rather than the original launch-model method. In other words, think small panel, lift the front edge, pop the clips, remove the cover.
PS5 Pro cover removal steps
- Turn the console off and unplug everything.
- Let it cool before touching the cover.
- Set the console on a soft cloth on a flat surface.
- Position it with the bottom facing up and the front facing you.
- Remove any feet or stand components that need to come off first.
- Lift the front edge of the target cover away from the console.
- Once the clips release, pull the cover off completely.
The PS5 Pro uses the same general idea as the Slim family: remove the appropriate panel by releasing the clips at the front edge. Reattachment is equally straightforward. Align the cover carefully, press it back into position, and listen for the click that says, “Yes, you did in fact survive another hardware task.”
Common Mistakes to Avoid
1. Pulling straight up
Most PS5 covers don’t come off with a simple upward tug. There’s usually a slight lift-plus-slide or lift-plus-release motion. Pulling straight up too hard is how people end up convinced the cover is “stuck” when really it just isn’t being moved in the correct direction.
2. Forgetting to remove the stand or feet
If the base, stand, or feet are still attached, the cover removal process gets more awkward than it needs to be. Remove those first and give yourself room to work.
3. Working on a hot console
Fresh off a three-hour gaming session is not the best time to start handling the shell. Let the PS5 cool down. Your fingers and your patience will both appreciate it.
4. Using metal tools on the plastic panels
Unless you enjoy scratches, skip the prying tools. The PS5 covers are meant to be removed by hand.
5. Powering on the console without the cover seated correctly
Make sure every panel is back on properly before turning the system on again. A crooked cover is not just ugly; it can affect airflow and overall fit.
What to Do After the Cover Is Off
Once the panel is removed, you have a few sensible options. You can clean visible dust with a microfiber cloth, use a low-powered vacuum around air vents, or carefully remove debris from accessible areas. If you’re installing an SSD, this is the point where you move on to the internal expansion slot cover. If you’re swapping console plates, now’s your moment to trade “default white” for whatever color better matches your setup.
Just remember that removing the outer PS5 cover is not the same thing as performing a full teardown. You’re opening the shell, not auditioning to become a console surgeon. If your goal is routine cleaning or a normal upgrade, stay within the steps Sony actually supports.
Troubleshooting: If the PS5 Cover Won’t Come Off
If the panel won’t budge, stop and check three things:
- Are you holding the correct corner? The original PS5 is very orientation-specific.
- Are you lifting and sliding, not just yanking? The motion matters.
- Did you remove the stand or feet? If not, do that first.
Sometimes the cover feels tighter the first time because the clips haven’t been removed before. That doesn’t mean it’s glued shut by dark magic. It usually means you need steadier hand placement and slightly firmer pressure in the right direction. The keyword there is slightly. This is a gaming console, not a jar of pickles.
Final Thoughts
Learning how to remove a PS5 cover is one of those jobs that sounds intimidating and then becomes hilariously manageable once you know the trick. The original PS5 needs a very specific lift-and-slide motion. The Slim and Pro families use smaller covers that pop off by lifting the front edge and releasing the clips. In every case, the rules are the same: power down, unplug, cool off, work on a soft surface, and don’t force anything just because you’re feeling confident.
Whether you’re cleaning dust, adding more storage, attaching a disc drive on a newer model, or just giving your console a style upgrade, removing the PS5 cover is a quick skill worth knowing. And once you’ve done it once, you’ll never again stare at the side panels like they’re protected by ancient PlayStation runes.
Extra Experience: What It’s Really Like the First Time You Remove a PS5 Cover
The first time most people take off a PS5 cover, they go through the same emotional storyline. It begins with confidence. You watch a guide, nod like a seasoned technician, clear a little space on the table, and think, “This will take two minutes.” Then you touch the panel, apply a careful amount of pressure, and nothing happens. Suddenly, your confidence leaves the room without saying goodbye.
That’s a very normal experience. The PS5 cover removal process is easy once the motion clicks in your brain, but before that, it can feel oddly unnatural. People expect a panel to either unscrew, hinge open, or pop straight off. Sony chose a method that is secure and clean-looking, but not exactly intuitive on your first try. So if you feel like you need one or two practice attempts just to understand the angle, welcome to the club.
A common experience with the original PS5 is hearing the first little snap and immediately freezing. Not because anything went wrong, but because your brain translates every unfamiliar plastic sound into “you have broken a very expensive object.” In reality, the covers are supposed to release with a noticeable pop. That sound is the clip disengaging, not your budget collapsing.
The Slim and Pro-style covers create a slightly different kind of uncertainty. Because there are multiple smaller panels, people often second-guess whether they’re pulling on the right one or reattaching it in the right place. That’s why the symbol markings and alignment points matter so much. Once you understand that each cover is built to match a specific position, the process becomes less like guesswork and more like fitting together a clean, well-designed set of parts.
Another real-world detail people notice is that the PS5 looks far less mysterious once the cover is off. Instead of some terrifying exposed machine guts, you mostly see a fan area, vents, and accessible sections designed for maintenance or upgrades. That visual alone tends to lower the fear level. It reminds you that Sony expected people to do this. You are not sneaking into forbidden hardware territory. You are using the console the way it was meant to be serviced on the outside.
And finally, there is the oddly satisfying moment when the panel goes back on and clicks into place. That click is tiny, but emotionally, it is huge. It means the cover is aligned, the clips are seated, and your PS5 no longer looks like it just lost a shoulder pad in battle. After that first successful removal and reattachment, the task becomes much easier forever. The console stops feeling fragile and starts feeling maintainable, which is exactly how a modern piece of hardware should feel.


