Table of Contents >> Show >> Hide
- Why Fold-Down Nightstands Are a Small-Space Power Move
- Pick Your Build: Two Fold-Down Nightstand Styles
- Planning the Perfect Size for a Fold-Down Nightstand
- Materials and Tools
- Safety First: Mounting It Like You Mean It
- Build Option A: Rope-Supported Fold-Down Nightstand (Nautical Classic)
- Build Option B: Folding Brackets for a Stronger Fold-Down Nightstand
- Nautical Design That Doesn’t Feel Like a Costume
- Make It More Useful: Smart Add-Ons for Real Life
- Common Mistakes (and How to Avoid Them)
- Styling Ideas: Nautical, Cozy, and Not Overdone
- of Real-World DIY “Experiences” You Can Expect (and How to Win Them)
- Conclusion
Small bedrooms have a special talent: they can make a “cute little nightstand” feel like a full-time roommate. If your bed is already doing the mostsleeping, scrolling, snack management, existential dread at 2 a.m.your nightstand shouldn’t also demand precious floor space.
Enter the fold-down nightstand: a wall-mounted, flip-open bedside surface that disappears when you don’t need it. And because we’re doing the Nautical Edition, it can look like it belongs in a cozy seaside cabineven if your “ocean view” is a YouTube loop of waves and your neighbor’s parking lot.
This guide breaks down two smart builds (one ultra-simple, one extra-sturdy), plus nautical design ideas that feel classic, not cartoonish. You’ll get measurements, hardware options, safety notes, and finishing tipsso your tiny bedroom can feel bigger, calmer, and less like a furniture obstacle course.
Why Fold-Down Nightstands Are a Small-Space Power Move
You get your floor back
Wall-mounted nightstands and floating bedside solutions are popular for small bedrooms because they keep the floor visually open and easier to clean. When the surface folds away, it’s even better: you remove the “permanent protrusion” that turns shins into victims.
You can build it to fit your exact bed (not the other way around)
Most store-bought nightstands are sized for “average rooms,” which is adorablelike how “one-size-fits-all” hats never fit. A fold-down design lets you choose the width, depth, and height that work for your bed frame, mattress thickness, and the way you actually use your bedside space.
It can double as a micro desk or charging hub
With the right supports, a fold-down nightstand can hold a book, water, phone, and even a small laptop. Add a cord pass-through or a cable notch, and suddenly you’ve built a neat little bedside command center.
Pick Your Build: Two Fold-Down Nightstand Styles
Option A: The “Captain’s Clipboard” (fast build, rope supports)
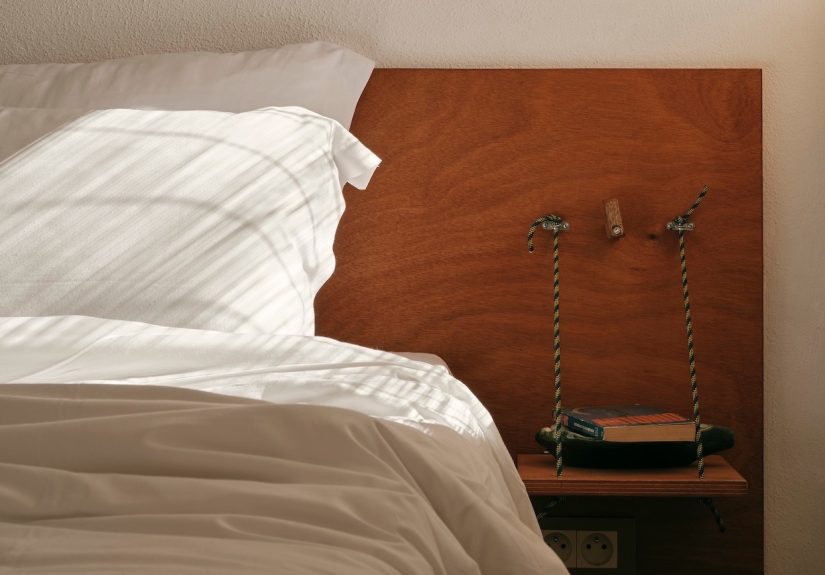
This is the simplest approach: a slim wall-mounted box with a front panel that folds down into a shelf. The shelf is supported by rope or chain attached to the sidesnautical and functional. It’s perfect for light-to-medium bedside use (phone, book, glasses, small lamp).
Option B: The “Harbor Master” (heavy-duty folding brackets)
If you want more strength and stability, use folding shelf brackets that lock open. This style is ideal if you’ll place heavier items on the surface (chunky lamp, tablet, occasional laptop) and you want that “no wobble” confidence.
Pro tip: You can still add nautical flair to Option Brope doesn’t have to do the structural work to look great.
Planning the Perfect Size for a Fold-Down Nightstand
Start with three measurements
- Bed height: Measure from the floor to the top of your mattress.
- Reach zone: Sit on the bed and note where your hand naturally lands on the wall beside you.
- Depth tolerance: How far can the shelf stick out when open without blocking a walkway or closet door?
Small-space friendly dimensions that usually work
- Open shelf depth: 8–12 inches (enough for a mug without feeling like a dining table)
- Width: 14–20 inches (wide enough for the essentials, narrow enough to stay discreet)
- Closed box depth: 4–6 inches (slim profile so it doesn’t dominate the wall)
- Mount height: Typically 1–3 inches above mattress top for “easy grab” comfort
Think of it like designing a tiny airport runway: long enough to land your stuff, short enough to avoid collisions.
Materials and Tools
Materials (one nightstand)
- 3/4-inch plywood (or 1x boards) for the main parts
- 1×2 or 1×3 lumber for a simple face frame (optional but makes it look custom)
- Hinge: piano hinge (continuous hinge) or two sturdy butt hinges
- Support choice:
- Option A: 1/4-inch rope or chain + eye bolts + a cleat or hooks
- Option B: locking folding shelf brackets (sized for your shelf depth)
- Wood glue
- Screws (wood screws; pocket-hole screws if using pocket holes)
- Wall mounting hardware (more on this in the safety section)
- Primer + paint (nautical palette) or stain + clear finish
- Optional: small knob/pull (porthole-style knob, brass pull, or rope loop)
- Optional: magnetic catch to keep it shut
Tools
- Drill/driver + bits
- Stud finder
- Level + tape measure
- Circular saw or miter saw (or have lumber cut at the store)
- Sander or sanding block
- Clamps (helpful, not mandatory)
- Optional: pocket-hole jig (makes clean, strong joints easier)
Safety First: Mounting It Like You Mean It
A fold-down nightstand is only charming if it stays on the wall. For anything that bears weight, the best practice is to anchor into studs whenever possible. If you can’t hit studs exactly where you want the piece, use a mounting strategy that spreads load or uses the correct heavy-duty anchors for your wall type.
Three reliable mounting approaches
- Direct-to-stud screws: simplest and strongest if the box lands over studs.
- French cleat mount: great for leveling and removing the unit later (also spreads load well).
- Ledger board: mount a sturdy strip into studs first, then attach the nightstand box to the ledger.
If you must use anchors (drywall, plaster), choose the right type and follow manufacturer guidance about load and installation. When in doubt, design the mount so studs do the heavy lifting, and anchors only help with stability.
Build Option A: Rope-Supported Fold-Down Nightstand (Nautical Classic)
Cut list (example size)
- Back panel: 18″ wide x 16″ tall (3/4″ plywood)
- Top and bottom: 18″ wide x 5″ deep (2 pieces)
- Sides: 16″ tall x 5″ deep (2 pieces)
- Front fold-down panel (the “shelf”): 18″ wide x 10″ deep (1 piece)
- Optional face frame: 1×2 strips to border the front opening
These dimensions create a slim box that looks tidy when closed, and a shelf deep enough for bedside essentials when open.
Step 1: Build the box
- Sand the plywood edges lightly to remove splinters and factory fuzz.
- Assemble the sides, top, and bottom onto the back panel using wood glue and screws. Pre-drill to avoid splitting.
- If you’re using pocket holes, drill them on the inside edges for a cleaner exterior.
Step 2: Attach the fold-down shelf
- Align the front panel to the bottom edge of the box opening.
- Attach a piano hinge along the full width for smooth, strong support (or use two sturdy hinges spaced evenly).
- Test the fold: it should open flat and close neatly without rubbing.
Step 3: Add rope supports (the nautical signature)
- Install small eye bolts on the inside side walls of the box, near the upper corners.
- Install matching eye bolts on the underside (or outer sides) of the fold-down shelf.
- Cut two equal lengths of rope. Tie secure knots (figure-eight or bowline-style knots are common for strength and reliability).
- Connect rope to the eyes so the shelf opens to a level position. Adjust length until the shelf sits flat.
Nautical detail: Mount a small boat cleat on the side or inside edge and wrap the rope tail around it, even if the rope is already fixed. It’s a tiny touch that instantly reads “coastal” without screaming “theme park gift shop.”
Step 4: Keep it closed
Add a magnetic catch inside the top edge or a simple latch. For the handle, consider:
- A brass pull (warm and classic)
- A rope loop (soft, nautical, easy to grab)
- A porthole-style knob (fun, but keep it tasteful)
Build Option B: Folding Brackets for a Stronger Fold-Down Nightstand
This version swaps rope supports for locking folding shelf brackets. It’s more rigid, can hold more weight, and feels like a “real piece of furniture” when open.
What changes?
- You can skip the side eye bolts and rope entirely.
- The fold-down shelf is supported from underneath by two brackets, mounted into studs or a strong backer board.
- The box can be shallower because the brackets do the heavy support work.
Bracket placement tips
- Use two brackets, one near each side, leaving clearance so they fold flat.
- Keep them square and level, or the shelf will open with a “lean” that makes your water glass nervous.
- Choose bracket length that matches (or slightly exceeds) shelf depth for best support.
Design note: You can still add rope as a decorative detaillike a small rope border on the front panelwithout relying on it structurally.
Nautical Design That Doesn’t Feel Like a Costume
Color palette ideas
- Navy + warm white: timeless, crisp, and works in modern spaces
- Sea glass green + sand beige: softer, beachy, calming
- Deep ocean blue + brass: moody and upscale (like a boutique hotel that charges $18 for toast)
Finish options
- Painted: prime first, then two thin coats for a smooth finish
- Stained: great for a driftwood vibe; seal with a durable clear coat for bedside wear-and-tear
Easy nautical details
- Rope accents (supports, handle, or trim)
- Brass or matte black hardware (clean and nautical-adjacent)
- A subtle stripe detail (think one stripe, not a whole referee uniform)
- A small “chart” liner inside the box (use decorative paper for a surprise moment)
Make It More Useful: Smart Add-Ons for Real Life
Hidden charging
Drill a small hole in the back panel for cords and add a rubber grommet. Or cut a small notch at the back edge of the shelf so cables can pass through without getting pinched when you close it.
Micro storage
Add a shallow pocket inside the box (a thin strip of wood creates a quick divider). It’s perfect for lip balm, glasses cloths, earplugs, or that one tiny screwdriver you swear you’ll return to the toolbox someday.
Lighting that frees space
Instead of a table lamp, consider a wall-mounted swing arm or a small sconce. It keeps the surface clear and makes the whole setup feel intentional.
Common Mistakes (and How to Avoid Them)
1) Mounting only into drywall
If you load the shelf and the wall mount isn’t solid, you’ll eventually get sagging, wobble, or failure. Use studs, a cleat, or a ledger board whenever possible.
2) Shelf not opening level
Rope supports need equal lengths; brackets need perfectly level installation. Measure twice, install once, and then measure again because the universe enjoys humble DIYers.
3) Overbuilding the box and underbuilding the mount
It’s tempting to make the box “extra sturdy” by adding more wood. But the mount and supports matter most. Focus on solid wall attachment and reliable hinge/support hardware.
4) Forgetting the close clearance
Make sure the shelf can close without hitting baseboards, bed frames, or that slightly-too-enthusiastic duvet. Test the swing path before final installation.
Styling Ideas: Nautical, Cozy, and Not Overdone
- The Minimal Captain: navy box, brass knob, one small book, one small plant.
- The Coastal Collector: driftwood finish, rope handle, tiny tray for rings, vintage postcard tucked inside.
- The Modern Marina: crisp white box, matte black hardware, subtle stripe liner, cable pass-through for a charging dock.
Remember: the goal is “nautical mood,” not “I live inside a souvenir shop.”
of Real-World DIY “Experiences” You Can Expect (and How to Win Them)
People who build fold-down nightstands in small spaces usually discover three things: the wall is never as straightforward as it looks, the level is your best friend, and your bedroom instantly feels like it gained square footage. That last one is the dopamine you deserve.
One common experience is the “stud finder scavenger hunt.” You start with confidence (“I will mount this perfectly beside my bed!”), then the stud finder beeps in a spot that makes no sense, and suddenly you’re tapping the wall like you’re trying to communicate with a submarine. The win here is planning flexibility: many DIYers find it easiest to mount a ledger board or French cleat into studs first, then attach the nightstand box wherever it looks best. That way, your design isn’t held hostage by framing that was installed during an era when measuring tapes were apparently optional.
Another frequent moment: the “why is it not level?” crisis. With rope supports, even a half-inch difference in knot placement can make the shelf tilt. The workaround is delightfully low-techmark rope lengths, tie loose knots first, test open/close, then tighten when it’s right. With folding brackets, the lesson is that “close enough” is not a measurement. People who take an extra five minutes to level bracket placement end up with a shelf that feels sturdy and satisfying, instead of a surface that makes every mug look like it’s practicing for the luge.
Then there’s the surprisingly emotional experience of decluttering the bedside zone. When you only have a small fold-down surface, you automatically become more intentional: phone, book, water, glassesdone. Everything else either gets a home inside the box or doesn’t get to live there. DIYers often say this tiny boundary makes the whole room feel calmer. It’s like your nightstand becomes a gentle bouncer: “Sorry, random receipts. Not on the list.”
Finally, the nautical styling tends to be the fun part. People who go subtlenavy paint, brass hardware, maybe a rope handleend up with a piece that looks custom and grown-up. People who go full pirate ship (anchors everywhere, giant rope coils, a ship wheel as a knob) usually dial it back after living with it for a week. The sweet spot is a couple of details that nod to the theme, not a full maritime reenactment.
When it all comes together, the payoff is real: you fold the shelf down, set your book and water on it, and think, “Wow, my tiny room isn’t fighting me anymore.” That’s the whole mission. And if you do accidentally tie one rope knot too short? Congratulationsyour nightstand has officially become a hands-on lesson in “measure twice, knot once.”
Conclusion
A fold-down nightstand is one of those DIY projects that feels almost magical in a small bedroom: you gain function without losing floor space, you control the size, and you can build it to match your style. With the Nautical Edition detailsrope accents, navy-and-white color, brass touchesyou get a piece that looks intentional and timeless, not like a temporary fix.
Choose the rope-supported version for a quick, charming build, or go with locking brackets for maximum stability. Either way, mount it securely, keep the surface sized for real life, and enjoy the rare luxury of walking past your bed without doing the “tiny-room sidestep.”


